Home > GE Appliances > GE Appliances PTW Series Dishwasher
GE Appliances PTW Series Dishwasher

Care and Cleaning
- Electrical Shock Hazard
Certain internal parts are intentionally not grounded and may present a risk of electric shock only during servicing.
Service personnel DO NOT contact the following parts while the appliance is energized: Drive Motor, Lid Lock,
Water Valves, Drain Pump and Recirculation Pump.
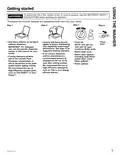
Exterior of the Washer
Immediately wipe off any spills with a damp cloth.
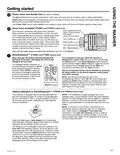
Interior of the Washer
To clean the interior of the washer, select the Bulky cycle on
the control panel. This Bulky cycle should be performed, at
a minimum, once per month. This cycle will use more water,
in addition to bleach, to control the rate at which soils and
detergents may accumulate in your washer.
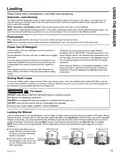
3. Close the lid and select the Bulky cycle. Push the Start
button.
4. When the Bulky cycle is working, the display will show the
estimated cycle time remaining. Do not interrupt the cycle.
IMPORTANT:
NOTE: Read the instructions below completely before starting
the Bulky cycle.
Run Bulky with 1 Cup (250 ml) of bleach once a month.
After the completion of a Bulky cycle, the interior of your
washer may have a bleach smell.
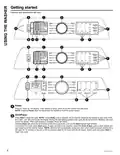
1. Remove any garments or objects from the washer and
ensure the washer basket is empty.
For basket cleaning option, download and refer to the SmartHQ
App.
2. Open the washer lid and pour one cup or 250 ml
of liquid bleach or other washing machine
cleaner into the basket.
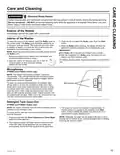
Microphones
(PTW905 and PTW900 models only)
NOTE: The washer control panel contains 2 sensitive
microphones. If the microphones become exposed to liquid
contaminates or if the audio ports become clogged, feature
performance could be degraded.
To clean the audio ports/microphones, immediately wipe
off any spills on or near the microphone audio ports. Next,
gently wet a small cotton swab with water. Be sure to wring
out excess water from swab so that it is only damp. Gently
insert the damp cotton swap into the audio port holes and
wipe out with a gentle spinning motion. Repeat process until
all contaminants are clear. Allow unit to dry. Drying times may
vary and can exceed 24hours in some cases.
Microphones
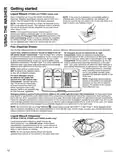
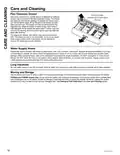
Detergent Tank Clean-Out
(PTW905 and PTW900 models only)
NOTE: All clothes should be removed from the washer prior to
cleaning out the detergent tank.
3. The empty out routine will continue for approximately 15
minutes unless it is paused by the pressing of the Start
button. If tank is initially full, routine may need to be run a
second time to empty detergent tank.
To empty out the tank and remove any remaining detergent
from the reservoir:
NOTE: Optionally, hot water can be added to the tank to aid in
flushing out the system of any residual detergent prior to starting
or during the cleanout routine.
1. Press and hold both the Smart Dispense and Smart Wash
buttons for three seconds.
2. The empty out routine will begin with the contents of tank,
mixed with water, being dispensed into the basket and
consequently drained from the machine at the same time.
49-3000295 Rev. 0
15
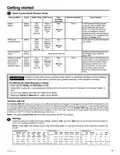
| General | Details |
|---|---|
| Name | GE Appliances PTW Series Dishwasher |
| Make | GE Appliances |
| Language | English |
| Filetype | PDF (Download) |
| File size | 1.28 MB |


GE APPLIANCES GTW845 Dishwasher

GE APPLIANCES GSD2100VBB Dishwasher

GE APPLIANCES GDF550PGR Plastic Interior Dishwasher with Front Controls

GE APPLIANCES PDT755SYV/BTV UltraFresh System Dishwasher with Interior

GE APPLIANCES GDT670SGV Interior Dishwasher with Hidden Controls

GE APPLIANCES GDT650SYV Interior Dishwasher with Hidden Controls

GE APPLIANCES PDP715SYVFS GE Profile Series Interior Dishwasher

GE APPLIANCES PDT715SYV Interior Dishwasher with Hidden Controls

GE APPLIANCES PDT705SYWFS Dishwasher

GE APPLIANCES GDT565HSYSS Energy Star Hybrid Tub Dishwasher


Hotpoint A1385707 Dishwasher

omega ODWIS6015X Semi Integrated Dishwasher

FISHER AND PAYKEL DD60D2NB9 Dishwasher

FRIGIDAIRE FDHP4336AS 24 Tall Tub Dishwasher

Electrolux ESL2500RO Dishwasher

BOMANN GSP 7418 Household Dishwasher

FISHER and PAYKEL DD60ST4NX9 Contemporary Tall Dishwasher

IKEA RENODLAD Dishwasher

FISHER PAYKEL DD24DHTI9 N Sanitize Dishwasher

hp 50 Glass and Dishwasher