Home > GE Appliances > GE Appliances PTW Series Dishwasher
GE Appliances PTW Series Dishwasher

GE is a trademark of the General Electric Company. Manufactured under trademark license.

| General | Details |
|---|---|
| Name | GE Appliances PTW Series Dishwasher |
| Make | GE Appliances |
| Language | English |
| Filetype | PDF (Download) |
| File size | 1.28 MB |


GE APPLIANCES GTW845 Dishwasher

GE APPLIANCES GSD2100VBB Dishwasher

GE APPLIANCES GDF550PGR Plastic Interior Dishwasher with Front Controls

GE APPLIANCES PDT755SYV/BTV UltraFresh System Dishwasher with Interior

GE APPLIANCES GDT670SGV Interior Dishwasher with Hidden Controls

GE APPLIANCES GDT650SYV Interior Dishwasher with Hidden Controls

GE APPLIANCES PDP715SYVFS GE Profile Series Interior Dishwasher

GE APPLIANCES PDT715SYV Interior Dishwasher with Hidden Controls

GE APPLIANCES PDT705SYWFS Dishwasher

GE APPLIANCES GDT565HSYSS Energy Star Hybrid Tub Dishwasher

GE Appliances PTW Series Dishwasher Overview
Summary of Contents
- Page 1: Page 1
- Page 2: Thank you for making GE Appliances a part of your home. We take pride in the craftsmanship, innovation and design that goes into every GE Appliances product. Registration of your appliance ensures that we can deliver important product information and warranty details when you need them. Register your GE appliance now online. Helpful websites and phone numbers are available in the Consumer Support section of this Owner's Manual. You may also mail in the pre-printed registration card included in the packing material.
- Page 3: Important safety information includes reading all instructions before using the appliance. To reduce the risk of death, fire, explosion, electric shock, or injury, follow basic precautions. Do not wash or dry articles that have been previously cleaned with flammable substances. Do not add flammable substances to the wash water as they can ignite or explode. Hydrogen gas may be produced in unused hot-water systems; it is explosive. Do not allow children to play on or in the appliance, and supervise them closely. Do not reach into the appliance if the tub or agitator is moving to prevent entanglement. Use only the Bulky or Delicates cycle for waterproof and bulky items to avoid damage. Do not install or store the appliance where it will be exposed to the weather. Unplug the appliance before servicing; pressing the power button does not disconnect power.
- Page 4: Important safety information Read all instructions before using the appliance. Proper installation is necessary before use. Ensure that the hot water hose is connected to the H valve and the cold water hose to the C valve. Install or store the washer where it will not be exposed to freezing temperatures or weather. Properly ground the washer to conform with all governing codes and ordinances. Use factory specified parts and new water supply hoses to reduce the risk of failures. Consider recycling options for appliance packaging material. The washer will turn on the cold water valve or drain pump during the start-up sequence. The machine will automatically drain if the lid is left open for more than 15 minutes. Turn off water faucets when not in use to minimize leakage.
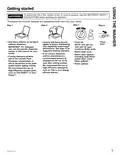
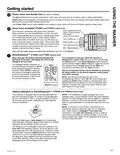
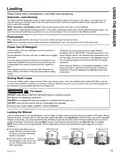
- Page 5: Getting started To reduce the risk of fire, electric shock, or injury to persons, read the important safety instructions before operating this appliance. Throughout this manual, features and appearance may vary from your model. Press Start. Add fabric softener to the fabric softener dispenser. Close lid. Note: Unit will not start with lid open. Loosely add items around agitator or Infusor. Overloading may negatively impact wash performance. For detergent use, see the specific dispenser section in this manual for your model. Select wash cycle. If not using a dispenser, add the manufacturer's recommended amount of detergent to the top of the load after adding clothes. We recommend the use of high efficiency detergents such as Tide in your energy efficient washer.
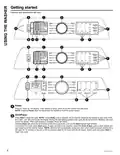
- Page 6: Getting started Features and appearance will vary. Press to wake up the display. If the display is active, press to put the washer into idle mode. Pressing Power does not disconnect the appliance from the power supply. Press Start to begin the cycle. Unless Bulky cycle is selected, the lid must be closed for the washer to start cycle. During the load sensing portion of the cycle, the lid will lock and SEnSing will scroll across the display. Pressing Pause will unlock the lid, pause the cycle, and the Start indicator light will blink. To continue the cycle, press Start again. If water remains in the machine, select the Drain & Spin cycle to drain basket and spin water out of the washer basket. Machine will automatically cancel and drain when water is present and the lid is left open for 15 minutes.
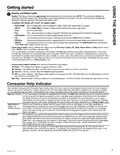
- Page 7: Getting started Display shows the approximate time remaining until the end of the cycle. Cycle time is affected by how long it takes the washer to fill and the size of the load being washed. Display will scroll the washer status including balance, delay, and end of the cycle. Fill will scroll across the display during fill, followed by the estimated end of cycle time. Cycle status lights indicate whether the washer is in different portions of the cycle. If an out-of-balance condition is detected, the spin light will blink and the washer will attempt to correct it. Consumer Help Indicator communicates simple remedies for some situations without needing service. Messages may scroll on the display to provide simple remedies you can quickly perform. Check your house water supply if H2O supply appears on the display. Canceled may scroll if the machine was paused for longer than 24 hours or stopped due to errors.
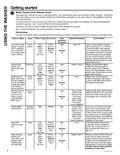
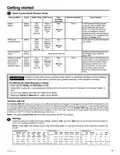
- Page 8: Getting started The wash cycle controls the type of washing process. The cycle selector knob can be turned in either direction. Turning the knob after starting a cycle will stop the washer and change the cycle/options to the new selection. For optimal performance, select the cycle that most closely matches the items being washed. Selections and options shown in bold are the recommended settings for that cycle. Some cycles and options may not be available on some models. Use with the SmartHQ App to download additional cycles to your washer. Cycle for normal, regular, or typical use for washing up to a full load of normally soiled cotton clothing. Utilizes an extra gentle agitate profile and a low spin speed to provide special care to delicate fabrics. Utilizes more intense agitation profile and expedited wash period to clean small lightly soiled loads in the fastest time possible. Cycle uses an initial lower water fill for super concentrated, high temperature sanitization followed by a heavy wash step.
- Page 9: Getting started Wash cycles - Cycle selector knob Cycle designed for washing towels or sheets, using a higher water level to effectively clean these items. It is recommended that towels and sheets be washed separately for best care and washing performance. Cycle tailored to clean and brighten your whites. Specialty cycles selectable through the SmartHQ App. Cycle designed for care of medium to lightly soiled active wear, athletic wear, and technical fabrics. Failure to closely follow these instructions may result in an abnormal vibrating and out-of-balance condition that could result in physical injury, property damage, and/or appliance damage. Only use the Bulky (or Delicates) cycle for waterproof, water-resistant, or bulky items. The Sanitize With Oxi cycle is designed to remove 99.9% of bacteria found in home laundry. The default Sanitize With Oxi cycle water temperature can NOT be changed.
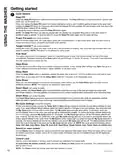
- Page 10: Getting started Deep Fill feature is recommended for special case loads only, not for typical use. Press and release the Deep Fill button once before starting the cycle to add 3 additional gallons of water. Holding the Deep Fill button for 3 seconds will provide the deepest fill level possible. Power Pre-wash is ideal for heavily soiled loads and works with SmartDispense to loosen and remove heavy soil. Tangle Control adjusts your wash cycle to aid in the prevention of tangling. Auto Soak begins with a brief agitation, soaks for a specified period, then moves through the rest of the cycle automatically. Deep Rinse provides a deep rinse or when using fabric softener and may change other settings to maximize performance. Delay Wash allows you to set a delay time from 1 to 9 hours. Extra Rinse helps better remove additional residues when using extra detergent or bleach. Smart Wash automatically senses the soil level of the load and adjusts the wash cycle accordingly.
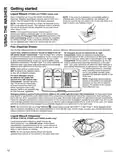
- Page 11: Getting started Power Clean and Gentle Care (on some models) The Auto setting balances wash performance, fabric care, and cycle time for normally-soiled or lightly-soiled loads. Gentle Care reduces agitation time and adds a series of soaks to reduce fabric wear/fading while still providing great wash performance on garments needing special care. Use Power Clean to add heavy agitation and soaking to boost wash performance for loads needing a deep clean. Your washer is embedded with Alexa voice assistant. When connected to your SmartHQ App, you can use your voice to automatically set your washer to handle tough stains or to set the appropriate cycle to wash specific fabrics. When paired with a compatible dryer, you can also set your dryer to optimally handle a specific fabric. SmartDispense feature will automatically add detergent to the wash, eliminating the need to add detergent for each load. The smart dispense feature can be disabled by pressing the Select button on the Smart Dispense control panel until Off is selected. This machine is equipped with a bulk detergent reservoir that can hold approximately 75 ounces of liquid detergent for your convenience.
- Page 12: Getting started Liquid bleach should be poured into the bleach dispenser using a measuring cup. Do not pour directly from the bleach bottle into the bleach dispenser. The bleach dispenser is a single-use dispenser and should not exceed 1 cup of bleach per load. If detergent accidentally spills into the bleach opening, it will be used in the next wash cycle without needing a flushing routine. Excessive chlorine bleach in the detergent tank requires following the Detergent Tank Clean-Out instructions to prevent clothing damage. Use the Flex Dispense Drawer for softener, pre-wash detergent, detergent packets, and main detergent. Liquid fabric softener should be added to the far left compartment, following manufacturer recommendations. HE detergent should be added to the far right compartment, adhering to the manufacturer's guidelines. Do not add fabric softener crystals or single-dose laundry packets to the dispenser drawer as they will not dispense properly. For optimal performance, place powdered HE detergent directly on top of the load in cooler temperatures.
- Page 13: Always follow the fabric manufacturer's care label when laundering. Automatic load sensing determines the appropriate amount of water suited to the size and type of load. The washer will not start the wash cycle or fill with water if the lid is open. This is a high efficiency washing machine that requires less water while providing effective cleaning action. Place laundry pretreatments directly on top of the load of clothes. Do not use liquid chlorine bleach and laundry pretreatments in the same wash load. Using too little or too much detergent is a common cause of laundry problems. Sort wash loads by color, soil level, fabric type, and lint production. Do not wash fabrics soiled with flammable liquids or cleaning solvents. Load dry items loosely in the washer basket for best results.
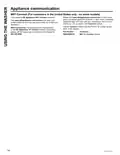
- Page 14: Appliance communication WiFi Connect (For customers in the United States only - on some models) Your washer is GE Appliances WiFi Connect enabled. Please visit www.GEAppliances.com/connect to learn more about connected appliance features. Learn what connected appliance apps will work with your smartphone. Learn where you can purchase a U+ Connect module. Visit www.GEAppliances.com/connect and enter your model number to show you the proper steps to connect your appliance. The U+ Connect module has the FCC/IC ID located on the back of the module. For assistance with the appliance or the GE Appliances U+ Connect network connectivity, please call GE Appliances Connected Home Support. Accessory: WiFi U+ Connect module.
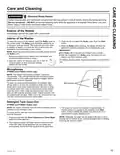
- Page 15: Care and cleaning Electrical shock hazard Certain internal parts are intentionally not grounded and may present a risk of electric shock only during servicing. Service personnel should not contact specific parts while the appliance is energized. To clean the interior of the washer, select the Bulky cycle on the control panel. Run Bulky with 1 cup (250 ml) of bleach once a month. After the completion of a Bulky cycle, the interior of your washer may have a bleach smell. The washer control panel contains 2 sensitive microphones. To clean the audio ports/microphones, immediately wipe off any spills on or near the microphone audio ports. All clothes should be removed from the washer prior to cleaning out the detergent tank. Press and hold both the Smart Dispense and Smart Wash buttons for three seconds to begin the empty out routine.
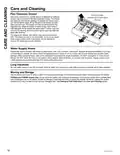
- Page 16: Care and cleaning instructions are provided for the Flex Dispense Drawer. The drawer can be removed for cleaning by pulling it out and lifting the back on both sides. It is recommended to wash the drawer in warm, soapy water and rinse it with warm water. Siphon caps should be pushed back into place after cleaning. The dispenser drawer and siphon caps are not dishwasher safe. Water supply hoses should be periodically inspected for leaks and wear. Hoses should be replaced every 5 years to reduce the risk of failures. Water supply should be shut off during long vacations, and hoses should be drained if freezing weather is expected. When moving the washer, ensure it is not exposed to weather and avoid moving it with a full tank of detergent. If necessary, flush out the detergent tank before moving the washer.

BOSCH SBT4ECX10E Integrated Dishwasher

Haier HDW9TFE3SS2 Compact Dishwasher

INDESIT W11667630 B Dishwasher

Domain DW60ET Dishwasher

FISHER AND PAYKEL DD24DTX6HI1 Dishwasher

Miele PFD 104 SCVi XXL XXL Dishwasher

NEFF S353HCX02G Dishwasher

BOSCH SMV4ECX23G Dishwasher

FISHER PAYKEL DD24SI9 N Sanitize Dishwasher

BOSCH SMS4HCW19E Dishwasher