Home > GE Appliances > GE APPLIANCES GSD2100VBB Dishwasher
GE APPLIANCES GSD2100VBB Dishwasher


Installation Instructions
Built-In Dishwasher
If you have questions, call GE Appliances at 800.GE.CARES (800.432.2737) or visit our website
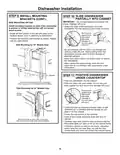
BEFORE YOU BEGIN
FOR YOUR SAFETY
Read these instructions completely and carefully.
Read and observe all WARNINGS and CAUTIONS
shown throughout these instructions.
While performing installations described in this
booklet, gloves and safety glasses or goggles
should be worn.
WARNING
• Remove all power leading to the appliance from the
circuit breaker or fuse box before beginning installation.
Failure to do so can result in a risk of electrical shock.
IMPORTANT – Observe all governing codes and
ordinances.
•
To reduce the risk of electric shock, fire, or injury to persons,
the installer must ensure that the dishwasher is completely
enclosed at the time of installation.
• Note to Installer – Be sure to leave these instructions
for the consumer’s and local inspector’s use.
• Note to Consumer – Keep these instructions with
your Owner’s Manual for future reference.
• The improper connection of the equipment grounding
conductor can result in a risk of electric shock. Check
with a qualified electrician or service representative
if you are in doubt that the appliance is properly
grounded. If house wiring is not 2-wire with ground, a
ground must be by the installer. When house wiring
is aluminum, be sure to use UL-Listed anti-oxidant
compound and aluminum-to-copper connectors.
• Skill Level – Installation of this dishwasher requires
basic mechanical, electrical and plumbing skills.
Proper installation is the responsibility of the
installer. Product failure due to improper installation
is not covered under the GE Appliances Warranty.
See Warranty information.
•
To reduce the risk of electric shock, fire, or injury to
persons, the installer should check to ensure that wires are
not pinched or damaged, the house wiring is attached to the
junction box bracket through a strain relief, and all electrical
connections made at the time of install (wire nuts) are
contained inside of the junction box cover.
• Completion Time – 1 to 3 Hours. New installations
require more time than replacement installations.
IMPORTANT – The dishwasher MUST be installed to
allow for future removal from the enclosure if service is
required.
Care should be exercised when the appliance is installed
or removed, to reduce the likelihood of damage to the
power supply cord.
• Do not use an extension cord or adapter plug with this
appliance.
• Be sure to leave complete literature package, these Installation
Instructions and product samples and/or coupons with the
consumer.
If you received a damaged dishwasher, you should
immediately contact your dealer or builder.
Optional Accessories – See the Owner’s Manual for
available custom panel kits.
NOTE: Product improvement is a continuing endeavor
at GE Appliances. Therefore, materials, appearance and
specifications are subject to change without notice.
Your dishwasher is a water heating appliance.
READ CAREFULLY
KEEP THESE INSTRUCTIONS
0120501699B
31-4000247 Rev 0 04-21 GEA
| General | Details |
|---|---|
| Name | GE APPLIANCES GSD2100VBB Dishwasher |
| Make | GE Appliances |
| Language | English |
| Filetype | PDF (Download) |
| File size | 0.86 MB |


GE APPLIANCES GTW845 Dishwasher

GE APPLIANCES GDF550PGR Plastic Interior Dishwasher with Front Controls

GE APPLIANCES PDT755SYV/BTV UltraFresh System Dishwasher with Interior

GE APPLIANCES GDT670SGV Interior Dishwasher with Hidden Controls

GE APPLIANCES GDT650SYV Interior Dishwasher with Hidden Controls

GE APPLIANCES PDP715SYVFS GE Profile Series Interior Dishwasher

GE APPLIANCES PDT715SYV Interior Dishwasher with Hidden Controls

GE APPLIANCES PDT705SYWFS Dishwasher

GE APPLIANCES GDT565HSYSS Energy Star Hybrid Tub Dishwasher

GE APPLIANCES GD*650-670 Series Interior Dishwasher

GE APPLIANCES GSD2100VBB Dishwasher Overview
Summary of Contents
- Page 1: Installation instructions for built-in dishwasher are provided. Read and observe all warnings and cautions throughout the instructions. Wear gloves and safety glasses or goggles during installation. Remove all power from the circuit breaker or fuse box before beginning installation to avoid electrical shock. Ensure the dishwasher is completely enclosed at the time of installation to reduce risks. Leave these instructions for the consumer and local inspector's use. Keep these instructions with your Owner’s Manual for future reference. Installation requires basic mechanical, electrical, and plumbing skills. Check that wires are not pinched or damaged and that all electrical connections are properly contained. The dishwasher must be installed to allow for future removal if service is required.
- Page 2: Installation preparation Parts supplied in installation package include drain hose extension, toekick insulation (18” models only), mounting brackets (18” models only), drain hose extension, hose clamp, and Phillips-head screws. Materials you will need include UL-listed wire nuts, thread seal tape, 90° elbow, air gap for drain hose, waste tee for house plumbing, electrical cable or power cord kit, screw-type hose clamp(s), strain relief for electrical connection, and hand shut-off valve. Tools you will need include Phillips-head screwdriver, 1/4” and 5/16” nutdriver, T25 torque driver, 6” adjustable wrench, gloves, safety glasses, flashlight, bucket, level, measuring tape, and carpenter’s square. For new installations only, you will need a tubing cutter, drill and appropriate bits, and a hole saw set.
- Page 3: Installation preparation is crucial for proper dishwasher setup. The dishwasher must be completely enclosed during installation to reduce risks of electric shock, fire, or injury. Ensure the wall area is free of pipes and wires. The drain hose must not exceed 12 feet in length for proper drainage. The dishwasher needs to be fully enclosed on the top, sides, and back, without supporting any part of the enclosure. Plumbing and electric service must enter the designated shaded area. Follow local codes and ordinances for drain requirements. An air gap is necessary if local codes require it or if the waste tee is less than 18 inches above the floor. Drill a 1-1/2 inch diameter hole in the cabinet wall for the drain hose connection. Always ensure the disposer drain plug is removed before attaching the dishwasher drain hose to avoid drainage issues.
- Page 4: Installation preparation involves ensuring electrical wiring is ready before starting. Remove all power from the circuit breaker or fuse box to avoid electrical shock risks. The electrical connection must conform to the National Electric Code and local ordinances. This appliance requires a 120V, 60Hz, AC-only electrical supply with a 15-ampere or 20-ampere fuse. Wiring must be 2 wire with ground and rated for 75°C (167°F). A circuit breaker or time-delay fuse is recommended for safety. Cut a maximum 1-1/2 diameter hole for the electrical cable, ensuring smooth edges. The appliance must be connected to a grounded metal wiring system or an equipment-grounding conductor. Grounding reduces the risk of electric shock by providing a safe path for electric current. For power cord connections, a 3-prong grounding type receptacle must be installed within specified dimensions.
- Page 5: Installation preparation involves several key steps for connecting the water line. The water supply line can enter from various locations, including the side, rear, or floor. It is recommended to use copper tubing for the water line, but a flexible braided hose can be used if preferred. A hand shut-off valve should be installed in an accessible location, such as under the sink. The hot water inlet line must be installed using at least 3/8” copper tubing or a flexible braided hose. The water heater should be adjusted to a temperature between 120°F and 140°F. Flushing the water line is necessary to clean out any debris. The hot water supply line pressure must be maintained between 20-120 PSI. Ensure to locate all items in the installation packages before starting the installation. Turn the page to begin the dishwasher installation.
- Page 6: Dishwasher installation involves several key steps. Remove the toekick by unscrewing the 4 toekick screws and setting it aside for later use. Opening the door can cause the dishwasher to tip forward if not fully installed; hold the top securely when opening. Check the door balance by opening and closing the door; adjust spring tension if necessary. If the door drops when released, increase the spring tension; if it rises, decrease it. Install the power cord unless the dishwasher is permanently connected or has a factory-installed cord. Ensure the power cord complies with the National Electrical Code and local codes. Remove the junction box cover and install strain relief in the junction box bracket. Connect the power cord wires to the corresponding dishwasher wires using UL-listed wire nuts. Adjust the leveling legs by measuring the installation height and extending the legs accordingly.
- Page 7: Dishwasher installation involves several key steps. Ensure the rubber gasket is located between the valve and the 90° elbow. Thread the 90° elbow onto the water valve without overtightening to avoid damage. Position the end of the elbow to face the rear of the dishwasher. Stand the dishwasher upright and insert the drain hose into the cabinet opening. Position utility lines to avoid interference with the dishwasher components. The molded end of the drain hose fits various inlet port sizes. Cut the drain hose connector if necessary to fit the inlet port. Do not cut the corrugated portion of the hose already attached to the unit. The drain connection height must not exceed 72 inches above the bottom of the dishwasher.
- Page 8: Dishwasher Installation Connect drain line to air gap, waste tee or disposer using the previously determined method. Secure hose with a screw-type clamp. You must install the mounting brackets onto the dishwasher tub frame top or sides prior to sliding the dishwasher into place under the countertop. The mounting brackets have several available attachment positions to accommodate different cabinet constructions. After installing brackets and before closing dishwasher door, adjust the brackets by bending them up as needed, so that they do not contact the top of dishwasher door and cause damage. Either one of the above methods must be used or dishwasher will not operate properly. When connecting drain line to disposer, check to be sure that drain plug has been removed. Dishwasher will not drain if plug is left in place. Avoid unnecessary service call charges for a no drain complaint. Make sure excess drain hose has been pulled through the cabinet opening to prevent kinking or crushing.
- Page 9: Dishwasher installation involves several key steps. Do not push against the front panel with knees to avoid damage. Install mounting brackets on the sides if the countertop is granite or similar material. Grasp the sides of the front panel and slide the dishwasher into the opening gradually. Break off the front portion of the tab with pliers before attaching to the dishwasher. Ensure the drain hose is not kinked and does not interfere with components under the dishwasher. Push the dishwasher into the cabinet using your hands, avoiding the door panel with your knee. Check that the tub insulation blanket does not interfere with the springs during installation. Center the dishwasher in the opening, ensuring the front of the door panel is flush with the cabinet face. Reposition and level the unit if the door catches or rubs on the cabinet frame.
- Page 10: Dishwasher installation involves connecting water and power supply. Connect the water supply line to the 90° elbow. If using a flexible braided hose, attach the nut to the elbow with an adjustable wrench. For copper tubing, slide the compression nut and ferrule over the water line. Insert the water line into the 90° elbow and secure it with the compression nut. Ensure the dishwasher is aligned correctly under the countertop. If house wiring is not 2-wire with ground, a ground must be provided. Leave a 1/2” minimum gap between the countertop and the dishwasher door. Use UL listed wire nuts to connect the dishwasher wires to the house wiring. If replacing an existing dishwasher, new holes may be required for the countertop bracket.
- Page 11: Dishwasher must be level for proper dish rack operation, wash performance, and door operation. Prevent door panel and control panel damage by ensuring the dishwasher is positioned correctly. Maintain a 1/2” minimum gap under the countertop. Secure the dishwasher to the underside of the wood countertop with Phillips head screws. If the dishwasher is not level, adjust the four leveling legs individually. Verify that the dishwasher is leveled to prevent unnecessary service charges. The door should fit in the tub opening without hitting the side of the tub. Re-check that the dishwasher is square and level after mounting to the cabinets or countertop. Confirm all leveling legs are in contact with the floor to prevent rocking. Use Method 1 for wood countertops and Method 2 for materials like granite that do not accept wood screws.
- Page 12: Dishwasher installation involves several important steps to ensure proper functioning. Review the pretest checklist after installation to avoid service call charges not covered by warranty. Check to ensure power is off before starting the installation process. Remove all foam and paper packaging from the dishwasher. Read the Owner’s Manual for operating instructions. Verify that the door opens and closes freely and adjust spring tension if necessary. Ensure that wiring is secure and not pinched or in contact with other components. Check for leaks under the dishwasher and around the door, and correct any issues found. Verify that water supply and drain lines are not kinked or in contact with other components. Ensure incoming water temperature is between 120°F and 140°F for optimal wash performance.

FISHER PAYKEL DW24UNT2X2 Dishwasher

BOSCH SMV4HAX08E Dishwasher

FISHER AND PAYKEL DD24SCTX9 N Dish Drawer Dishwasher

Westinghouse WSF6606 Dishwasher

BOSCH SMT6ECX00E/38 Dishwasher

BOSCH SPH4HKX10E 45 cm Dishwasher

Hotpoint H7F HS41 UK Full Size Dishwasher

Omega ODW300XN Slimline Dishwasher

BOSCH SMS2ITW00I Free Standing Dishwasher

FISHER and PAYKEL DD60ST4ZB9 Contemporary Tall Dishwasher