KUCHT K6502D Dishwasher


www.kucht.com
BE A PRO IN YOUR KITCHEN
K6502D - DISHWASHER
K430D - 166 Bottles
6
WASH
46db
24”
BUIT-IN
DISHWASHER
INSTALLATION MANUAL
APPLICABLE MODEL: K6502D

| General | Details |
|---|---|
| Name | KUCHT K6502D Dishwasher |
| Make | Kucht |
| Language | English |
| Filetype | PDF (Download) |
| File size | 1 MB |


KUCHT KD240PR Panel Ready Dishwasher

KUCHT K6502D Dishwasher Overview
Summary of Contents
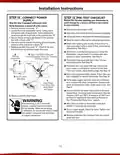
- Page 1: Be a pro in your kitchen. K6502D - Dishwasher. Applicable model: K6502D. Installation manual. Built-in dishwasher. 46db. 24”. K430D - 166 bottles. Wash. 6.
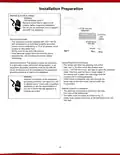
- Page 2: Installation instructions for the dishwasher are provided. The dishwasher must be installed to allow for future removal if service is required. Read these instructions completely and carefully. If you received a damaged dishwasher, contact your dealer or builder immediately. Observe all governing codes and ordinances. Leave these instructions for the consumer’s and local inspector’s use. Read and observe all cautions and warnings throughout these instructions. Gloves, safety glasses, or goggles should be worn during installation. Installation requires basic mechanical and electrical skills. Completion time for installation is 1 to 3 hours.
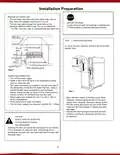
- Page 3: Installation preparation includes parts supplied for securing the dishwasher. Materials needed include a ferrule, compression nut, and 90° elbow for water supply. Wire nuts and thread seal tape are also required. For new installations, an air gap for the drain hose may be necessary. Tools needed include a Phillips head screwdriver and a level. Nut drivers of 1/4 and 5/16 sizes are essential. A 6 adjustable wrench and carpenter's square are also required. Safety glasses and a flashlight are important for the installation process. A bucket is needed to catch water when flushing the line. For new installations, a hole saw set and drill with appropriate bits are necessary.
- Page 4: Installation preparation requires the dishwasher to be fully enclosed on the top, side, and back. The drain hose must be no more than 10 feet in length for proper drainage. Clearances of 2 inches minimum between the dishwasher and adjacent cabinets or appliances are necessary when installed in a corner. The rough cabinet opening must be at least 24 inches deep and wide, with a maximum height of 35 inches. An air gap or a minimum 32-inch high drain loop is required to prevent backflow into the dishwasher. Local codes and ordinances must be followed regarding drain installation. An air gap must be used if the waste tee or disposer connection is less than 18 inches above the floor. Drill a 1-1/2 inch diameter hole in the cabinet wall for the drain hose connection. Failure to provide the proper drain connection height will result in improper draining of the dishwasher. Provide a method to attach the drain hose to the underside of the countertop.
- Page 5: Installation preparation includes essential steps for electrical wiring. For personal safety, remove the house fuse or open the circuit breaker before beginning installation. Do not use an extension cord or adapter plug with this appliance. The appliance must be supplied with 120V / 60 Hz and connected to a properly grounded branch circuit. Wiring must be two wire with ground, and if the electrical supply does not meet the requirements, consult a licensed electrician. The appliance must be connected to a grounded metal, permanent wiring system. Cut a 1-1/2” diameter hole to admit the electrical cable, ensuring the hole is free of sharp edges. Cable direct connections may pass through the same hole as the drain hose and hot water line. Improper connection of the equipment grounding conductor can result in a risk of electric shock. The electrical connection is located on the right front side of the dishwasher, and the cable must extend a minimum of 24” from the rear wall.
- Page 6: Installation preparation involves several key steps. The hot water line may enter from various locations within the designated area. It is permissible for the line to share a hole with the electrical cable and drain hose, or a separate hole can be created. Before beginning, locate the package containing the countertop mounting screws. To check the door balance, hold the top of the dishwasher firmly. Turn off the water supply before making any connections. Install a hand shut-off valve in an accessible location. The water connection is located on the left front side of the dishwasher. Flush the water line to remove any debris. Ensure the hot water supply line pressure is between 20 to 120 psi. Caution is advised to avoid opening the door until ready to install the dishwasher, as it may tip forward.
- Page 7: Page 7
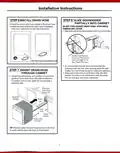
- Page 8: Installation instructions provide essential steps for setting up the dishwasher. Slide the dishwasher into the opening a few inches at a time. Install the screw type hose clamps to the drain hose. Install the drain hose to the drain hose installation hose, then tighten the screw type hose. Do not push against the front door panel with your knee to avoid damage. Pull the drain hose through the opening under the sink as you proceed. Ensure the drain hose is not kinked and there is no interference with the water line and wiring. Upright the dishwasher and position it in front of the opening. Insert the drain hose into the cabinet wall hole. Position the water line and house wiring on the floor to avoid interference with the base of the dishwasher.
- Page 9: Installation instructions provide essential steps for positioning and leveling the dishwasher. Position the dishwasher under the countertop by grasping both sides. Ensure that wires are secure under the dishwasher and not pinched or in contact with components. Check the tub insulation blanket to ensure it is not bunched up or interfering with door springs. Push the dishwasher into the cabinet, ensuring the front corners are flush with cabinet doors. Avoid pushing against the front door panel with your knee to prevent damage. Level the dishwasher by adjusting the four leveling legs individually. The dishwasher must be level for proper dish rack operation and wash performance. Use a level on the door and rack track inside the tub to check if the dishwasher is level. If the lower rack rolls forward or back, the dishwasher must be leveled again. Adjust leveling legs if the door hits the tub to align the door correctly.
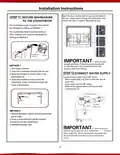
- Page 10: Installation instructions outline the steps for securing the dishwasher to the countertop and connecting the water supply. Remove the tub cap on both sides of the tub before installation. For countertops made of wood, use Method 1; for granite or marble, use Method 2. Drive screws straight and flush to avoid scratching the control panel. In Method 1, use longer brackets and bend them to secure to the dishwasher tub. Connect the water supply line to the 90° elbow using a compression nut and ferrule. Secure the dishwasher to the countertop with provided screws through the bracket holes. In Method 2, remove plastic caps on the mounted bracket access holes and drive a wood screw into the cabinet frame. Ensure the door spring does not rub against the fill hose or water supply line. Test the door operation after installation to check for any interference.
- Page 11: Installation instructions for drain line installation include connecting the drain line to an air gap, waste tee, or disposer. The drain hose molded end fits various diameter connections: 5/8”, 3/4”, or 1”. Method 1 involves using an air gap with a waste tee or disposer, cutting the marked line as required. Method 2 is a high drain loop with a waste tee or disposer, allowing for an additional length of up to 42” for a total of 10 feet. Use 5/8” or 7/8” inside diameter hose and a coupler to connect two hose ends, securing with hose clamps. Secure the drain hose to the air gap, waste tee, or disposer with clamps. The total drain hose length must not exceed 10 feet for proper drain operation. Check that the drain plug has been removed when connecting the drain line to the disposer. The dishwasher will not drain if the plug is left in place. Always ensure the disposer drain plug has been removed before attaching the dishwasher drain hose to the dispenser.
- Page 12: Installation instructions outline the steps for connecting power supply and performing a pre-test checklist after installing the dishwasher. Skip the power supply step if equipped with a power cord. Verify that power is turned off at the source before proceeding. Remove the junction box cover and ensure power is off. Insert dishwasher wires through the small hole in the junction box. Secure house wiring to the junction box with a strain relief. Check door opening and closing; adjust spring if necessary. Verify that wiring is secure and not pinched under the dishwasher. Check door alignment with the tub and cabinet; level if needed. Verify water supply and drain lines are not kinked or in contact with other components. Add water to the bottom of the dishwasher to lubricate the pump seal and check for leaks.
- Page 13: Installation instructions Turn on power supply or plug power cord into outlet. Turn on your dishwasher and select RINSE ONLY cycle. Check to be sure that water enters the dishwasher. If water does not enter, check that water and power are turned on. Check for leaks under the dishwasher and around the door. Reposition the dishwasher if necessary to prevent door leaks. Install the toekick against the legs of the dishwasher. Check the drain lines for leaks when the dishwasher is draining. Make sure most of the water has drained from the dishwasher. Leave complete literature package and installation instructions with consumer.
- Page 14: We transform a simple kitchen into a pro one. This is why we care about making very high performance ranges and hoods, to make you feel like a pro and stylish cooker.

ARISTON LFF8M132 Dishwasher

BOMANN GSP 7417 Household Dishwasher

BOSCH SMV6ZCX10G Dishwasher

FISHER PAYKEL DD24DV2T9_N Dishwasher

BERTAZZONI DW18S2IXV 18 Inch Dishwasher

rhima RU-40 Underbench Dishwasher

caple DI654 Dishwasher

SIEMENS SX63HX60AE Fully Integrated Dishwasher

Hotpoint HSFC 3T127 C Dishwasher

BOSCH SHP9PCM5N Custom Panel Dishwasher