Home > Maidaid Halcyon > Maidaid Halcyon AMH51 Amika Drain Pump Dishwasher
Maidaid Halcyon AMH51 Amika Drain Pump Dishwasher


AMH51
GRAVITY WASTE
User & Installation
Guide
JUNE.2021
REF:918745
All spares available from
The Engine Shed
Top Station Road
Brackley
NN13 7UG
Tel: 0845 1308060
Fax: 01280 845345
Copyright Notice: All rights reserved. No parts of this manual may be reproduced in any form without
express written permission of Maidaid-Halcyon (A trading name of Buttress Group Ltd)

| General | Details |
|---|---|
| Name | Maidaid Halcyon AMH51 Amika Drain Pump Dishwasher |
| Make | Maidaid Halcyon |
| Language | English |
| Filetype | PDF (Download) |
| File size | 1.15 MB |


maidaid halcyon C612 Undercounter Tray Dishwasher

Maidaid Halcyon C652 Range Commercial Tray/Dishwasher

maidaid halcyon AMH91 Pass Through Gravity Drain Dishwasher

Maidaid Halcyon AMH80 Amika Pass Through Gravity Drain Dishwasher

maidaid halcyon EVO2160 Evolution Pass Through Dishwasher

maidaid halcyon AMH95WSD Water Softener Pass Through Dishwasher

Maidaid Halcyon AMH51 Amika Drain Pump Dishwasher Overview
Summary of Contents
- Page 1: Gravity waste user and installation guide. June 2021. All spares available from The Engine Shed. Copyright notice: All rights reserved. No parts of this manual may be reproduced in any form without express written permission.
- Page 2: Instruction manual for dishwashers. Translation from the original instructions. Contents. Risks and important warnings. Normal operating conditions. Preface. Installation. Unpacking. Positioning. Electrical connection. Water circuit hookup. Connection to the drain line. Rinse aid and detergent. Using the machine. Key and symbols. Switching the dishwasher on. Filling the rack. Cycle selection and start-up. Continuous washing (optional). Automatic cycle start-up. Removing the integral filter. Emptying the dishwasher. Maintenance. General rules. Cleaning. Cleaning the filter unit. Cleaning the arms. Self diagnostics. Settings. Number of cycles to regenerate resin. Scrapping. Environment. In legal terms, the manufacturer reserves the property of this document. It is forbidden to reproduce it or divulge it without prior written authorization. The manufacturer reserves the right to introduce changes for improvements without prior notice.
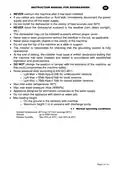
- Page 3: Instruction manual for dishwashers provides essential safety and operational guidelines. The appliance is intended solely for its designed use, and improper use is hazardous. Installation must be performed by a specialized technician who will instruct the user on operation and safety measures. Only authorized service centers with qualified staff may work on the machine, using original spare parts. Always disconnect the machine from power and water supplies before servicing or cleaning. The machine should not be used by untrained persons. Children aged at least 8 years may use the appliance under supervision or after receiving training. Cleaning and maintenance should not be performed by unsupervised children. The machine must not remain powered when not in use. If the power cable is damaged, it must be replaced by qualified personnel to prevent risks.
- Page 4: Instruction manual for dishwashers Never overturn the machine after it has been installed. If you notice any malfunction or fluid leak, immediately disconnect the power supply and shut off the water supply. Do not install the dishwasher in the vicinity of heat sources over 50°C. Never leave the dishwasher exposed to the weather. The dishwasher may not be installed outdoors without proper cover. Never start a wash programme without the overflow in the tub. The installer is responsible for checking that the grounding system is fully operational. At the end of testing, the installer must issue a written declaration stating that the machine has been installed and tested in accordance with established legislation and good practice. Do not clean the appliance with steam or water jets. Max inlet water temperature: 50°C.
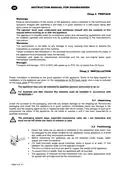
- Page 5: instruction manual for dishwashers preamble Warnings: Keep all documentation in the vicinity of the appliance for technicians and operators. The operator must read and understand the manual before working with the appliance. The appliance is intended for professional heavy-duty dishwashing applications. Installation and servicing must be done by qualified persons according to the manufacturer's instructions. The manufacturer is not liable for damage from improper use or failure to observe instructions. Failure to follow instructions may compromise safety and void the warranty. Unauthorized installation or use of non-original spare parts voids the warranty. Transport and storage temperature range is -10°C to 55°C, with peaks up to 70°C for short durations. installation Proper installation is essential for good operation of the appliance. Installation must be performed by qualified persons authorized to do so. Check the condition of the packaging and report any damage immediately. Ensure the installation area is free of objects that may be damaged by steam. Set up electrical power supply, water supply, and drain connections before positioning the appliance. The floor or built-in unit must support the weight of the appliance and be leveled properly. The appliance is intended for fixed installation only; any other approaches require manufacturer approval.
- Page 6: Instruction manual for dishwashers Remove the protective film from its body panels before operating the dishwasher. The power supply must be fitted with an omnipolar circuit breaker to break all contacts including neutral. The master power switch must be fitted to the power line in the vicinity of the installation. The mains voltage and frequency must match the nameplate ratings. The installation must include a grounding system conforming with established electrical safety legislation. This appliance conforms to EN/IEC 61000-3-11 certification if the system impedance is within specified limits. The power cable must be exclusively type H07RN-F with current capacity at 60°C. The appliance must also be connected to an equipotential system. The equipotential cable must have a cross section of 10 mm². Do not use multi-sockets, adapters, or cables that do not conform to established electrical installation regulations.
- Page 7: Instruction manual for dishwashers The appliance must be connected to its water supply with a flexible hose. A shut off valve must be installed between the water supply line and the appliance's solenoid valve. The water supply, temperature, and pressure must be compatible with the ratings shown on the technical data plate. Make sure that the water supply flow rate is no less than 20 l/min. If the water hardness is greater than 14 °f (8 °dH), we recommend using an internal water softener. The drain line must consist of a free drain sump with siphon suited to the flow capacity of the drain hose. The tub drains under gravity, so the drain sump must be lower than the machine's base. If the drain is not lower than the base of the appliance, you can use the version with drain pump. The rinse aid and detergent are dispensed by the machine's integral dispenser. NEVER use chlorine or hypochlorite based detergents.
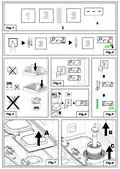
- Page 8: Instruction manual for dishwashers Using the machine Key and symbols Turn on the main power switch and open the external water tap. Press ON/OFF. The status bar lights up from the top downwards to indicate that the dishwasher is heating up. Use a suitable rack, fill without overloading and without overlapping the dishes. Always wipe the dishes before placing in the dishwasher. Place the cutlery in the cutlery basket, handle end down. Press the programme selection button repeatedly to select a wash cycle. To run the programme, press START; the status bar starts to flash. When the cycle is completed, all the LEDs will come on, fixed. In hood versions, after the first work cycle the automatic start is automatically enabled.
- Page 9: Instruction manual for dishwashers Continuous washing is an extended cycle; the time varies according to the model. The cycle duration may be varied by pressing START during the wash cycle to interrupt the wash and start the rinse phase. Automatic cycle start-up allows the chosen cycle to start automatically when the door is closed. To enable automatic start, press and hold START until AS appears on the display. To disable the function, press START again for five seconds with the door open. Removing the integral filter involves moving the washing and rinsing arms and lifting each semi-filter by the handle. Emptying the dishwasher requires switching it off and removing the integral filter. For appliances with no drain pump, wait for the tub to empty completely after removing the overflow pipe. For appliances with a drain cycle, select the cycle dr and press START to initiate the drain cycle. Resin regeneration is necessary when the warning ‘SLT’ appears, indicating the need to add salt to the container.
- Page 10: Instruction manual for dishwashers Rinse the area around the salt cap by hand and run a self-cleaning cycle to avoid any risk of corrosion. The ‘SLT’ warning will disappear after a few minutes. The warning rEG on the display indicates that the machine is running a resin regeneration cycle. Do not switch off the machine if a regeneration cycle is underway. With the dishwasher on, press PROGRAMME SELECTION for five seconds to display wash temperature, rinse temperature, and wash cycles carried out. List of viewable messages includes door open, number of cycles carried out, end of cycle, rinse temperature, and wash temperature. At the end of the day, always drain the machine as described in the section Machine draining. Disconnect the power supply by means of the main switch and close the external water cock. Perform routine maintenance and clean the machine as described in the section Maintenance. If possible, leave the door ajar to prevent bad odours building up inside the machine.
- Page 11: Instruction manual for dishwashers Maintenance General rules Before doing any maintenance, completely drain out all water, shut off the power supply and close the water supply cock. Do not use water under pressure - it can damage the electrical equipment. Only wash the body panelling when it is cold, using only product specifically designed for steel. If there is a risk of ice forming, drain the water from the boiler and wash pump. Cleaning To keep the machine in good working order, it must be maintained regularly. We recommend periodically running a sanitising treatment with suitable non-corrosive commercial products. Cleaning the filter unit Run this procedure at the end of the day or when you see the filters are dirty. Do not use abrasive products to clean the tub. Cleaning the arms The wash and rinse arms are easily removed in order to clean their nozzles and prevent blockage/encrustations.
- Page 12: Instruction manual for dishwashers Self diagnostics The machine is equipped with a self-diagnosis system that registers and warns of a number of malfunctions. No rinsing: The rinsing cycle was not completed correctly. Make sure that the rinsing nozzles are clean. No drainage: The water was not drained or drained incorrectly. Check that the drain pipe is not bent or crushed and that the siphon and filters are not blocked. Rinsing temperature reset fault: The boiler temperature did not reset in the set time during the washing cycle. Switch the machine off and then on and run a new cycle. Water filling in tank fault: Make sure the pipes are connected correctly, and that the water tap is open. Tank thermometer fault (Probe open): The machine does not read the tank temperature value. Switch the dishwasher off and then on. Boiler loading time out: Boiler not filled. Impossible to carry out rinse cycle. Check that the water tap is open. Insufficient rinse: The right amount of rinsing did not take place; make sure the rinse nozzles are clean. Electro-mechanical safety device: The boiler or tub safety thermostats have cut in, or the tub safety pressure switch has been triggered. WARNING! Switching the dishwasher off and then on again resets the signals. If the problem persists, contact an Authorised Service Centre.
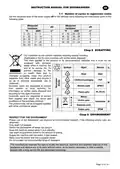
- Page 13: Instruction manual for dishwashers Settings The following settings should only be configured by a qualified technician. The parameters listed below can be set during installation or afterwards, accessing the settings menu. Machine in standby with door open. Press buttons 2 and 3 together for 5 seconds to enter the key CH 12. Language selection. Boiler temperature settings for programmes. Tub temperature regulation for programmes. Enabling the Thermostop function, which guarantees the correct rinse temperature. Enabling the Energy Saving function. Setting the supply water hardness for dishwashers with water softener. Cycle counter setting and activation to enable the Service alert for an external water softener.
- Page 14: Instruction manual for dishwashers Set the hardness level of the water supply in the settings menu following the instructions given in the table. Our machines do not contain materials requiring special handling. The mark applied to the product indicates that it must not be scrapped with domestic waste when it reaches the end of its service life. To prevent damage to the environment or health risks due to improper scrapping, keep this product separate from other waste and recycle it. Domestic users are requested to contact their reseller or local authority for information on sorted waste disposal and recycling. Proper use of the dishwasher can improve its environmental footprint if the following simple rules are observed: only wash full baskets, switch the dishwasher off when not using it, and keep the machine closed when it is in standby. Use wash programmes suited to the amount of soiling. Do not exceed the recommended dose of detergent. The manufacturer reserves the right to modify the electrical, technical and aesthetic features of this appliance without notice.
- Page 15: Page 15


