maxima HQ-400 Undercounter Dishwasher


GLASSWASHER
USER’S MANUAL
Model:
HQ 400
HQ 400 ULTRA
SPANGENBERG INTERNATION B.V.
NIJVERHEIDSWEG 23C | 3641 RP MIJDRECHT | THE NETHERLANDS

| General | Details |
|---|---|
| Name | maxima HQ-400 Undercounter Dishwasher |
| Make | maxima |
| Language | English |
| Filetype | PDF (Download) |
| File size | 0.5 MB |


maxima 09240000 Dishwasher

maxima 09240080 Pass Through Dishwasher

maxima HQ-400 Undercounter Dishwasher Overview
Summary of Contents
- Page 1: Hood type dishwasher Glasswasher User’s manual Model: HQ 400 Model: HQ 400 Ultra
- Page 2: Introduction Technical data Warning signs and safety details Transporting and moving Operation of the machine Clean-up and maintenance Electrical circuit diagram Troubleshooting
- Page 3: Introduction Thank you for purchasing our device and for your reliance upon our company. Our devices have been used within our customers' kitchens in 100 countries. Our devices are produced in compliance with international standards. Important notice: Please read or ensure that the users read this user’s manual in order to achieve the desired performance in line with your expectations and to use your device for long years. Please read and ensure that your operation personnel also reads this user’s manual carefully before installing and using the device. If the device is operated without reading the user’s manual, the device will not be covered by the guarantee. The manual contains information about installation, usage, and maintenance of our product you purchased. Please ensure that power supply connections to the device are already installed by qualified personnel according to local legislation. If you are confused or you don’t have enough information please get in touch with authorized service. Please keep in mind that, if the service personnel is delayed at your site, related expenses and delay costs will be charged to you on an hourly basis. We hope that you will get the best performance from our product.
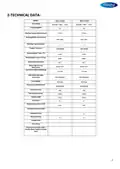
- Page 4: Technical data includes model specifications and ratings. Total rating for both models is 220-240 V ~ NPE / 50 Hz. Both models have a total rating of 3.3 kW. Washing capacity is 27/18/14 for both models. Washing and boiler tank capacity is 18.4 / 2.8 liters. Each model has three washing programs with varying program times. Washing water temperature ranges from 55-60 °C. Rinsing water temperature can reach up to 80-85 °C. Water inlet pressure is 2-4 Bar at 50 °C. Protection class for both models is IPX5.
- Page 5: Page 5
- Page 6: WARNING SIGNS AND SAFETY DETAILS The machine should never be exposed to direct sunlight. The machine should never be left in water and its outer surface should never be cleaned with high pressure water. This machine is designed for industrial use and should only be operated by personnel trained according to this manual. This machine must be installed according to effective regulations. It should only be operated in places that are ventilated well or under a chimney hood. Ambient humidity should not exceed 65%. Ambient temperature where the machine is operated should be between +5 °C and +40 °C. If the machine is fed with hot supply water, water inlet temperature should not exceed maximum +50 °C. The machine is designed to operate with softened water at a French water hardness level of 0-10. Low quality detergent may harm operating system and plastic components of the device.
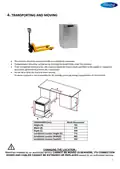
- Page 7: Transporting and moving The machine should be placed vertically on a palette by manpower. Transportation should be carried out by inserting the forklift forks under the machine. If the transported distance is far, the machine should be moved slowly and fixed to the palette or supported by another personnel to prevent jolt, if necessary. Do not hit or drop the machine when moving. Producer company is not responsible for the damage occurring during transportation of the machine. Machines installed by an authorized service cannot be moved elsewhere; its connection hoses and cables cannot be extended or replaced except by an authorized service.
- Page 8: Makinanın kurulacağı yerde gerekenler Sigorta kutusu; 1x32A sigorta 3x2.50 kablo Taze su girişi; Çamaşır makinası musluğu (3/4ꢀ) Tahliye gideri için; 3x2.5 mm² antigran kablo Duvardan ise; Ø50 çatallı boru (plastik) ucuna conta takılmalı Yerden ise; mazgala verilmelidir
- Page 9: Electrical connections must be made by authorized service personnel in accordance with local and national standards and directives. All products must be connected to the residual current device of 30mA. Before connection, ensure that the rated voltage on the name plate matches the mains voltage and that the fuse rating matches product specifications. If the power cable is damaged, obtain a replacement from authorized service. A 3/4” water inlet hose is provided with the appliance for water connection. Washing performance depends on external conditions such as water inlet temperature, pressure, hardness, and chemicals used. Any damage from the use of hard water will void the product warranty. Water inlet temperature should be between 4-50°C, and appropriate inlet pressure is 2-4 bars. In models without a drain pump, waste water is transferred to the drain vent by gravity. For models with a drain pump, ensure the drain vent height is appropriate and the connection is watertight.
- Page 10: Loading detergents and rinse aid involves chemical pumps located on the back side of the front panel. Disconnect the appliance before removing any panel. A plastic hose is available for each chemical pump, with hose outlets on the back side of the appliance. Always ensure to attach the detergent hose to the detergent drum and the rinse aid hose to the rinse aid drum. Only use chemicals suitable for industrial washing or glass washing, with rinse aid suitable for temperatures below 40°C. Detergent pump dosage is set during production, while the rinse aid pump is automatically set. Chemical dosage may be re-set on the detergent pump depending on actual water hardness. Water temperatures can be adjusted, with the appliance set to specific temperature values during production. The rinsing water temperature should be between 80-85°C, and the washing water temperature should be between 55-60°C.
- Page 11: Machine assembly Call a qualified electrician to complete the electrical connection of the appliance. Ground the appliance with the mains ground lead securely attached to the ground terminal. The appliance is delivered with a power cable, an inlet hose with a tap connector, and a drain hose. To supply clean water, install a new piping system on the rear wall at a minimum height. To discharge wastewater, install a PVC piping system on the rear wall at a maximum height. Ensure there is a hood-equipped ventilation system in the installation room. Adjust the appliance's legs to create a level plane on the floor. The room must be free of steam and moisture. Unless customer completes these measures, the authorized service will not install the appliance. Never start the appliance before the service member arrives, or the product warranty will be void.
- Page 12: Operation of the machine Getting to know our device: To understand the information in the user manual correctly, the main parts of the machine should be known. This product is used in tourism facilities, industrial kitchens, work sites, patisseries, and catering companies for washing dishes. Only preparation equipment, dishes, and service utensils should be washed in the machine. Do not use for purposes other than mentioned above. The machine should be operated by qualified personnel informed about safety terms and technical specifications. It should be shown how to cut off the electricity and water supply in case of emergency. Turning on the machine. Working with the machine. Water discharge process. Turning off the machine.
- Page 13: Operation: Description of the appliance Industrial dish and glass washers are designed for almost uninterrupted operation. Control panel Familiarize yourself with the control buttons and symbols on the front panel. Starting the appliance Ensure that power, water, and drain connections are installed. Press the “On-Off Switch” on the front panel to run the machine. The appliance will automatically start to take water during this process. Washing operation will not start until washing temperature reaches ‘Factory Settings’. During the heating process, boiler and tank heating symbols will be blinking. When boiler and washing tank temperature reaches ‘Factory Settings’, the symbols will be stable.
- Page 14: Initial preparation for use involves waiting 25-30 minutes for the water to warm up. The appliance functions efficiently when proper temperatures are reached. To start a wash cycle, open the door, load the basket, and ensure the arms turn freely. Select a program using the program selection key and press the washing start button. If the machine cover is opened during operation, the washing will stop and resume once closed. After the washing operation, a warning sound will ring, indicating the cycle is complete. It is recommended to operate the appliance at an ambient temperature range of 5°C - 40°C, with a moisture level of 65%. Excess water will be automatically drained during operation. At the end of the day, leave the appliance door open for draining and drying. Always bleed the boiler water before switching off the appliance. To drain the water in the washing tank, activate the drain symbol.
- Page 15: Models without drain pump require turning off the appliance, removing the drain plug, and allowing the machine to drain by gravity. For models with a drain pump, the drain system activates automatically during the rinsing cycle. After the washing cycle, the drain plug should be removed, and the drain pipe disconnected to start the drainage operation. It is recommended to disconnect the mains water and electrical supply after draining and to clean the appliance. Leaving the appliance door open after draining helps ensure the boiler dries naturally. When deactivating the appliance, local or national regulations should be followed. Chemical hoses should be removed carefully to avoid spillage, and the water must be fully drained from the appliance. The mains power supply should be turned off, and if directly connected, a qualified electrician should handle disconnection. The voltage and ground wire must be removed from the appliance's housing after disconnection. For recycling or disposal, ensure compliance with local and national regulations.
- Page 16: Hardness of water supplied to the appliance should be softened to 0-10 °fH. Extremely hard water shortens the service life of the appliance and drops its washing performance. In case of continuous operation, apply a 1-hour break every 4 hours of operation. Never move the appliance when running. Take utmost care to install and operate the appliance in strict accordance with this manual. Dirt level of dishes and detergent characteristics should be considered to assess water hardness and consumption in the dishwasher. User should never modify the detergent dosing rate set by authorized members of the detergent company. Excess foam produced from unauthorized detergent dose increases can cause dishes to look dirty and lead to excessive detergent consumption. Rinse aid pump is automatically set according to rinse water consumption and water hardness. It is recommended to use non-effervescent detergents and rinse aids designed for dishwashers.
- Page 17: Clean-up and maintenance Daily maintenance should be carried out by people informed about the safety instructions after disconnecting power supply and water connections. Daily maintenance should be carried out by the user to clean the machine after washing operations. Wash and rinse arms should be disconnected and cleaned using pressure water, brush, or fine wire. Scraps remaining in the washing tank should be removed and cleaned up. If the period between washing operations exceeds five hours, the water outlet pipe should be disconnected and drained fully. The suction filter should be disconnected and cleaned with plenty of water. The inside of the tank should be cleaned with a sponge or cloth and plenty of water. Periodic maintenance should be carried out by the user at least once a month after cleanup and maintenance. After adding decalcination substance to the washing tank, the machine should be operated for half an hour to clean itself. If the device is not used for a long period, drain the water left inside the boiler to prevent harm to the resistances.
- Page 18: - Electrical circuit diagram
- Page 19: Troubleshooting Check the electrical supply to the appliance if it does not run partially or completely. Ensure mains water and electrical connection is active. The electrical supply to the appliance should be 230 V~3PE/60 Hz. If the appliance does not run when the start button is pressed, check if the door is securely closed. If the appliance fails to heat the wash water, the thermostat in the reservoir may be faulty. Check the inlet water temperature, as very low or high temperatures may affect heating. For poor washing performance, check the detergent and polishing chemicals in the drum. Clean water outlet parts on washing/rinsing arms and replace filters properly. If the appliance cannot be switched off, disconnect the mains electrical supply and call for technical service.
- Page 20: Appliance does not drain. Check and clean the filters. Check if drain hose and drain vent are not clogged. In appliances with a motorized drain unit, drain system should comply with section 4.6. Water intake is slow. Check if water supply taps are open. Check water pressure; it should be 2-4 bars. Clean water outlet parts on the rinsing arms. Check if water hose is clogged or bent. If any wrong installation or use is found during the service under product warranty, a service fee is charged. The building, facility or area where the appliance is to be installed should have a proper electrical installation as per the interior wiring regulation.
- Page 21: Page 21

FISHER PAYKEL baseDD24DHTI9 N Dishwasher

BOSCH SBT6TB801E-46 Dishwasher

element ENB6632PEBB Dishwasher

JENNAIR JDPSS24 Series Dishwasher

BOSCH SMV4HVX00E Dishwasher

Miele HG07-W Fully Dishwasher

Miele G 7783 SCVi AutoDos K2O FF Dishwasher

Haier HDW13V1S1 Dishwasher

FISHER PAYKEL DD24DCTX9 N Double Dishwasher

FISHER PAYKEL DD60D4NX9 Built-Under Dishwasher