Midea WQP12-5201C Dishwasher


1
2
A
A
技术要求:
1.该手册印刷颜色均为黑色 :PANTONE BLACK C
2.电子档A5规格,请按A4规格制作印刷
3.如果供应商的排版需要加空白页,请加在封底之前
B
B
C
C
用户手册
WQP12-5201C(5201C-AU)Midea
6710031313
澳大利亚(北极星
12套精简版
碗篮,半载,E3W4.5)
D
标记处数 分区 更改文件号 签 名
校对
日 期
阶 段 标 记
比 例
D
80G双胶
00
REV.
1:1
编
制
数
审 核
审 定
批 准
性能
排版
日期
量
重
第
量
佛山市顺德区美的
1
洗涤电器制造有限公司
1 张
共 1 张
1
2

| General | Details |
|---|---|
| Name | Midea WQP12-5201C Dishwasher |
| Make | Midea |
| Language | English |
| Filetype | PDF (Download) |
| File size | 2.08 MB |


Midea MDW-14D8-OD Dishwasher

Midea MDWPF1233F W WG,MDWPF1233F W WG Dishwasher

Midea MDF18A1A Series Dishwasher

Midea MDF24P2B Dishwasher

Midea WQP4-2605 Tabletop Dishwasher

Midea MDT24X2APR Dishwasher

Midea MDC17P2BWW Dishwasher

Midea MDF24P1BST Dishwasher

Midea MDC17P0ABB Dishwasher

Midea MDC22P1AWW Dishwasher

Midea WQP12-5201C Dishwasher Overview
Summary of Contents
- Page 1: 技术要求: 该手册印刷颜色均为黑色: PANTONE BLACK C 电子档A5规格,请按A4规格制作印刷 如果供应商的排版需要加空白页,请加在封底之前 用户手册 WQP12-5201C(5201C-AU)Midea 澳大利亚(北极星 12套精简版 碗篮,半载,E3W4.5) 比 例 编 制 数 审 核 审 定 批 准
- Page 2: Please read this manual carefully before using the dishwasher. Keep this manual for future reference.
- Page 3: Safety information Earthing instructions Disposal Product overview Installation instruction About power connection Position the appliance Water supply and drain Using your dishwasher Control panel
- Page 4: Troubleshooting tips can help you solve common problems by yourself. If you cannot solve the problems by yourself, please ask for help from a professional technician. The manufacturer may make modifications without giving prior notice. You can receive a new user manual from the manufacturer or responsible vendor if lost or out-of-date.
- Page 5: Safety information When using your dishwasher, follow the precautions listed below. Installation and repair can only be carried out by a qualified technician. This appliance is intended to be used in household and similar applications. This appliance can be used by children aged from 8 years and above with supervision. Children shall not play with the appliance. Cleaning and user maintenance shall not be done by children without supervision. This appliance is not intended for use by persons with reduced physical, sensory or mental capabilities unless supervised. Packaging material could be dangerous for children. This appliance is for indoor household use only. To protect against the risk of electrical shock, do not immerse the unit, cord or plug in water.
- Page 6: The plug must be plugged into an appropriate outlet that is installed and earthed in accordance with all local codes and ordinances. Improper connection of the equipment-earthing conductor can result in the risk of an electric shock. Do not modify the plug provided with the appliance; if it does not fit the outlet, have a proper outlet installed by a qualified electrician. Do not operate your dishwasher unless all enclosure panels are properly in place. Open the door very carefully if the dishwasher is operating, as there is a risk of water squirting out. Warning: knives and other utensils with sharp points must be loaded in the basket with their points facing down or placed in a horizontal position. Some dishwasher detergents are strongly alkaline and can be extremely dangerous if swallowed. Use only detergent and rinse agents recommended for use in an automatic dishwasher. Never use soap, laundry detergent, or hand washing detergent in your dishwasher. If the supply cord is damaged, it must be replaced by the manufacturer or its service agent.
- Page 7: The appliance needs to be connected to the main water valve using new hose sets. Old sets should not be reused. To save energy, in standby mode, the appliance will switch off automatically while there is no operation in 30 minutes. For disposing of the package and the appliance, please go to a recycling center. Cut off the power supply cable and make the door closing device unusable. Cardboard packaging is manufactured from recycled paper and should be disposed of in the waste paper collection for recycling. By ensuring this product is disposed of correctly, you will help prevent potential negative consequences for the environment and human health. For more detailed information about recycling of this product, please contact your local city office and your household waste disposal service. Do not dispose of this product as unsorted municipal waste. Collection of such waste separately for special treatment is necessary.
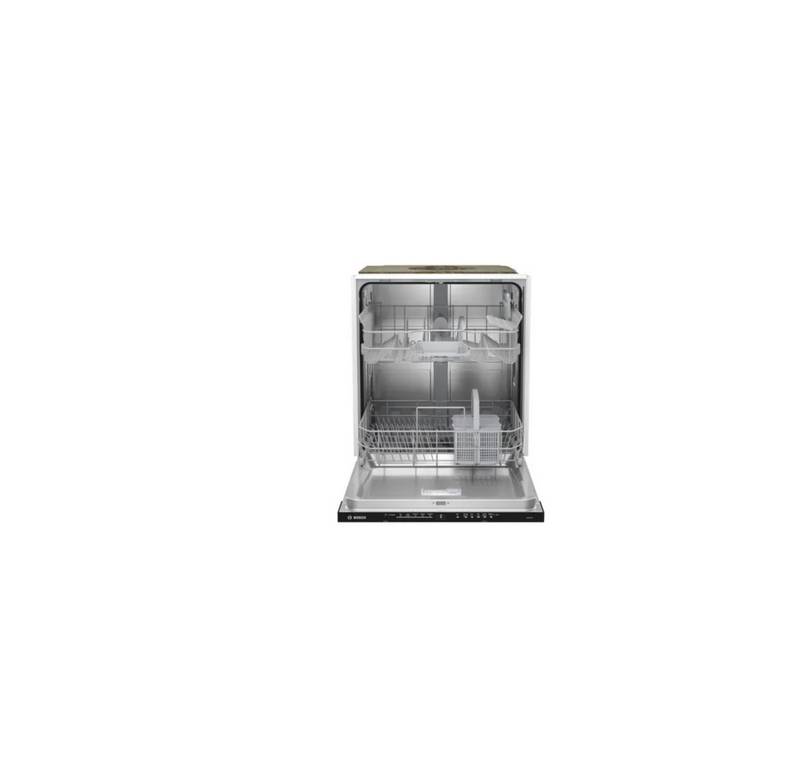
- Page 8: Product overview To get the best performance from your dishwasher, read all operating instructions before using it for the first time. Inner pipe Lower spray arm Filter assembly Dispenser Upper spray arm Cup rack Upper basket Cutlery basket Lower basket To make room for taller items in the upper basket, raise the cup rack upwards.
- Page 9: Installation instruction Electrical shock hazard Disconnect electrical power before installing dishwasher. Failure to do so could result in death or electrical shock. The installation of the pipes and electrical equipment should be done by professionals. Do not use an extension cord or an adapter plug with this appliance. Do not, under any circumstances, cut or remove the earthing connection from the power cord. Please look at the rating label to know the rating voltage and connect the dishwasher to the appropriate power supply. Ensure the voltage and frequency of the power being corresponds to those on the rating plate. Only insert the plug into an electrical socket which is earthed properly. Ensure that proper earthing exists before use.
- Page 10: Position the appliance in the desired location. The back should rest against the wall behind it, and the sides, along the adjacent cabinets or walls. The dishwasher is equipped with water supply and drain hoses that can be positioned either to the right or the left sides to facilitate proper installation. Once the appliance is positioned for levelling, the height of the dishwasher may be altered via adjustment of the screwing level of the feet. The appliance should not be inclined more than 2°. Connect the cold water supply hose to a threaded 3/4(inch) connector and make sure that it is fastened tightly in place. Let the water run to make sure that the water is clear if the water pipes are new or have not been used for an extended period of time. This precaution is needed to avoid the risk of the water inlet being blocked and damaging the appliance. Please close the hydrant after using.
- Page 11: Connection of drain hoses Insert the drain hose into a drain pipe with a minimum diameter of 4 cm, or let it run into the sink, making sure to avoid bending or crimping it. The height of the drain pipe must be less than 1000mm. The free end of the hose must not be immersed in water to avoid backflow. Please securely fix the drain hose in either position A or position B. If the sink is 1000mm higher from the floor, the excess water in hoses cannot be drained directly into the sink. It will be necessary to drain excess water from hoses into a bowl or suitable container that is held outside and lower than the sink. The drain hose must be correctly fitted to avoid water leaks. Ensure that the water drain hose is not kinked or squashed. If you need a drain hose extension, make sure to use a similar drain hose. The waste connection must be at a height less than 100 cm from the bottom of the dish.
- Page 12: Using your dishwasher Control panel Press this button to turn on your dishwasher, the screen lights up. Select the appropriate washing program, the selected program indicator will be lit. Only about or less than 6 place setting dishware, and you will see less water and energy consumption. Press the button to set the delay time, corresponding indicator will be lit. This option allows you to lock the buttons on the control panel, except the Power button. To lock or unlock the buttons on the control panel, hold the button for 3 seconds. To start the selected washing program or pause it when the dishwasher is working.
- Page 13: Display Intensive for heaviest soiled crockery, such as pots, pans, casserole dishes and dishes that have been sitting with dried food on them for some time. Heavy for heavily soiled loads, such as pots, plates, glasses and lightly soiled pans. ECO for normally soiled loads, such as pots, plates, glasses and lightly soiled pans, standard everyday cycle. 90 mins for lightly soiled plates and pans that need quick wash. Glass for lightly soiled crockery and glass. Rapid a shorter wash for lightly soiled loads that do not need drying. Delay time to show the delay time (2h/4h/6h/8h). Rinse aid if the indicator is lit, it means the dishwasher is low on dishwasher rinse aid and requires a refill. Program end when the program is end, the indicator will be lit. Water faucet if the indicator is lit, it means the water faucet closed.
- Page 14: Function of the rinse aid and detergent The rinse aid is released during the final rinse to prevent water from forming droplets on your dishes, which can leave spots and streaks. It also improves drying by allowing water to roll off the dishes. Your dishwasher is designed to use liquid rinse aids. WARNING Only use branded rinse aid for dishwasher. Never fill the rinse aid dispenser with any other substances. This would damage the appliance. When to refill the rinse aid dispenser You can always estimate the amount from the color of the optical level indicator located next to the cap. You should never let the rinse aid level be less than 1/4 full. Function of detergent The chemical ingredients that compose the detergent are necessary to remove, crush and dispense all dirt out of the dishwasher. Use only detergent specifically made for dishwashers use.
- Page 15: Filling the rinse aid reservoir involves removing the cap by rotating it counterclockwise. Carefully pour in the rinse aid while avoiding overflow. Clean up any spilled rinse aid with an absorbent cloth to prevent excessive foaming during the next wash. Close the rinse aid reservoir cap by rotating it clockwise. Adjust the rinse aid indicator dial to a number between 1 and 6; the higher the number, the more rinse aid the dishwasher uses. If dishes are not drying properly or are spotted, adjust the dial to the next higher number until dishes are spot-free. Reduce the setting if there are sticky whitish stains on dishes or a bluish film on glassware or knife blades.
- Page 16: Filling the detergent dispenser involves several steps. Press the release catch on the detergent dispenser to open the cover. Add detergent into the larger cavity for the main wash cycle. For more heavily soiled wash loads, also add some detergent into the smaller cavity for the pre-wash cycle. Close the cover and press on it until it locks into place. Be aware that depending on the soiling of water, settings may be different. Please observe the manufacturer's recommendations on the detergent packaging.
- Page 17: Folding back the rack shelves. The spikes of the lower basket are used for holding plates and a platter. They can be lowered to make more room for large items. Consider buying utensils which are identified as dishwasher-proof. For particular items, select a program with the lowest possible temperature. To prevent damage, do not take glass and cutlery out of the dishwasher immediately after the program has ended. Cutlery with wooden, horn china or mother-of-pearl handles are not suitable. Plastic items that are not heat resistant are not suitable. Some types of glasses can become dull after a large number of washes. Silver and aluminum parts have a tendency to discolor during washing.
- Page 18: Recommendations for loading the dishwasher Scrape off any large amounts of leftover food. It is not necessary to rinse the dishes under running water. For best performance of the dishwasher, follow these loading guidelines. Place objects in the dishwasher in the following way: Items such as cups, glasses, pots, pans, etc. are faced downwards. All utensils are stacked securely and cannot tip over. Load hollow items such as cups, glasses, pans etc. with the opening facing downwards. Dishes and items of cutlery must not lie inside one another, or cover each other. The upper basket is designed to hold more delicate and lighter dishware such as glasses, coffee and tea cups. Please do not overload your dishwasher.
- Page 19: Loading the upper basket is designed for delicate and lighter dishware such as glasses, cups, and shallow pans. Position dishes so they will not get moved by the spray of water. The lower basket is for large items and difficult to clean items like pots, pans, and serving dishes. Place serving dishes and lids on the side to avoid blocking the spray arm. The maximum diameter for plates in front of the detergent dispenser is 19 cm to ensure it can open properly. Cutlery should be placed separately in the cutlery rack to avoid nesting, which may cause poor performance. Do not let any item extend through the bottom and always load sharp utensils with the sharp point down. To prevent water dripping, empty the lower basket first, followed by the upper basket. Items will be hot after the cycle; do not remove glass and cutlery for about 15 minutes after the program ends.
- Page 20: Loading the baskets according to AS/NZS 2007.1 Upper basket: Cups Saucers Glasses Lower basket: Dinner plates Soup plates Dessert dishes Cutlery basket
- Page 21: Cutlery basket Information for comparability tests in accordance with AS/NZS 2007.1 Capacity: 12 place settings Position of the upper basket: lower position Program: ECO Rinse aid setting: 6 Detergent (Pre/main): 5/25g Door is open at the end of the drying cycle for the drying performance test Door position: Open 50 mm
- Page 22: Programming the dishwasher Wash cycle table The table below shows which programs are best for the levels of food residue on them and how much detergent is needed. Detergent, Pre/Main, Energy (Kwh), Water (L), Description of cycle, Running time (min), Rinse aid. Pre-wash (50°C), Wash (60°C), Rinse, 5/25g, 170, 1.6, 18.5, Rinse (1 or 2 pieces). Intensive, Rinse (65°C), Drying, Pre-wash (45°C), Wash (55°C), Rinse, 5/25g, 160, 185, 90, 1.4, 0.74, 1.2, 15, (1 or 2 pieces). Heavy, Rinse (65°C), Drying, Wash (45°C), Rinse, 5/25g, 10.7, 11.5, Rinse (45°C), Drying, (1 or 2 pieces). Wash (65°C), Rinse, 30g, Rinse (65°C), Drying, (1 or 2 pieces), 90 mins. Pre-wash, Wash (42°C), Rinse, 5/25g, 125, 30, 0.9, 0.6, 14.5, 11.5, (1 piece). Glass, Rapid, Rinse (60°C), Drying, Wash (40°C), Rinse, 25g, Rinse (45°C), 20.
- Page 23: Starting a cycle wash involves drawing out the lower and upper basket, loading the dishes, and pushing them back. It is recommended to load the lower basket first, then the upper one. Pour in the detergent and ensure the power supply is connected. Make sure that the water supply is turned on to full pressure. Close the door and press the Power button to switch on the machine. Choose a program and press the Start/Pause button to begin the cycle. A wash cycle can only be changed if it has been running for a short time. If the detergent has already been released, the dishwasher needs to be reset and the detergent dispenser refilled. To reset the dishwasher, press the Start/Pause button to pause the washing, then press the Program button for more than 3 seconds to enter standby mode. Select the desired program and press the Start/Pause button to resume the cycle.
- Page 24: Forget to add a dish? A forgotten dish can be added any time before the detergent dispenser opens. Press the Start/Pause button to pause the washing. After the spray arms stop working, you can open the door completely. Add the forgotten dishes. Close the door. Press the Start/Pause button after 10 seconds, the dishwasher will start. It is dangerous to open the door mid-cycle, as hot steam may scald you.
- Page 25: Maintenance and cleaning External care Clean the door seals regularly with a soft damp cloth to remove food deposits. Food and drink residues may drip onto the sides of the dishwasher door. These surfaces are outside the wash cabinet and are not accessed by water from the spray arms. The control panel should be wiped with a soft damp cloth only. To avoid penetration of water into the door lock and electrical components, do not use a spray cleaner of any kind. Never use abrasive cleaners or scouring pads on the outer surfaces. The filtering system in the base of the wash cabinet retains coarse debris from the washing cycle. Check the condition of the filters regularly and clean them if necessary under running water. Pictures are only for reference; different models of the filtering system and spray arms may be different.
- Page 26: Main filter Coarse filter Fine filter Hold the coarse filter and rotate it anticlockwise to unlock the filter. Lift the filter upwards and out of the dishwasher. The fine filter can be pulled off the bottom of the filter assembly. Larger food remnants can be cleaned by rinsing the filter under running water. Reassemble the filters in the reverse order of the disassembly. WARNING: Do not over tighten the filters. Never use the dishwasher without filters in place.
- Page 27: Spray arms need to be cleaned regularly to prevent clogging from hard water chemicals. To clean the spray arms, follow specific instructions. To remove the upper spray arm, hold the nut and rotate the arm clockwise. To remove the lower spray arm, pull it out upward. Wash the arms in soapy warm water and use a soft brush to clean the jets. Replace the spray arms after rinsing them thoroughly.
- Page 28: Caring for the dishwasher involves taking frost protection measures in winter. After washing cycles, cut off the electrical power, turn off the water supply, and disconnect the water inlet pipe. Drain the water from the inlet pipe and water valve, and remove the filter at the bottom of the tub to soak up water in the sump. After every wash, turn off the water supply and leave the door slightly open to prevent moisture and odors. Always remove the plug from the socket before cleaning or performing maintenance. Do not use solvents or abrasive cleaning products; use a cloth with warm soapy water instead. For stains in the interior, use a cloth dampened with water and vinegar or a dishwasher-specific cleaning product. When not in use for a long time, run a wash cycle empty, remove the plug, turn off the water supply, and leave the door slightly open. If moving the appliance, keep it in a vertical position; it can be laid on its back if necessary. Periodic cleaning of seals with a damp sponge will help prevent odors from trapped food.
- Page 29: Troubleshooting tips can help avoid unnecessary service calls. Check for a blown fuse or tripped circuit breaker if the dishwasher doesn't start. Ensure the power supply is turned on and the dishwasher door is securely closed. Verify that the power cord is properly plugged into the wall socket. Low water pressure may indicate improper connection or that the water is turned off. Make sure the dishwasher door is properly closed and latched. Inspect the drain hose for twists or traps that may impede drainage. A clogged filter can prevent water from being pumped out of the dishwasher. Check the kitchen sink for clogs, as this may require a plumber. Using the wrong detergent can cause suds; use only special dishwasher detergent.
- Page 30: Problem Possible causes What to do Spilled rinse-aid. Always wipe up rinse-aid spills immediately. Stained tub interior Detergent with colourant may have been used. Make sure that the detergent has no colourant. White film on inside surface Hard water minerals. To clean the interior, use a damp sponge with dishwasher detergent and wear rubber gloves. Rust stains on cutlery The affected items are not corrosion resistant. The items should be corrosion resistant. Knocking noise in the dishwasher A spray arm is knocking against an item in a basket. Interrupt the program and rearrange the items which are obstructing the spray arm. Rattling noise in the dishwasher Items of crockery are loose in the dishwasher. Interrupt the program and rearrange the items of crockery. Knocking noise in the water pipes This may be caused by on-site installation or the cross-section of the piping. This has no influence on the dishwasher function. The dishes are not clean The dishes were not loaded correctly. See notes in “Loading & unloading your dishwasher”. The program was not powerful enough. Select a more intensive program.
- Page 31: Problem: The dishes are not clean. Possible Causes: Not enough detergent was dispensed. What To Do: Use more detergent, or change your detergent. Possible Causes: Items are blocking the movement of the spray arms. What To Do: Rearrange the items so that the spray can rotate freely. Possible Causes: The filter combination is not clean or is not correctly fitted in the base of the wash cabinet. What To Do: Clean and/or fit the filter correctly. Clean the spray arm jets. Possible Causes: Combination of soft water and too much detergent. What To Do: Use less detergent if you have soft water and select a shorter cycle to wash the glassware. Problem: Cloudiness on glassware. Possible Causes: Aluminium utensils have rubbed against dishes. What To Do: Use a mild abrasive cleaner to eliminate those marks. Problem: Black or grey marks on dishes. What To Do: Re-load the dishes properly. Problem: The dishes aren't drying. Possible Causes: Improper loading. What To Do: Load the dishwasher as suggested in the directions. Possible Causes: Too little rinse-aid. What To Do: Increase the amount of rinse-aid/refill the rinse-aid dispenser. Problem: Dishes are removed too soon. What To Do: Do not empty your dishwasher immediately after washing. Open the door slightly to let steam escape.
- Page 32: Problem The dishes aren't drying. Possible Causes Wrong program has been selected. Use of cutlery with a low-quality coating. What To Do Choose a program with a long washing time. Cutlery or dishes of this type are not suitable for washing in the dishwasher. Error Codes If there is a malfunction, the dishwasher will display error codes to identify these. WARNING If overflow occurs, turn off the main water supply before calling a service. If there is water in the base pan because of an overfill or small leak, the water should be removed before restarting the dishwasher.
- Page 33: Height (H) is 845mm. Width (W) is 598mm. Depth (D1) is 600mm with the door closed. Depth (D2) is 1175mm with the door opened 90°.
- Page 34: Product fiche Manufacturer Type / Description Standard place settings Energy efficiency class Water consumption class Standard cleaning cycle Energy consumption of the standard cleaning cycle Noise level Power consumption
- Page 35: Page 35

FISHER PAYKEL HDW13V1S1 Dishwasher
BOSCH SMV2ITX18G Dishwasher

rhima RU-40 Underbench Dishwasher

BOSCH SMV2HTX02G Fully Integrated Dishwasher

BOSCH SMS6ECI15E Dishwasher

BOSCH SHX78CM2N 24 Dishwasher

FISHER AND PAYKEL DD60SHI9 Dish Drawer Dishwasher

CMA DISHMACHINES CMA-180 VL Dishwasher

IKEA 905.681.49 OSTVEDA Dishwasher

ZLINE Kitchen DWMT Monument Dishwasher