×
- 1. Dishwasher User Manual (Dw60**7***** Series)
- 2. Preparation (Connecting Smartthings (wi-fi Model Only) → Registering The Product / Reading The Manual / Connecting To Services)
- 3. Safety Information (Installation → Before You Start → Settings → Troubleshooting)
- 4. Cycle Chart (Transportation/relocation → Protection Against Frost → Disposing The Dishwasher And Helping The Environment → Specifications)
- 5. Safety Information (What You Need To Know About Safety Instructions → Important Safety Symbols)
- 6. Safety Information (Important Safety Precautions → To Reduce The Risk Of Fire, Electric Shock, Or Injury To Persons When Using Your Appliance, Follow Basic Precautions, Including The Following:)
- 7. For Appliances With Ventilation Openings In The Base (Children Of Less Than 3 Years Should Be Kept Away From Appliance Unless Continuously Supervised → Caution: In Order To Avoid A Hazard Due To Inadvertent Resetting Of The Thermal Cut-out → Knives And Other Utensils With Sharp Points Must Be Loaded In The Basket With Their Points Down Or Placed In A Horizontal Position → This Appliance Is Solely Intended To Be Used In Household And Similar Applications)
- 8. Safety Information (Instructions When Using Your Dishwasher → Correct Usage Of Detergent And Rinse Aid → Loading Cutlery And Utensils → Plastic Items And Dishwasher Safety)
- 9. Instructions For Protecting Your Children (Instructions For Installing Your Dishwasher)
- 10. Safety Information (Installation And Maintenance → Electrical Safety Requirements → Waterproof System Protection → Repairs And Authorized Service)
- 11. In Countries Where There Are Areas Which May Be Subject To Infestation By Cockroaches Or Other Vermin, Pay Particular Attention To Keeping T…
- 12. Installation Requirements (Power Supply → Grounding → Water Supply → Aqua Stop)
- 13. Drain (Flooring → Ambient Temperature → Test Run → Final Check)
- 14. Installation (Built-in Installation Under The Sink (for Free Standing Model) → Preparation)
- 15. Step-by-step Installation (Select A Location → Installation In A New Location)
- 16. Installation (Check The Water Line → Arrange The Hoses)
- 17. Install The Custom Panel (Fs (bespoke, Dw60*b750f**) Models)
- 18. Installation
- 19. Level The Dishwasher (Caution)
- 20. Installation (Connect The Drain Hose → Caution)
- 21. Attach The Trim
- 22. Installation (Smartthings (applicable Models Only) → Wi-fi Connection → Log In → To Register Your Device To Smartthings)
- 23. Dishwasher App (Integrated Control → Note → Smartthings App Compatibility → Compliance And Declaration)
- 24. Installation (Wi-fi → Smart Control → Energy Monitoring → My Favorite)
- 25. Open Source Announcement (Open Source License Information)
- 26. Before You Start (Dishwasher At A Glance)
- 27. Caution (Unsuitable Items For The Dishwasher → Note)
- 28. Before You Start (Basic Use Of Racks → Height Adjustment → Upper Rack Removal)
- 29. Loading Dishes (Lower Rack → Using The Folding Tines)
- 30. Before You Start (Upper Rack → Guide Tines)
- 31. Cutlery Rack (Using The Glass Support)
- 32. Before You Start (Detergent Compartment → Filling The Detergent)
- 33. If The Items Are Heavily Soiled, Pour A Small Amount Of Detergent Onto The Door For Better Cleaning Results.
- 34. Before You Start (Rinse Aid Reservoir → Filling The Rinse Aid)
- 35. Settings (Sound → Brightness → Dose Per Rinse → Auto Release Dry)
- 36. Before You Start (Auto Release Dry → To Cancel Your Changes)
- 37. Operations (Control Panel → Power → Cycle → Half Load)
- 38. Operations (Indicators → Rinse Refill Indicator → Ai Energy Mode Indicator → Wi-fi Indicator)
- 39. Cycle Overview (Auto → Eco → Intensive → Delicate → Express)
- 40. Operations (Download Course (applicable Models Only) → Pots And Pans → Plastic → Baby Care)
- 41. Simple Steps To Start (Delay Start)
- 42. Maintenance (Cleaning → Exterior → Interior → Nozzles)
- 43. Upper Nozzle (Lower Nozzle → Internal Cleaning)
- 44. Maintenance (Filter)
- 45. Remove Any Dirt And Impurities From The Micro Filter And The Coarse Filter. (Rinse Both Filters With Running Water, And Then Dry Well. → Reinsert The Filter, And Then The Coarse Filter. → Turn The Filter Handle Clockwise To Lock. → Make Sure The Coarse Filter Is Closed Properly.)
- 46. Maintenance (Cleaning The Drain Pump → Long-term Care)
- 47. Troubleshooting (Checkpoints)
- 48. Troubleshooting (Symptom → Possible Cause → Action)
- 49. Symptom (Possible Cause → Action)
- 50. Troubleshooting (Information Codes → Water Supply Check → Pcb Communication Check → Drain Pump Check)
- 51. Cycle Chart (Water Consumption (l) → Energy Consumption (kwh) → Cycle Time (min.) → Cycle Sequence)
- 52. Cycle Chart (Download Cycle → Baby Care → Cycle → Energy Consumption)
- 53. Transportation/relocation (Caution → Protection Against Frost → Disposing The Dishwasher And Helping The Environment)
- 54. Specifications (Model → Type → Power → Dimension)
- 55. For Standard Test (Washing Capacity: 15 Place Settings → Test Standard: As/nzs:2007 → Drying Condition: Auto Door Open (more Than 110 Mm) → For The Arrangement Of The Items, Refer Below Figures)
- 56. Questions Or Comments? (Country → Toll Free Numbers: → Dedicated Hotline For Mobile Phones: → All Products :)
×
Samsung DW60 7 Series Dishwasher
Installation
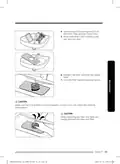
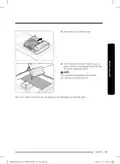
4. Unpack the caps and screws (two for
each) included in the product package.
5. Tighten the screws on either side of the
dishwasher.
NOTE
When tightening the screw on either side,
make sure to check the gap between either
side as the custom door may lean in either
side.
6. Insert the caps on either side. Make sure
the rib of the cap fits in the hole of the
dishwasher in the right direction.
7. This is the completion of mounting the
custom panel.
18 English
DW60BG750FSL_SA_DD68-00250K-01_EN.indd 18
2023-02-27 오후 1:51:30
| General | Details |
|---|---|
| Name | Samsung DW60 7 Series Dishwasher |
| Make | Samsung |
| Language | English |
| Filetype | PDF (Download) |
| File size | 10.26 MB |

SAMSUNG DW80N3030UW Front Dishwasher

SAMSUNG DW90F89 Dishwasher

SAMSUNG DW80BB70 Dishwasher

SAMSUNG DW50T6060U Dishwasher

SAMSUNG DW80BB70 Series Dishwasher

SAMSUNG DW80CB5450 Dishwasher
Samsung DW60M5062 Dishwasher

SAMSUNG DW9000F Dishwasher

SAMSUNG DW60R2014 Wide 12 Place Dishwasher
SAMSUNG DW60H9950FW-SA Dishwasher

BOSCH SHE41CM6N Dishwasher

BOSCH SMI4EAS23E Dishwasher

FRIGIDAIRE GDSH4715AF Tub Dishwasher

Whirlpool Dishwashers Safety

KitchenAid KDTF324PPA Dishwasher

BOSCH SMV4EB804E Dishwasher

beko BDFN26521XQ Dishwasher

FISHER PAYKEL DW60UN2B2 Built Under Dishwasher

Omega ODWF6014X Dishwasher

GE APPLIANCES GDT650SYV Interior Dishwasher with Hidden Controls
Table of Contents
- 1. Dishwasher User Manual - Dw60**7***** Series →
- 2. Preparation - Connecting Smartthings (wi-fi Model Only) →
- 3. Safety Information - Installation →
- 4. Cycle Chart - Transportation/reloc... →
- 5. Safety Information - What You Need To Know About Safety Inst... →
- 6. Safety Information - Important Safety Precautions →
- 7. For Appliances With Ventilation Openings In The Base - Child... →
- 8. Safety Information - Instructions When Using Your Dishwasher →
- 9. Instructions For Protecting Your Children - Instructions For... →
- 10. Safety Information - Installation And Maintenance →
- 11. In Countries Where There Are Areas Which May Be Subject To I... →
- 12. Installation Requirements - Power Supply →
- 13. Drain - Flooring →
- 14. Installation - Built-in Installation Under The Sink (for Fre... →
- 15. Step-by-step Installation - Select A Location →
- 16. Installation - Check The Water Line →
- 17. Install The Custom Panel - Fs (bespoke, Dw60*b750f**) Models →
- 18. Installation →
- 19. Level The Dishwasher - Caution →
- 20. Installation - Connect The Drain Hose →
- 21. Attach The Trim →
- 22. Installation - Smartthings (applicable Models Only) →
- 23. Dishwasher App - Integrated Control →
- 24. Installation - Wi-fi →
- 25. Open Source Announcement - Open Source License Information →
- 26. Before You Start - Dishwasher At A Glance →
- 27. Caution - Unsuitable Items For The Dishwasher →
- 28. Before You Start - Basic Use Of Racks →
- 29. Loading Dishes - Lower Rack →
- 30. Before You Start - Upper Rack →
- 31. Cutlery Rack - Using The Glass Support →
- 32. Before You Start - Detergent Compartment →
- 33. If The Items Are Heavily Soiled, Pour A Small Amount Of Dete... →
- 34. Before You Start - Rinse Aid Reservoir →
- 35. Settings - Sound →
- 36. Before You Start - Auto Release Dry →
- 37. Operations - Control Panel →
- 38. Operations - Indicators →
- 39. Cycle Overview - Auto →
- 40. Operations - Download Course (applicable Models Only) →
- 41. Simple Steps To Start - Delay Start →
- 42. Maintenance - Cleaning →
- 43. Upper Nozzle - Lower Nozzle →
- 44. Maintenance - Filter →
- 45. Remove Any Dirt And Impurities From The Micro Filter And The... →
- 46. Maintenance - Cleaning The Drain Pump →
- 47. Troubleshooting - Checkpoints →
- 48. Troubleshooting - Symptom →
- 49. Symptom - Possible Cause →
- 50. Troubleshooting - Information Codes →
- 51. Cycle Chart - Water Consumption (l) →
- 52. Cycle Chart - Download Cycle →
- 53. Transportation/reloc... - Caution →
- 54. Specifications - Model →
- 55. For Standard Test - Washing Capacity: 15 Place Settings →
- 56. Questions Or Comments? - Country →