Home > Westinghouse > Westinghouse WSF6604WA Dishwasher
Westinghouse WSF6604WA Dishwasher


| General | Details |
|---|---|
| Name | Westinghouse WSF6604WA Dishwasher |
| Make | Westinghouse |
| Language | English |
| Filetype | PDF (Download) |
| File size | 8.02 MB |


Westinghouse WSF6602XB 14 Place Dishwasher

Westinghouse WSF6606 Dishwasher

Westinghouse WSF6604XB Dishwasher

Westinghouse WSF6606XB Dishwasher

Westinghouse WSU6608XB Dishwasher

Westinghouse WSF6608XB Dishwasher

Westinghouse WSF6608KXB Sensor Wash Dishwasher

Westinghouse WSF6602WB Dishwasher

Westinghouse WSF6606KXB Dishwasher

Westinghouse WSF6604WB Dishwasher

Westinghouse WSF6604WA Dishwasher Overview
Summary of Contents
- Page 1: User manual for dishwasher models WSF6604WA and WSF6604XA.
- Page 2: Congratulations on the purchase of your new Westinghouse dishwasher. Before you use the dishwasher, we recommend that you read through the whole user manual which provides the description of the dishwasher and its functions. To avoid the risks that are always present when you use an electrical appliance, it is important that the dishwasher is installed correctly and that you read the safety instructions carefully to avoid misuse and hazards. We recommend that you keep this instruction booklet for future reference and pass it on to any future owners. Please read the user manual carefully and store it in a handy place for later reference. The symbols you will see in this booklet have specific meanings regarding safety and appliance use. Adherence to the directions for use in this manual is extremely important for health and safety. Failure to strictly adhere to the requirements in this manual may result in personal injury, property damage, and affect your ability to make a claim under the manufacturer's warranty. Products must be used, installed, and operated in accordance with this manual.
- Page 3: General warnings Please read the user manual carefully and store it in a handy place for later reference. It is important to use your appliance safely. Check these safety points before using your appliance. You must read these warnings carefully before installing or using the appliance. Do not change the specification of this appliance. The operating water pressure must be between 0.3 and 10 bar. Children and vulnerable people safety. Put knives and cutlery with sharp points in the cutlery basket with the points down. This appliance can be used by children aged from 8 years and above if they have been given supervision or instruction. Before maintenance, turn the appliance off and disconnect the plug from the mains. Do not use water spray and steam to clean the appliance.
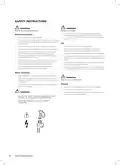
- Page 4: Safety instructions highlight the risks of fire and electrical shock. If the water inlet hose is damaged, disconnect the mains plug immediately and contact the Authorised Service Centre for replacement. The appliance must be earthed, and the electrical information on the rating plate should match the power supply. Do not sit or stand on the open door of the appliance. Always use a correctly installed shockproof socket and avoid multi-plug adapters and extension cables. Dishwasher detergents are dangerous; follow the safety instructions on the packaging. Do not drink or play with the water in the appliance, and do not remove dishes until the program is complete. Connect the mains plug only at the end of installation and ensure access to it afterward. The appliance can release hot steam if the door is opened during operation. Before connecting to new or unused pipes, let the water flow until clean to avoid risks of injury or suffocation.
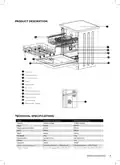
- Page 5: Product description includes various components such as the worktop, upper spray arm, lower spray arm, filters, air vent, rinse aid dispenser, detergent dispenser, lower basket, and upper basket. Technical specifications detail the models WSF6604WA and WSF6604XA, both freestanding. The capacity is 13 place settings with a height of 850mm. The depth is 598mm for both models. The net weight is 47kg. Electrical input is 220-240 V, 50 Hz with a current of 10 A. Total power consumption is 1900W. Water supply pressure ranges from 0.03 MPa (0.3 bar) to 1 MPa (10 bar). The maximum water temperature is 60°C with a flow rate of 10L/min.
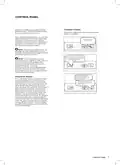
- Page 6: Control panel Start/Pause key: When you press the Start/Pause key, the program you have selected will start operating and the washing light will be on. On/Off button: It turns on/off the energy of the machine when it is pushed. Program selection buttons: It is used for program selection with up/down buttons. Program monitoring lights: You can monitor the program flow with the program lights on the control panel. Tablet option button: It is used for selection for tablet option. The Tablet Detergent Indicator will remain on for as long as it is selected. Delay button: It is used for activation of delay timer. Rinse aid indicator: Check the rinse aid missing warning indicator light to know if the amount of rinse aid is enough. Child lock feature led: This feature is activated by pressing both tablet and delay timer buttons at the same time. Half load button: You can shorten the durations of the programs and reduce energy and water consumption by using half load.
- Page 7: Control panel Changing a program Switch the machine on by pressing the On/Off button. Press the Start/Pause button to start the selected program. If the door of your machine is opened while a program is in operation, the Start/Pause light will flash. Press the half load button to activate the Half Load function. After the program stops, select a new program using the program Selection Up/Down buttons. If an extra feature is used, this feature will remain active on the next selected program. To cancel this feature on the newly selected wash program, turn the machine off and on. Delaying the program Press the Delay button to delay the start time of a program for 3, 6, or 9 hours. During a delay, the light corresponding to the remaining time is switched on.
- Page 8: Control panel Cancelling a program Follow the steps below to cancel a program while in operation. Press and hold the Start/Pause button for 3 seconds. When the End light illuminates, press the On/Off button to switch your machine off. While the program is cancelling, the End led will blink. Do not open the door before the program is complete. Leave the door slightly open at the end of a wash program to speed up the drying process. You can add the programs and options that you consider are best for your dishes and you frequently use. Select the program that you want to select using the program button. When you press “up” and “down” buttons together after completing your program and option selection, your favourite program and option will be saved. Press the “Up” button for 3 seconds to select your favourite program.
- Page 9: Program table outlines various washing programs and their durations. Prewash is a 15-minute program for rinsing items before washing. Fast program lasts 30 minutes at 40°C for lightly soiled items without drying. Delicate program is 74 minutes at 40°C for lightly soiled delicate items. Eco program runs for 195 minutes at 50°C and is recommended for normally soiled loads. TimeSave program lasts 50 minutes at 65°C for lightly to normally soiled items with reduced drying. Heavy program is 117 minutes at 65°C for heavily soiled items like pots. Program duration may change based on the amount of dishes, tap water, ambient temperature, and selected additional functions. Only use powder detergent in short programs, which do not include a drying step. For drying assistance, partially open the door after the program has finished.
- Page 10: Hints and tips for troubleshooting common issues with the machine include checking for partial food waste on dishes, ensuring dishes are correctly placed, and confirming the door is shut. If the program won't start, verify the plug connection, check indoor fuses, and ensure the water inlet tap is turned on. White stains on dishes may indicate low detergent use, low rinse aid dosage, or high water hardness. For drying issues, ensure a drying program is selected and that rinse aid dosage is adequate. Rust on dishes can result from adding detergent to a wet compartment or using low-quality stainless steel dishes. If water remains inside the machine, check for a clogged drain hose and ensure filters are clean. To improve drying results, open the door slightly at the end of the program and allow items to cool before unloading. If the machine stops during operation, it may be due to a power or water inlet failure. For maintenance, unplug the machine when not in use and keep the interior clean to prevent unpleasant smells. Correct loading of dishes can enhance washing and drying performance while reducing energy consumption.
- Page 11: Installation Positioning the machine Only turn the locking nut to secure the hose – do not turn the hose. Ensure that there is adequate space to enable loading and unloading of the dishes. Do not put your machine in any location where the ambient temperature can fall below 0°C. The first time you use the appliance, make sure that there is no leakage. After the connections are made, the tap should be turned on fully and checked for water tightness. For the safety of your machine, make sure to always turn off the water inlet tap after each wash program is finished. Make sure that the water inlet and outlet hoses do not get squeezed while positioning the machine. Always use new hoses when you connect the appliance to the water supply. Ensure that the indoor plumbing is suitable for installing a dishwasher and complies with AS/NZS 3500.
- Page 12: Installation Water drain hose If you connect the water drain hose to a trap spigot under the sink, remove the plastic membrane. The plug of your machine should be connected to an earthed outlet that supplies suitable voltage and current. The indoor fuse current value should be 10-16 A. Your machine is designed for 220-240 V. The machine should not be plugged in during installation. Always use the molded plug supplied with your machine. Running in low voltage will cause a decline in washing quality. Maximum drain hose length is 4m. Longer hose length will prevent correct draining and result in poor wash performance. If you wish to fit your machine undercounter, check whether you have sufficient space under your countertop. To ensure the stability of the dishwasher for an underbench installation, any gap between the dishwasher and the underside of the benchtop should be bridged with a packing piece. To remove the worktop, remove the screws that hold the worktop located at the rear of the machine.
- Page 13: Installation instructions include details on timber, wedging pieces, and filler pieces cut to suit installation. Ensure a 3mm gap for the bench top. Adjust the machine feet according to the slope of the floor. Fit the machine by pushing it under the counter without crushing or bending the hoses. After removal of the worktop, verify that the opening for the dishwasher meets specified dimensions.
- Page 14: Preparing for use You may have to add more detergent into your machine, depending on the degree of soil and the water hardness in your area. Use a detergent specifically designed for use in domestic dishwashers. Detergent should be put into the compartment prior to starting the machine. Keep your detergents in cool, dry places out of reach of children. Do not fill detergent into the detergent compartment more than required. If your dishes are from the previous day and there is dried food waste on them, pour 5cm³ detergent onto the base of the door and start your machine. Detergent manufacturers produce combined detergents called “2 in 1”, “3 in 1” or “5 in 1”. Always make sure to check the specifications of the product you will use or whether or not it is a combined product. When using combined detergents, observe the instructions on packaging. Contact the detergent manufacturer if you are not obtaining good wash results after having used 2 in 1 or 3 in 1 detergents.
- Page 15: In order to set rinse aid level, follow below steps. Turn on the machine by pressing the On/Off button. Press the Up button for at least 5 seconds immediately after the machine is turned on. Solubility of the tablet detergents produced by different companies can vary depending on the temperature and time. It is more suitable to use powder detergents in short programs. Press Up or Down button to increase or decrease the hardness level. Fill the rinse aid compartment. If the dishes are not drying properly or are spotted, increase the level. Use only those rinse aid materials which are allowed for use in the machine. Be careful not to overfill the rinse aid compartment and wipe up any spills.
- Page 16: Top basket height adjustment while it is empty. Turn the Rail Stop Clips to the sides to open them, then pull out and remove the basket. Change the position of the wheels, then reinstall the basket to the rail. When the upper basket is in the higher position, large items such as pans can be placed on the lower basket. If your dishes are correctly placed in the dishwasher, you will be using it in the best way in terms of energy consumption, washing and drying performance. There are two separate baskets for you to load your dishes into your machine. The upper basket has been designed for tea plates, dessert plates, salad bowls, cups, and glasses. Do not lean long glasses against one another or they won't remain steady and can be damaged. Always place long-handle and sharp-pointed dishes with their sharp points facing down or horizontally on the baskets. Place your dishes into your machine in a way that they will not prevent the upper and lower spray arms from spinning.
- Page 17: Loading your dishwasher. Alternative basket loads. Lower basket. Top basket.
- Page 18: The movable cutlery basket can slide between the front and rear wires of the bottom basket. The folding racks are designed so that large items, such as pots and pans, can be easily placed in the dishwasher. Each section can be folded separately. The racks can be folded down or raised up.
- Page 19: Loading your dishwasher. Alternative basket loads. Lower basket. Top basket. Important. Examples of incorrect loading.
- Page 20: Maintenance and cleaning are crucial for prolonging the machine's service life. Oil and lime may accumulate in the washing section; use a high-temperature program or a specialty cleaner if needed. Regularly clean the seals in the machine door with a dampened cloth. Clean the filters and spray arms at least once a week and check for clogs. Unplug the machine and turn off the tap before cleaning. Use a fine cleaning material and a dampened cloth; avoid hard materials. Check for food waste in the coarse and fine filters and clean them thoroughly. The inlet hose filter prevents contamination from the water supply; check and clean it regularly. Never operate the dishwasher without filters, as incorrect fitting reduces washing effectiveness. Clean filters are essential for the proper functioning of the machine.
- Page 21: Troubleshooting Possible fault: Insufficient water Make sure the water inlet tap is open and water is flowing. Separate the inlet hose from the tap and clean the filter of the hose. Contact for service if the error continues. Possible fault: Continuous water input Close the tap and contact for service. Water discharge hose and filters may be clogged. Cancel the program. Possible fault: Inability to discharge water If the error continues, contact for service. Possible fault: Faulty heater and heater sensor Unplug the machine and close the tap. Contact for service. Possible fault: Overflow Contact for service. Possible fault: Faulty electronic card Contact for service.
- Page 22: Warranty for sales in Australia and New Zealand outlines the terms and conditions for Westinghouse dishwashers. This document is important and should be kept with proof of purchase for future reference regarding manufacturing defects. The warranty is in addition to rights under the Australian Consumer Law. Claims under this warranty require proof of purchase and adherence to specific steps outlined in the document. The warranty period lasts for 24 months from the original purchase date in both Australia and New Zealand. Electrolux is not liable under the warranty for damages caused by misuse, negligence, or improper installation. During the warranty period, Electrolux will repair or replace defective parts at no extra charge. Exclusions from the warranty include perishable parts, parts not supplied by Electrolux, and cosmetic damage that does not affect operation. For service inquiries, customers should ensure they follow the specified steps before contacting support. The warranty applies only to new appliances purchased and used in Australia or New Zealand.
- Page 23: Page 23
- Page 24: For more information on all Westinghouse appliances, or for dimension and installation information, call into your retailer, phone or email our customer care team or visit our website. Westinghouse are trademarks of Westinghouse Electric Corporation. Used under license by Electrolux Home Products Pty Ltd. All Rights Reserved. © 2019 Electrolux Home Products Pty Ltd.

FISHER and PAYKEL DD60SDFTX9 Tall, Dishwasher

Miele 12 668 930 Dishwasher

Porter Charles DWTPC5FC Dishwasher

FISHER PAYKEL DD60SCHW9 Dishwasher

FISHER AND PAYKEL DW60U6I1 Dishwasher

BOSCH SMV26DX00T Dishwasher

CMA H-1X Undercounter Dishwasher

FISHER AND PAYKEL DW60FC1X2 Dishwasher

baridi DH224 Mini Tabletop Dishwasher

UNIQUE APPLIANCES UGP-24CR DW W Dishwasher