Home > Westinghouse > Westinghouse WSF6606XB Dishwasher
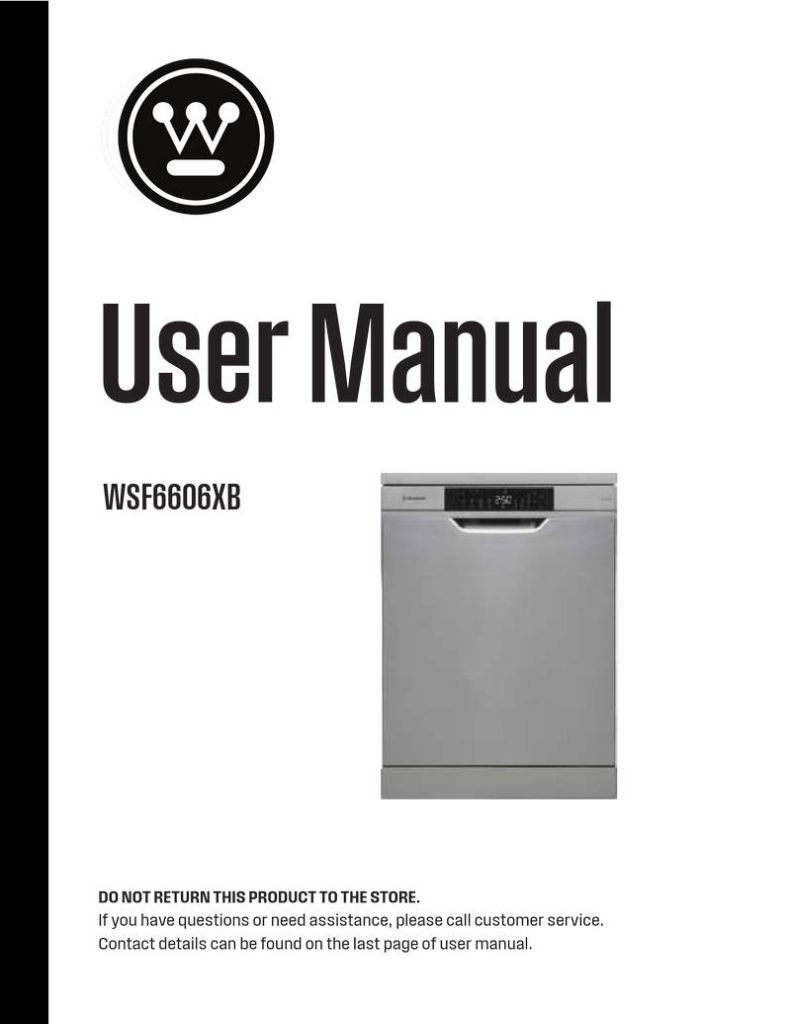
Westinghouse WSF6606XB Dishwasher


User Manual
WSF6606XB
DO NOT RETURN THIS PRODUCT TO THE STORE.
If you have questions or need assistance, please call customer service.
Contact details can be found on the last page of user manual.

| General | Details |
|---|---|
| Name | Westinghouse WSF6606XB Dishwasher |
| Make | Westinghouse |
| Language | English |
| Filetype | PDF (Download) |
| File size | 0.8 MB |


Westinghouse WSF6602XB 14 Place Dishwasher

Westinghouse WSF6606 Dishwasher

Westinghouse WSF6604WA Dishwasher

Westinghouse WSF6604XB Dishwasher

Westinghouse WSF6604WB Dishwasher

Westinghouse WSU6608XB Dishwasher

Westinghouse WSF6608XB Dishwasher

Westinghouse WSF6608KXB Sensor Wash Dishwasher

Westinghouse WSF6602WB Dishwasher

Westinghouse WSF6606KXB Dishwasher
Westinghouse WSF6606XB Dishwasher Overview
Summary of Contents
- Page 1: User manual for WSF6606XB. Do not return this product to the store. If you have questions or need assistance, please call customer service. Contact details can be found on the last page of the user manual.
- Page 2: Congratulations and thank you for choosing our product. We are sure you will find your new appliance a pleasure to use and a great asset to your cooking. Before you use the appliance, we recommend you read through the whole user manual which provides important safety instructions. This appliance complies with the requirements of Australian Standard AS/NZ 60335.2.5. To make the best use of your new appliance, it is important that the appliance is installed correctly and that you read the safety instructions carefully to avoid misuse and hazards. This appliance is intended to be used in household and similar applications such as staff kitchen areas in shops, offices, and other working environments. Most of the packaging materials are recyclable. Please dispose of those materials through your local recycling depot or by placing them in appropriate collection containers. If you wish to discard this product, please contact your local authorities and ask for the correct method of disposal. Adherence to the directions for use in this manual is extremely important for health and safety. Failure to strictly adhere to the requirements in this manual may result in personal injury, property damage, and affect your ability to make a claim under the manufacturer's warranty. You may not be able to claim on the manufacturer's warranty in the event that your product fault is due to failure to adhere to this manual.
- Page 3: IMPORTANT SAFETY INSTRUCTIONS Check whether the indoor electrical fuse system is connected according to the regulations. These warnings have been provided in the interest of safety. You must read them carefully before installing or using the appliance. Make sure that the electrical information on the rating plate is the same as the power supply. Always use a correctly installed shockproof socket. Connect the mains plug to the mains socket only at the end of the installation. Do not pull the mains cable to disconnect the appliance. Always pull the mains plug. Pay special attention and make sure that the machine does not crush the power cord. Do not use water spray and steam to clean the appliance. Only use detergents and rinse aids which are produced specifically for dishwashers. The machine door should not be opened while the machine is in operation, to avoid the risk of hot water spraying out.
- Page 4: Safety information and recommendations Do not leave your dishwasher’s door open, this may lead to accidents and injury. Place knives and other sharp ended objects in the cutlery basket in the point down position. This appliance is not intended for use by persons with reduced physical, sensory or mental capabilities unless supervised. Some dishwasher detergents are strongly alkaline and can be extremely dangerous if swallowed. Keep children away from the machine while it is open because there may still be residues of cleaning substances inside. Any malfunction in the machine should be repaired by qualified persons. Prior to any repair work on the machine, be sure to unplug the dishwasher from the power supply. For energy and water saving, remove coarse residues on your dishes before placing them into the machine. Use the pre-wash program only whenever necessary. Items not suitable for dishwashing include cigarette ashes, candle leftovers, and chemical substances.
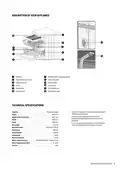
- Page 5: Description of your appliance includes various components such as the worktop, detergent and rinse-aid dispenser, lower spray arm, lower basket, upper basket with racks, upper spray arm, filters, cutlery tray, rating plate, turbo drying unit, ceiling spray rose, and control panel. Technical specifications detail the capacity of 15 place settings, height of 850 mm (820 mm without worktop), width of 598 mm, and depth of 598 mm. Electrolux reserves the right to amend design and technical specifications. The appliance should not be used with power and temperature specifications different from those indicated. The net weight of the appliance is 47.5 kg. Electricity input is 220-240 V, 50 Hz. Total power is 1900 W, with heating power at 1800 W. Pump power is 100 W and drain pump power is 30 W. Water supply pressure ranges from 0.03 MPa (0.3 bar) to 1 MPa (10 bar). Water supply temperature should be between 5 - 60°C, with a current of 10 A.
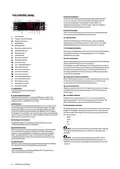
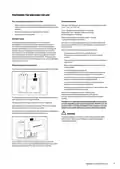
- Page 6: The control panel features various indicators and buttons essential for operation. Child lock is activated by pressing the select button for about 3 seconds, with indicators showing its status. The rinse aid indicator alerts when the rinse aid level is low, prompting a refill. The tablet indicator is used when selecting a combined detergent that includes additional components. The extra hygiene function increases wash temperature for maximum hygiene, indicated by a specific light. The half load function allows selection of which dishwasher area to wash, with an indicator showing its activation. The energy save option enables autodoor opening at the end of the program to enhance drying efficiency. The extra fast function reduces program duration for economical water usage, indicated by a light. The extra silent function minimizes sound pressure during operation, also indicated by a light. The delay button allows postponing the program start time, with an indicator showing the selected delay.
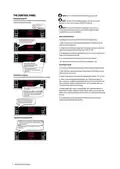
- Page 7: The control panel Do not open the door before the program ends. If you would like to change the program when the machine is already running. At the end of the washing program, you can leave the door of your machine ajar to hasten the drying. If the door of the machine is opened or power is cut off during washing, the program will continue when the door is closed or the power is restored. To change the buzzer sound level, follow the below steps. To activate or deactivate save power mode, follow the below steps. When Save Power Mode is activated, interior lights will turn off 2 minutes after the door is opened. During cancellation, the End light blinks. Switch your machine off with the On/Off button after the program has ended and the End light turns on.
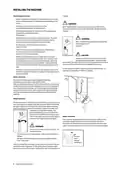
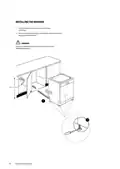
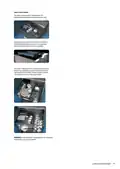
- Page 8: Installing the machine involves careful positioning to ensure proper loading and unloading of dishes. Do not place the machine in locations where the ambient temperature can fall below 5°C. Ensure adequate clearance from all sides for comfortable movement during cleaning. Always use new hoses when connecting the appliance to the water mains. The water inlet hose must be examined for deterioration at least every twelve months. A water tempering valve is required if the water temperature exceeds 60°C. Ensure that indoor plumbing complies with AS/NZS 3500.1 for dishwasher installation. Connect the water inlet hose directly to the water inlet tap, ensuring clean water flows before connection. If connecting the water drain hose to a trap spigot, remove the plastic membrane to prevent blockages. After making connections, check for leaks and ensure the water inlet tap is turned off after each wash program.
- Page 9: Installing the machine involves connecting the water drain hose either directly to the water drain hole or to the sink outlet spigot. The plug should be connected to an earthed outlet that supplies suitable voltage and current. If there is no earthing installation, a competent electrician should carry out the installation. The indoor fuse current value should be between 10-16 A. The electrical connection should be positioned between 50 cm and 110 cm above the base floor level of the dishwasher. The machine is designed for 220-240 V and should not be plugged in during installation. Maximum drain hose length is 4m; longer lengths may prevent correct draining and result in poor wash performance. The machine’s electrical cable should only be replaced by an authorized service or electrician. Always disconnect the plug when a wash program is finished for safety purposes. When disconnecting from the mains supply, always pull from the plug, not the cord itself.
- Page 10: Installing the machine involves adjusting the machine feet according to the slope of the floor. Fit the machine by pushing it under counter without letting the hoses get crushed or bent. Ensure the opening for the dishwasher meets specific dimensions.
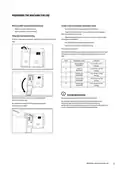
- Page 11: Preparing the machine for use involves several important steps. Check whether the electricity and water supply specifications match the installation instructions for the machine. Remove all packaging materials inside the machine. Fill the rinse aid compartment before use. Use a detergent specifically designed for domestic dishwashers, available in powder, gel, and tablet forms. Do not exceed the recommended amount of detergent to avoid etching glasses and leaving undissolved detergent. Combined detergents should be used according to the manufacturer’s instructions and are not recommended for short programs. Adjust the rinse aid setting to the correct level when switching from combined detergents. The detergent pod can hold a maximum of 40cm³ of detergent, with recommended amounts based on soil level. If encountering issues with detergents, contact the manufacturers directly for assistance.
- Page 12: Preparing the machine for use involves several steps. To set the rinse aid level, fill the rinse aid compartments and select a suitable rinse aid setting. Turn on the machine by pressing the On/Off button and press the Program button for at least 3 seconds immediately after turning on the machine. Release the program button when “rA” is shown to display the last setting level. Set the level by pushing the program button and switch off the machine to save the setting. The factory setting for rinse aid is “4”. If dishes are not drying properly, increase the rinse aid level; if blue stains form, decrease the level. Fill the compartment with rinse aid until the MAX level and close the cap. Only use rinse aid suitable for automatic dishwashers to avoid excessive foam and reduced washing performance. Wipe up any spills and remove excess rinse aid to prevent overfilling.
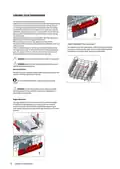
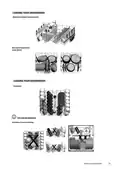
- Page 13: Loading guidelines are important for best results. Loading the dishwasher to the manufacturer's indicated capacity contributes to energy and water savings. Manual pre-rinsing of tableware items is not recommended as it increases water and energy consumption. Place cups, glasses, and small plates in the upper basket, ensuring long glasses are not leaning against each other. Long stem glasses should be leaned against the basket edge or rack. Containers should be placed with openings facing downwards to prevent water collection. Use the cutlery grid in the cutlery basket for best results. Large and very dirty items should be placed in the lower rack. Dishes and cutlery should not be stacked above each other. The upper basket has foldable racks for placing large items, and care should be taken not to obstruct the spray arms.
- Page 14: Upper cutlery basket is designed for the placement of large and small cutlery and utensils. The basket is easily removed from the dishwasher for convenience. The upper cutlery basket is composed of two pieces that can be separately removed. Removing one section of the cutlery basket allows for more space in the upper basket. Knives and other sharp objects must be placed horizontally in the cutlery basket.
- Page 15: Loading your dishwasher involves understanding the different basket positions and loads. Alternative modular basket positions can help optimize space. The lower basket is designed for larger items. The top basket is suitable for smaller and more delicate items. It's important to follow tips and information for effective loading. Examples of incorrect loading can lead to poor cleaning results.
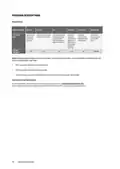
- Page 16: Program descriptions include various washing programs such as Fast 30’, Delicate, Eco, Dual Wash, Timesave 50’, and Sensorwash. Fast 30’ is suitable for lightly soiled items and offers a quick wash without drying. Delicate is designed for soiled delicate glassware on the upper rack and heavily soiled crockery on the lower rack. Eco is a standard program for normally soiled daily dishes with reduced energy and water consumption. Timesave 50’ provides a faster program for normally soiled daily dishes. Sensorwash is an auto program for normally and heavily soiled dishes. Program durations vary, with Fast 30’ at 30 minutes and Eco at 216 minutes. Program duration may change based on the amount of dishes, tap water, ambient temperature, and selected additional functions. Only use powder detergent in short programs, which do not include a drying step. To assist drying, it is recommended to partially open the door after the program has finished.
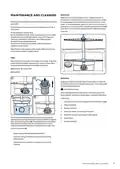
- Page 17: Spray arms Make sure that the spray holes are not clogged and that no food waste or foreign object is stuck to the spray arms. Cleaning your dishwasher is important to maintain the machine’s service life. Oil and limescale may build up in your dishwasher over time. To extend the life of your dishwasher, clean the appliance regularly each month. Wipe the door seals regularly with a damp cloth to remove any accumulated residue or foreign objects. Clean the filters and spray arms at least once a week. Large food residues or foreign objects which were not captured by the filters may block the waste water pump. When cleaning the waste water pump, ensure that you do not injure yourself on pieces of broken glass or pointed implements. Never use your dishwasher without a filter. Clean filters are necessary for proper running of the machine.
- Page 18: Failure codes and what to do in case of failure Water inlet system failure Make sure the water inlet tap is open and water is flowing. Separate the inlet hose from the tap and clean the filter of the hose. Contact for service if the error continues. Inability to discharge water Water discharge hose and filters may be clogged. Cancel the program. Heater error Unplug the machine and close the tap. The installation and repairing procedures should always be carried out by the Authorised Service Agent to avoid possible risks. The manufacturer shall not be held liable for damages that may arise from procedures carried out by unauthorized persons. Improper repairs or use of non-original spare parts may cause considerable damage and put the user at considerable risk.
- Page 19: Troubleshooting If one of the program monitor lights is on and the start/pause light is flashing, your machine’s door is open, shut the door. If the program won’t start, check if the plug is connected, check your indoor fuses, ensure the water inlet tap is turned on, and confirm the machine door is closed. If detergent residues are left in the detergent compartment, it may be due to detergent added when the compartment was wet or a large dish blocking the dispenser door. If water is left inside the machine at the end of the program, the water drain hose may be clogged, the filters may be clogged, or the program may not be finished yet. If the machine stops during a wash operation, it could be due to a power failure, water inlet failure, or the program being in standby mode. If shaking and hitting noises are heard during a wash operation, dishes may be placed incorrectly or the spray arm may be hitting the dishes. If there are partial food wastes left on the dishes, it may be due to incorrect placement, an overloaded basket, or clogged spray arms and filters. If there are whitish stains on the dishes, it could be due to a very small amount of detergent being used or rinse aid dosage set too low. If the dishes won’t dry up, a program without a dry operation may have been selected or dishes may have been unloaded too fast. If there are rust stains on the dishes, it may be due to insufficient stainless-steel quality or unhealthy mains grounding.
- Page 20: Warranty for sales in Australia and New Zealand outlines the terms and conditions for Westinghouse dishwashers. This document is important and should be kept with proof of purchase for future reference regarding manufacturing defects. The warranty is in addition to rights under the Australian Consumer Law. It applies only to new appliances purchased and used in Australia or New Zealand. The warranty period lasts for 24 months from the date of original purchase. Electrolux will repair or replace defective parts at no extra charge during the warranty period. Proof of purchase is required to make a warranty claim. Exclusions include damage due to negligence, misuse, or improper servicing. Electrolux is not liable if the appliance is used for unintended purposes or modified without authorization. For service inquiries, specific steps must be followed before contacting support.
- Page 21: Page 21


