
Whirlpool W8I HP42 L MaxiSpace Dishwasher
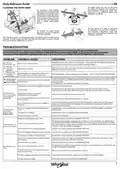


Daily Reference Guide
EN
Before using the appliance carefully read Safety
and Installation Instructions. More information about your product
available on website: docs.whirlpool.eu
THANK YOU FOR BUYING A WHIRLPOOL PRODUCT.
In order to receive a more complete assistance, please
register your appliance on: www.whirlpool.eu/register
After installation, please remember to remove all transport protection
parts from the dishwasher.
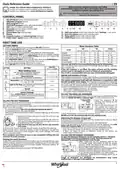
CONTROL PANEL
1. ON-OFF/Reset button with indicator light
2. PREVIOUS program button
3. NEXT program button
P
4. FAVOURITE program button with indicator light
5. Salt reservoir empty indicator light
6. Rinse Aid reservoir empty indicator light
7. DESCALE indicator light
3 sec.
1
2
3
4
5
6 7 8 9
10
11
12
13
14
15
12. Half Load option button with indicator light/ Settings - 3 sec. press
13. Extra Dry option button with indicator light
14. Delay option button with indicator light
8. Closed Water Tap indicator light
9. Display
10. Program number and remaining time indicator
11. Power Clean® option button with indicator light
15. START/Pause button with indicator light
FIRST TIME USE
SETTING MENU
Water Hardness Table
1. Switch on the appliance by pressing the ON-OFF button.
2. Hold the Settings (Half Load ) button for 3 seconds, until you hear
a beep and the display shows„SEt”.
°dH
German degrees
°fH
French degrees
°Clark
English degrees
Level
1 (soft)
3. After one second the first available setting (letter„h”) will be displayed.
4. Press PREVIOUS /NEXT to scroll through the list of available settings
0 - 6
7 - 11
0 - 10
11 - 20
21 - 29
30 - 60
61 - 90
0 - 7
8 - 14
2 (medium)
3 (average)
4 (hard)
(see table below), then press START/Pause
value of the currently selected setting.
to view and change the
12 - 16
17 - 34
35 - 50
15 - 20
21 - 42
43 - 62
5. Press PREVIOUS /NEXT to change the value, then press START/Pause
to save the new value and return to the main menu.
6. To change another setting, repeat points 4 and 5.
5 (very hard)
Only use salt that has been specifically designed for dishwashers.
After the salt has been poured into the machine, the SALT REFILL indicator
light switches off.
If the salt container is not filled, the water softener and the heating
element may be damaged as a result of limescale accumulation.
Use of salt is recommended with any type of dishwasher detergent.
7. Press ON-OFF or wait 30 seconds to exit the menu.
VALUES
(Default - in bold)
LETTER
SETTING
Water Hardness Level
(see “SETTING THE WATER HARDNESS”
and “WATER HARDNESS TABLE”)
1 | 2 | 3 | 4 | 5
WATER SOFTENING SYSTEM
Rinse Aid Level
(see “ADJUSTING THE DOSAGE OF RINSE AID”)
0 | 1 | 2 | 3 | 4 | 5
Water softener automatically reduces water hardness, consequently preventing
scale buildup on the heater, contributing also to better cleaning efficiency.
This system regenerates itself with salt, therefore it is required to refill
the salt container when empty. The frequency of regeneration depends
on the water hardness level setting - regeneration takes place once per 4-6
Eco cycles with the water hardness level set to 3. The regeneration process
occurs at the beginning of the cycle with additional fresh water.
NaturalDry (see “OPTIONS AND FUNCTIONS”)
“1”= On, “0”= Off
1 | 0
1 | 0
1 | 0
Light on the floor (see “OPTIONS AND FUNCTIONS”)
“1”= On, “0”= Off
•
•
•
Single regeneration consumes: ~3L of water;
Takes up to 5 additional minutes for the cycle;
Consumes below 0.005kWh of energy.
Sound
“1”= On, “0”= Off
Factory Settings
Press START/Pause to restore to the factory
default all the values of the settings included
in the settings menu.
FILLING THE RINSE AID DISPENSER
Rinse aid makes dish DRYING easier. The rinse aid dispenser A should be filled
when the RINSE AID REFILL indicator light in the control panel is lit.
-
1. Open the dispenser
pressing and pulling up the
tab on the lid.
2. Pour in the rinse aid (max.110
ml), making sure it does not
overflow from the dispenser.
If this happens, clean the spill
immediately with a dry cloth.
B
by
FILLING THE SALT RESERVOIR
The use of salt prevents the formation of LIMESCALE on the dishes and on
the machine’s functional components.
The salt reservoir is located in the lower part of the dishwasher (under the
lower rack on the left side).
•
•
•
It is mandatory that THE SALT RESERVOIR NEVER BE EMPTY.
It is important to set the water hardness.
Salt must be filled when the SALT REFILL indicator light
panel is lit.
A
B
on the control
3. Press the lid down until you hear a click to close it.
NEVER pour the rinse aid directly into the appliance tub.
1. Remove the lower rack and unscrew the reservoir cap
(anticlockwise).
Adjusting the dosage of rinse aid
If you are not completely satisfied with the drying results, you can adjust
the quantity of rinse aid used.
To change, follow instructions in the section “SETTING MENU”.
If the rinse aid level is set to ZERO, no rinse aid will be supplied. The LOW
RINSE AID indicator light will not be lit if you run out of rinse aid.
A maximum of 6 levels can be set according to the dishwasher model.
• If you see bluish streaks on the dishes, set a low number (0-3).
• If there are drops of water or limescale marks on the dishes, set
a mid-range number (4-5).
2. Position the funnel (see figure) and fill the salt reservoir
right up to its edge (approximately 0,5 kg); it is not un-
usual for a little water to leak out.
3. Only the first time you do this: fill the salt reservoir
with water.
4. Remove the funnel and wipe any salt residue away from the opening.
Make sure the cap is screwed on tightly so that no detergent can get into
the container during the wash program (this could damage the water
softener beyond repair).
Run a program every time as soon as you completed refilling the salt
reservoir to avoid corrosion.
FILLING THE DETERGENT DISPENSER
To open the detergent dispenser use the opening device C. Introduce
the detergent into the dry dispenser D only. Place the amount of
detergent for pre-washing directly inside the tub.
1. When measuring out the detergent refer to the
mentioned earlier information to add the proper
quantity. Inside the dispenser D, there are indica-
Setting the water hardness
To allow the water softener to work in a perfect way, it is essential that the water
hardness setting is based on the actual water hardness in your house. This infor-
mation can be obtained from your local water supplier. The factory setting is“3”.
See„WATER HARDNESS TABLE”.
D
tions to help the detergent dosing.
2. Remove detergent residues from the edges of the
To change, follow instructions in section“SETTING MENU”.
C
dispenser and close the cover until it clicks.
3. Close the lid of the detergent dispenser by pulling
it up until the closing device is secured in place.
The detergent dispenser automatically opens up at
the right time according to the program.
Usage of detergent not designed for dishwashers may cause
malfunction or damage to the appliance.
1


| General | Details |
|---|---|
| Name | Whirlpool W8I HP42 L MaxiSpace Dishwasher |
| Make | Whirlpool |
| Language | English |
| Filetype | PDF (Download) |
| File size | 8.28 MB |
 (1 votes, average: 5.00 out of 5)
 Loading...

Whirlpool 2B19 Dishwasher

Whirlpool WFO3O33PLAUS Standard Dishwasher

Whirlpool W11323304G Dishwasher

Whirlpool WH7IPC15BM60 Dishwasher

Whirlpool FINPUTSAD Dishwasher

Whirlpool W7U HS31 X Dishwasher

Whirlpool Thron Dishwasher

Whirlpool WDF332PAMS 24 Front Tall Tub Dishwasher

Whirlpool WRF540CWHZ Dishwasher

Whirlpool WDF130PAHB Dishwasher

Whirlpool W8I HP42 L MaxiSpace Dishwasher Overview
Summary of Contents
- Page 1: Daily Reference Guide Before using the appliance, carefully read safety and installation instructions. Thank you for buying a Whirlpool product. After installation, please remember to remove all transport protection parts from the dishwasher. Control panel includes various buttons for program selection and indicators for salt and rinse aid levels. For first-time use, switch on the appliance and access the settings menu. The water softening system prevents scale buildup and requires regular salt refills. Rinse aid makes dish drying easier and should be filled when the rinse aid refill indicator is lit. The salt reservoir must never be empty to avoid damage from limescale accumulation. Adjusting the dosage of rinse aid can improve drying results based on observed performance. To fill the detergent dispenser, use the opening device and ensure proper detergent quantity is used.
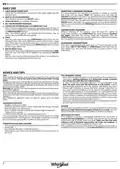
- Page 2: Daily use Check that the dishwasher is connected to the water supply and that the tap is open. If a wrong program was selected, it is possible to change it, provided that it has only just begun. Open the door and press the ON/OFF button to switch on the dishwasher. Select the most appropriate program in accordance with the type of crockery and its soiling level. Without switching off the machine, open the door slightly to avoid water splashing out and place the crockery inside. Start the wash cycle by pressing the START/Pause button and closing the door within 4 seconds. If the door is opened during the wash cycle, or if there is a power cut, the cycle stops. The end of the wash cycle is indicated by sound and the display shows END. Before loading the baskets, remove all food residues from the crockery and empty the glasses. To avoid odour and sediment, run a high-temperature program at least once a month.
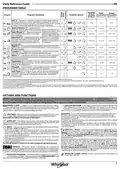
- Page 3: Daily Reference Guide Programs table Eco 50° - Program is suitable to clean normally soiled tableware, being the most efficient in terms of energy and water consumption. Auto Intensive 65° - Automatic program for heavily soiled dishes and pans, adjusting the program according to the soil level detected. Auto Mixed 55° - Automatic program for normally soiled dishes with dried food residues. Auto Fast 50° - Automatic program for normally and lightly soiled dishes, ensuring optimal cleaning in a shorter time. Silent 55° - Suitable for night-time operation, ensuring optimal cleaning with the lowest noise emission. Sanitizing 65° - For normally or heavily soiled crockery with additional antibacterial wash. Prewash - Used to refresh crockery planned to be washed later, with no detergent. Self Clean 65° - Program for dishwasher maintenance, to be used when the dishwasher is empty. Options and functions - Options can be selected/deselected after choosing the program, affecting time, water, or energy consumption. Descale alarm - Indicates limescale accumulation on internal components, requiring descaling to maintain performance.
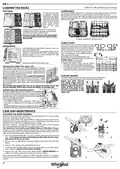
- Page 4: Capacity: 14 standard place-settings Loading the racks: The top rack provides targeted cleaning for pots, lids, plates, and cutlery. Large plates and lids should ideally be placed at the sides to avoid interferences with the spray arm. The lower rack has tip-up supports for arranging plates or loading pans and salad bowls easily. A separate arrangement of cutlery improves washing and drying performance. Power Clean® uses special water jets to wash highly dirty items more intensively. The upper rack has a Space Zone for supporting frying pans or baking pans in an upright position. Adjusting the height of the upper rack allows for more space and avoids collision with items in the lower rack. The upper rack is equipped with an upper rack height adjuster. The cutlery basket is fitted with top grids for improved arrangement and must be positioned at the front of the lower rack. Knives and sharp utensils should be placed with points facing downwards. Regularly clean the filter assembly to prevent clogging and ensure proper water flow. The filter assembly consists of three filters that remove food residues from the washing water. Inspect and clean the filter assembly at least once per month or after every 30 cycles. After cleaning, replace the filter assembly correctly to maintain efficient operation.
- Page 5: Daily Reference Guide The lower spray arm may be removed by pulling it upwards and rotating it anti-clockwise. Cleaning the spray arms is recommended to prevent food residue from blocking the holes. The top spray arm may be removed by pressing it up and rotating it anti-clockwise. To clean the top rack, slide it out and remove items lodged in the nozzles with tweezers. In case your dishwasher doesn’t work properly, check the troubleshooting list. Spare parts will be available for a period of either up to 7 or up to 10 years. If the salt indicator is lit, refill the reservoir with salt. The rinse aid indicator being lit means the rinse aid dispenser is empty. Descale the appliance immediately if the descaling indicator is lit or blinking. If the dishwasher won’t start, check if the door is closed and the appliance is plugged in properly.
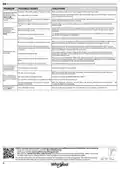
- Page 6: No water in the water supply or the tap is closed. Make sure there is water in the water supply and the water tap is open. The dishwasher does not fill the water. Check the inlet hose. The water inlet hose is kinked. Check and clean the screen in the water inlet hose. The filter is clogged with food residues or limescale. Clean the filter and descale the appliance. The dishwasher finishes the cycle prematurely. Check if the end of the drain hose is placed at the correct height. The detergent has not been measured out correctly or it is not suitable for use in dishwashers. An excessive amount of foam is present. Rinse aid is not present or the dosage is too low. Make sure the rinse aid dispenser is filled. The dishes are not dried well. Make sure the cycle has ended before starting to unload the dishes. The selected cycle does not have the drying phase. Check in the programs table if the selected program is equipped in the drying phase. The salt reservoir is empty. Refill the reservoir with salt as soon as possible.

FISHER PAYKEL DD24STX6HI1 Sanitize Dishwasher

beko DUT25401W Electrical Household Dishwasher

FISHER PAYKEL DD60SDFHTX9 Dishwasher

BOSCH SHP65CM5N Dishwasher

Haier HDW15U3B1 Steam Built Under Dishwasher

seasons 224FPC2MAWB Dishwasher

FISHER AND PAYKEL DD24SCTX9 N Dish Drawer Dishwasher

FISHER and PAYKEL DW24U6I1 Sanitize Dishwasher

Miele PFD 102 APFD 102 Dishwasher

BOSCH SMU2ITS01A Series 2 Built Under Dishwasher