
Whirlpool W8I HP42 L MaxiSpace Dishwasher


EN
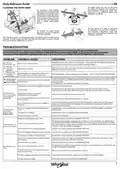
CAPACITY: 14 standard place-settings
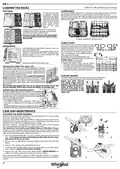
LOADING THE RACKS
TOP RACK
LOWER RACK
The top rack provides For pots, lids, plates, salad bowls, cutlery etc. Large plates and lids should ide-
a targeted cleaning ally be placed at the sides to avoid interferences with the spray arm.
Wash Zone for bowls, The lower rack has tip-up supports which can be used in a vertical position
mugs, even big plates when arranging plates or in a horizontal position (lower) to load pans and
and cutlery that you’d salad bowls easily.
normally load in the
lower racks, making
extra space for the
rest of the day’s
dishes.
A separate arrangement of the cutlery makes
collection easier after washing and improves
washing and drying performance.
Knives and other utensils with sharp edges
must be positioned with the blades facing
downwards.
(loading example for the lower rack)
POWER CLEAN®
Power Clean® uses the special water jets in the
rear of the cavity to wash more intensively the
UPPER RACK
Load delicate and light dishes: glasses, cups, sa- highly dirty items. The lower rack has a Space
ucers, low salad bowls.
Zone, a special pull-out support in the rear of
the rack that can be used to support frying
pans or baking pans in an upright position,
thus taking up less space.
The upper rack has tip-up supports which can be
used in a vertical position when arranging tea/
dessert saucers or in a lower position to load
bowls and food containers.
Placing the pots/casseroles faced to the
Power Clean® component please activate the
POWER CLEAN® on the panel.
How to use the Power Clean®:
(loading example for the upper rack)
1. Adjust the Power Clean® area G folding
down the rear plate holders to load pots.
2. Load pots and casseroles inclined vertically
in the Power Clean® area. Pots have to be
inclined towards the powerful water jets.
Adjusting the height of the upper rack
The height of the upper rack can be adjusted: a high po-
sition to place bulky crockery in the lower basket and a low
position to make the most of the tip-up supports by cre-
ating more space upwards and avoiding collision with the
items loaded into the lower rack.
The upper rack is equipped with an Upper Rack height ad-
juster (see figure), without pressing the levers, lift it up by
simply holding the rack sides, as soon as the rack is stable
in its upper position. To restore to the lower position, press
the levers A at the sides of the rack and move the basket
downwards.
CUTLERY BASKET
It is fitted with top grids for improved cutlery arrangement.
It must only be positioned at the front of the lower rack.
Knives and other utensils
with sharp edges must be
placed in the cutlery basket
with the points facing down-
wards or they must be po-
sitioned horizontally in the
tip-up compartments on the
upper rack.
We strongly recommend that you do not adjust the height of the rack
when it is loaded. NEVER raise or lower the basket on one side only.
Foldable flaps with adjustable position
The side foldable flaps can be folded or unfolded
to optimize the arrangement of crockery inside
the rack. Wine glasses can be placed safely in the
foldable flaps by inserting the stem of each glass
into the corresponding slots.
Depending on the model:
• to unfold the flap there is needed to slide it up
and rotate or release it from the snaps and pull it
down.
• to fold the flap there is needed to rotate it and slide the
flap down or pull it up and attach the flap to the snaps.
CARE AND MAINTENANCE
CLEANING THE FILTER ASSEMBLY
Regularly clean the filter assembly so that the filters do not clog and that
the waste water flows away correctly.
Using the dishwasher with clogged filters or foreign objects inside the fil-
tration system or spray arms may cause unit malfunction resulting in loss of
performance, noisy work or higher resources usage.
The filter assembly consists of three filters which remove food residues
from the washing water and then recirculate the water.
The dishwasher must not be used without filters or if the filter is loose.
At least once per month or after every 30 cycles, check the filter assembly
and if necessary clean it thoroughly under running water, using a non-me-
tallic brush and following the instructions below:
B
A
A
1. Turn the cylindrical filter A in an anti-clockwise direction and pull it out
(Fig 1). It is important when reinstalling the filter that the two trian-
gles shown on the zoom meet.
1
2
2. Remove the cup filter B by exerting a slight pressure on the side flaps
(Fig 2).
3. Slide out the stainless-steel plate filter C (Fig 3).
4. In case you find foreign objects (such as broken glass, porcelain, bones,
fruit seeds etc.) please remove them carefully.
5. Inspect the trap and remove any food residues. NEVER REMOVE the
wash-cycle pump protection (shown by an arrow) (Fig 4).
C
After cleaning the filters, replace the filter assembly and fix it in position
correctly; this is essential for maintaining the efficient operation of the dish-
washer.
4
3
4

| General | Details |
|---|---|
| Name | Whirlpool W8I HP42 L MaxiSpace Dishwasher |
| Make | Whirlpool |
| Language | English |
| Filetype | PDF (Download) |
| File size | 8.28 MB |
 (1 votes, average: 5.00 out of 5)
 Loading...

Whirlpool 2B19 Dishwasher

Whirlpool WFO3O33PLAUS Standard Dishwasher

Whirlpool W11323304G Dishwasher

Whirlpool WH7IPC15BM60 Dishwasher

Whirlpool FINPUTSAD Dishwasher

Whirlpool W7U HS31 X Dishwasher

Whirlpool Thron Dishwasher

Whirlpool WDF332PAMS 24 Front Tall Tub Dishwasher

Whirlpool WRF540CWHZ Dishwasher

Whirlpool WDF130PAHB Dishwasher


GE APPLIANCES G034 Dishwasher

BOSCH SMI6ECS00E Dishwasher

FRIGIDAIRE GDPH4525AF Dishwasher

AEG FFE83800PM Built-Under Dishwasher

Westinghouse WSF6604XB Dishwasher

respekta GSPU42 Mini Table Dishwasher

AEG FSE76607P Dishwasher

FRIGIDAIRE FDSR4501AP Panel Ready Dishwasher

FISHER PAYKEL DD60SHTI9 Integrated Single Dishwasher

FISHER AND PAYKEL DD60SHTI9-CN Tall Dishwasher