Home > Electrolux > Electrolux EES48400L Dishwasher
Electrolux EES48400L Dishwasher


EES48400L
EN
ET
Dishwasher
Nõudepesumasin
User Manual
Kasutusjuhend
2
30

| General | Details |
|---|---|
| Name | Electrolux EES48400L Dishwasher |
| Make | Electrolux |
| Language | English |
| Filetype | PDF (Download) |
| File size | 1.91 MB |


Electrolux ESS87300UX Dishwasher

Electrolux EES48401L Dishwasher

Electrolux EFF9392SXA Dishwasher

Electrolux ESZ89400UX 800 SprayZone Dishwasher

Electrolux ESL2500RO Dishwasher

Electrolux KECA7400W Builtin Dishwasher

Electrolux TAPPAN Dishwasher

Electrolux KESC7320L Dishwasher

Electrolux EEC87400W Sliding Door Dishwasher

Electrolux EFC3862MS UltimateCare 300 Compact Dishwasher

Electrolux EES48400L Dishwasher Overview
Summary of Contents
- Page 1: Dishwasher User manual
- Page 2: Safety information Safety instructions Installation Product description Control panel Programme selection Basic settings Before first use Daily use Hints and tips
- Page 3: safety information Before the installation and use of the appliance, carefully read the supplied instructions. The manufacturer is not responsible for any injuries or damage that are the result of incorrect installation or usage. Always keep the instructions in a safe and accessible location for future reference. children and vulnerable people safety This appliance can be used by children aged from 8 years and above and persons with reduced physical, sensory or mental capabilities if they have been given supervision or instruction concerning the use of the appliance in a safe way. Children between 3 and 8 years of age and persons with very extensive and complex disabilities shall be kept away from the appliance unless continuously supervised. Children of less than 3 years of age should be kept away from the appliance unless continuously supervised. Keep detergents away from children. general safety This appliance is for cleaning household-type dishes and tableware only. This appliance is designed for single household domestic use in an indoor environment.
- Page 4: Do not change the specification of this appliance. The operating water pressure must be between 0.5 and 10 bar. Follow the maximum number of 14 place settings. If the supply cord is damaged, it must be replaced by qualified persons. Knives and other utensils with sharp points must be loaded with points down. Do not leave the appliance with the open door unattended. Before maintenance, deactivate the appliance and disconnect the mains plug. Do not use high pressure water sprays or steam to clean the appliance. The appliance must be connected to the water mains using new hose-sets. Only a qualified person must install this appliance.
- Page 5: Warning: this appliance is designed to be installed/connected to a grounding connection in the building. Always use a correctly installed shockproof socket. Do not use multi-plug adapters and extension cables. If the water inlet hose is damaged, immediately close the water tap and disconnect the mains plug from the mains socket. Do not pull the mains cable to disconnect the appliance. Always pull the mains plug. Dishwasher detergents are dangerous. Follow the safety instructions on the detergent packaging. Do not drink and play with the water in the appliance. Do not remove the dishes from the appliance until the programme is complete. Before connection to new pipes, let the water flow until it is clean and clear. To repair the appliance contact the Authorised Service Centre. Use original spare parts only.
- Page 6: Spare parts are designed to withstand extreme physical conditions in household appliances. Some spare parts are only available to professional repairers, and not all parts are relevant for all models. Certain spare parts will be available for 10 years after the model has been discontinued. The lamps inside the product are intended for specific applications and not suitable for household room illumination. Disconnect the appliance from the mains supply before disposal to avoid risk of injury or suffocation. Cut off the mains cable and discard it during disposal. Remove the door catch to prevent children and pets from getting closed in the appliance. After installation, ensure the plastic covers are locked in position to maintain functionality and safety. If the plastic cover is damaged, contact the Authorized Service Centre for replacement. Refer to safety chapters for important warnings related to installation.
- Page 7: Page 7
- Page 8: Product description includes various components such as ceiling spray arm, upper spray arm, lower spray arm, filters, rating plate, salt container, air vent, lower basket, upper basket, and cutlery drawer. The graphic provides a general overview, and for more details, refer to other chapters or documents provided with the appliance. Beam-on-Floor is a light displayed on the floor below the appliance door and is off when the appliance is deactivated. During the drying phase with AirDry activated, the projection on the floor may not be completely visible. To check if the cycle is finished, refer to the control panel. A red light indicates that the programme has started and stays on for the duration of the programme. A green light appears when the programme is completed. If the appliance has a malfunction, the red light will flash.
- Page 9: Control panel includes the On/Off button, Delay start button, Display, Option buttons, AUTO Sense program button, and MY TIME program selection bar. The ECOMETER indicates how the programme selection impacts energy and water consumption. The more bars on the ECOMETER, the lower the consumption. The ECOMETER indicates the most environmentally friendly programme selection for a normally soiled dishwashing load. Rinse aid indicator is on when the rinse aid dispenser needs refilling. Salt indicator is on when the salt container needs refilling. Machine Care indicator is on when the appliance needs internal cleaning with the Machine Care programme. Drying phase indicator is on when a programme with the drying phase is selected. The drying phase indicator flashes when the drying phase operates.
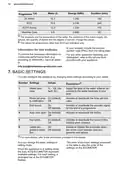
- Page 10: Programme selection includes energy and water consumption for crockery and cutlery with normal soil. MY TIME selection bar allows selecting a suitable dishwashing cycle based on programme duration. AUTO Sense programme automatically adjusts the dishwashing cycle to the type of load by sensing the degree of soil and the amount of dishes. Quick is the shortest programme (30min) suitable for dishwashing a load with fresh and light soil. Pre-rinse (15min) is for rinsing off food remains from the dishes and prevents odours. ExtraPower improves the dishwashing results by increasing the wash temperature and duration. GlassCare prevents delicate loads from damaging by reducing temperature changes during the wash. ECO is the longest programme offering the most efficient use of resources. The programmes overview includes various options based on load type and soil degree. This programme is used to assess compliance with the Ecodesign Commission Regulation (EU) 2019/2022.
- Page 11: Programme Dishwasher Degree of Programme phases Extras Crockery, cutlery Fresh, lightly dried-on Dishwashing 60 °C Intermediate rinse Final rinse 50 °C ExtraPower GlassCare AirDry ECO Crockery, Normal to heavy, dried-on Dishwashing 60 °C Intermediate rinse Final rinse 60 °C Machine Care For cleaning the appliance interior. Automatic door opening during the drying phase. Consumption values
- Page 12: Programme values for water, energy, and duration are provided for different settings. The pressure, temperature, and other factors can affect the programme values. Values for programmes other than ECO are indicative only. Basic settings can be configured according to user needs. Water hardness can be adjusted based on local water conditions. Rinse aid indicator can be activated or deactivated. Acoustic signal for the end of a programme can be turned on or off. AirDry feature can be activated or deactivated. Key tones for button presses can be enabled or disabled. Automatic selection of the most recently used programme can be enabled or disabled.
- Page 13: How to change a setting Make sure the appliance is in setting mode. Use Previous or Next to select the bar of the ECOMETER dedicated to the desired setting. The bar of the ECOMETER dedicated to the chosen setting flashes. The display shows the current setting value. You can navigate in setting mode using MY TIME selection bar. Press OK to enter the setting. The current setting value flashes. The new setting is saved. The appliance returns to the basic settings list. The water softener removes minerals from the water supply, which would have a negative effect on the washing results and on the appliance.
- Page 14: Water hardness levels are categorized by degrees in various measurements. The water softener level is indicated by specific ranges of water hardness. Factory setting should not use salt at certain hardness levels. It's important to set the proper water hardness level to keep the salt refill indicator active. Multi-tabs containing salt are not effective enough to soften hard water. The resin of the softener device needs to be regenerated regularly for correct operation. The regeneration process is automatic and part of normal dishwasher operation. A new regeneration process will be initiated after a prescribed quantity of water has been used. Regeneration initiation does not impact cycle duration unless it occurs mid-programme. Rinsing of the water softener may begin in the same cycle or at the beginning of the next cycle.
- Page 15: The next programme increases total water consumption by an additional 4 litres and total energy consumption by an additional 2 Wh. Acoustic signals sound when a malfunction of the appliance occurs and cannot be deactivated. AirDry improves drying results by automatically opening the appliance door during the drying phase. All consumption values are determined in line with applicable standards under laboratory conditions. AirDry is automatically activated with all programmes other than Pre-rinse. The rinse aid helps to dry dishes without streaks and stains and is automatically released during the final rinse. When the rinse aid chamber is empty, the rinse aid indicator turns on. For best drying performance, always use rinse aid. If children have access to the appliance, it is advised to deactivate AirDry due to safety concerns. You can activate an acoustic signal that sounds when the programme is completed.
- Page 16: The latest programme that was completed before the appliance deactivation is saved. You can deactivate the click sound made by the buttons on the control panel. When the latest programme selection is disabled, the default programme is ECO. Make sure that the current level of the water softener agrees with the hardness of the water supply. Fill the salt container and rinse aid dispenser before first use. Start the programme Quick to remove any residuals from the manufacturing process. Use rough salt designed for dishwashers only to avoid corrosion. Water and salt can come out of the salt container when you fill it. The salt is used to recharge the resin in the water softener. Fill the salt container with 1 kg of salt until it is full.
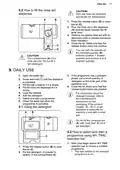
- Page 17: How to fill the rinse aid Only use rinse aid designed specifically for dishwashers. Press the release button to open the lid. Pour the rinse aid in the dispenser until the liquid reaches the fill level 'max'. Remove the spilled rinse aid with an absorbent cloth to prevent excessive foam formation. Close the lid and ensure the release button locks into position. The compartment is for rinse aid only. Do not fill it with detergent. Daily use Open the water tap. If the programme has a prewash phase, put a small quantity of detergent on the inner part of the appliance door. Fill the salt container if it is empty. Fill the rinse aid dispenser if it is empty. Load the baskets. Add the detergent. Select and start a programme. Close the water tap when the instructions on the packaging of the product indicate. How to select and start a programme using MY TIME selection bar Slide your finger across MY TIME selection bar to choose a suitable programme. Press the release button to open the lid. Put the detergent, in powder or tablets, in the compartment. The light related to the selected programme is on.
- Page 18: The ECOMETER indicates the level of energy and water consumption. Activating options often increases the water and energy consumption as well as the programme duration. The display shows the programme duration. The appliance senses the type of load and adjusts a suitable wash cycle. During the cycle, the sensors operate several times and the initial program duration can decrease. By default, options must be activated every time before you start a programme. If the latest programme selection is enabled, the saved options are activated automatically along with the programme. It is not possible to activate or deactivate options while a programme is running. Not all options are compatible with each other. When the countdown is complete, the programme starts.
- Page 19: How to cancel a running programme Press and hold for about 3 seconds. The appliance returns to the programme selection. The Auto Off function This function saves energy by switching the appliance off when it is not operating. The appliance operates automatically when the programme is completed or after 5 minutes if a programme was not started. End of the programme When the programme is complete, the appliance switches off automatically. Opening the door while the appliance operates Opening the door while a programme is running stops the appliance. After closing the door, the appliance continues from the point of interruption. Hints and tips Soak or slightly scour cookware with firmly cooked-on or baked-on food before washing it in the appliance. Make sure that items in the baskets do not touch or cover each other. Select a programme according to the type of load and the degree of soil. ECO offers the most efficient use of water and energy consumption. Washing dishes in the dishwasher as instructed in the user manual usually consumes less water and energy than washing dishes by hand. Load the dishwasher to its full capacity to save water and energy. Do not pre-rinse dishes by hand. It increases the water and energy consumption. Refill the salt container whenever necessary.
- Page 20: Follow the instructions in the chapter Care and cleaning. When the programme is completed, adjust the water softener according to the water hardness in your area. Only use salt, rinse aid, and detergent designed for dishwashers. In areas with hard water, use basic dishwasher detergent, rinse aid, and salt separately for optimal results. Detergent tablets do not fully dissolve with short programmes; use tablets with long programmes to prevent residues. Always use the correct quantity of detergent and rinse aid to avoid poor cleaning results and residues. Before starting a programme, ensure the filters are clean, the cap of the salt container is tight, and the spray arms are not clogged. Always use the whole space of the baskets and only wash dishwasher-safe items. Make sure the water softener level is correct to prevent rust on cutlery. Set the highest level of the water softener before switching to separate detergent, salt, and rinse aid.
- Page 21: External cleaning Clean the appliance with a moist soft cloth. Only use neutral detergents. Do not use abrasive products, abrasive cleaning pads or solvents. Cleaning the filters The filter system is made of 3 parts. Make sure that there are no residues of food or soil in or around the edge of the sump. Put back in place the flat filter. Turn the filter counterclockwise and remove it. Reassemble the filters. Put back the filter in the flat filter. Turn it clockwise until it locks.
- Page 22: Caution regarding the installation of the spray arm. An incorrect position of the filters can cause bad washing results and damage to the appliance. Regular cleaning of the lower spray arm is recommended to prevent soil from clogging the holes. Clogged holes can cause unsatisfactory washing results. To remove the lower spray arm, pull it upwards. Do not remove the upper spray arm. Use a thin pointed object to remove remaining particles of soil from the upper spray arm. Regular cleaning of the ceiling spray arm is recommended to prevent soil from clogging the holes. The ceiling spray arm is placed on the ceiling of the appliance. The spray arm is installed in the delivery tube with the mounting element.
- Page 23: Release the stoppers on the sides of the sliding rails of the cutlery drawer and pull the drawer out. Wash the spray arm under running water. Use a thin pointed tool, e.g. a toothpick, to remove particles of soil from the holes. To install the spray arm back, insert the mounting element in the spray arm and fix it in the delivery tube by turning it clockwise. Make sure that the mounting element locks into place. Install the cutlery drawer on the sliding rails and block the stoppers. Move the upper basket to the lowest level to reach the spray arm more easily. Improper repair of the appliance may pose a danger to the safety of the user. Any repairs must be performed by qualified personnel. Refer to the below table for information on possible problems.
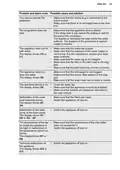
- Page 24: Problem and alarm code Possible cause and solution You cannot activate the appliance. Make sure that the mains plug is connected to the mains socket. Make sure that there is no damaged fuse in the fuse box. The programme does not start. Make sure that the appliance door is closed. If the delay start is set, cancel the setting or wait for the end of the countdown. The appliance does not fill with water. Make sure that the water tap is open. Make sure that the pressure of the water supply is not too low. The appliance does not drain the water. Make sure that the sink spigot is not clogged. Make sure that the interior filter system is not clogged. The anti-flood device is on. Close the water tap. Malfunction of the water level detection sensor. Make sure that the filters are clean. Switch the appliance off and on. Malfunction of the wash pump or the drain pump. Switch the appliance off and on. The temperature of the water inside the appliance is too high or malfunction of the temperature sensor occurred. Make sure that the temperature of the inlet water does not exceed 60°C. Technical malfunction of the appliance. Switch the appliance off and on.
- Page 25: Problem and alarm code Possible cause and solution The level of water inside the appliance is too high. Switch the appliance off and on. Make sure that the filters are clean. Make sure that the outlet hose is installed at the right height above the floor. The display shows iF1. The appliance stops and starts more times during operation. It is normal. It provides optimal cleaning results and energy savings. The programme lasts too long. If the delay start option is set, cancel the delay setting or wait for the end of the countdown. Activating options increases the programme duration. The appliance door is difficult to close. The appliance is not levelled. Loosen or tighten the adjustable feet. Parts of the tableware are protruding from the baskets. The appliance door opens during the wash cycle. The AirDry function is activated. You can deactivate the function. The appliance trips the circuit-beaker. Check the socket amperage and the capacity of the meter or turn off one of the appliances in use.
- Page 26: The PNC can be found on the rating plate on the appliance door. We do not recommend using the appliance until the problem has been completely fixed. Before checking the PNC, make sure the appliance is in the programme selection. If you contact an Authorised Service Centre, you need to provide the product number code of your appliance. The dishwashing and drying results are not satisfactory. Refer to Daily use, Hints and tips, and the basket loading leaflet for poor washing results. Activate the ExtraPower option to improve the washing results of a selected programme. Activate the function AirDry to set the automatic opening of the door and to improve the drying performance. Always use rinse aid, even with multi-tablets. The interior of the appliance is wet; this is not a defect of the appliance.
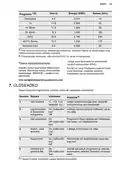
- Page 27: Problem Possible cause and solution Unusual foam during washing. Use the detergent designed specifically for dishwashers. Traces of rust on cutlery. There is too much salt in the water used for washing. Silver and stainless steel cutlery were placed together. Residues of detergent in the dispenser at the end of the programme. The detergent tablet was stuck in the dispenser. Odours inside the appliance. Start the Machine Care programme with a descaler. Limescale deposits on the tableware, on the tub and on the inside of the door. The level of salt is low, check the refill indicator.
- Page 28: Technical information includes dimensions, voltage, electrical connection, frequency, and water supply pressure. The dimensions are 596 mm width, 818 - 898 mm height, and 550 mm depth. The voltage is 220 - 240 V. The frequency is 50 Hz. The water supply pressure ranges from 0.5 to 10 bar. The appliance has a capacity of 14 place settings. For energy efficiency, use hot water from alternative energy sources. The EU EPREL database can be accessed for more information about the appliance. Recycling is encouraged for both the product and its packaging to protect the environment.
- Page 29: Ohutusinfo Ohutusjuhised Paigaldamine Tootekirjeldus Juhtpaneel Programmi valimine Üldseaded Enne esmakordset kasutamist Igapäevane kasutamine Vihjeid ja näpunäiteid Puhastus ja hooldus Tõrkeotsing Tehniline teave Jäätmekäitlus Täname, et ostsite Electroluxi seadme. Olete valinud toote, mille loomisel on rakendatud pikaaegset professionaalset kogemust ja innovatsiooni. Tere tulemast Electroluxi kasutajate hulka. Alati tuleb kasutada originaalvaruosi. Teave on toodud andmeplaadil. Keskkonnateave. Jäetakse õigus teha muutusi.
- Page 30: Ohutusinfo Enne seadme paigaldamist ja kasutamist lugege kaasasolev juhend tähelepanelikult läbi. Tootja ei võta endale vastutust vigastuste või varalise kahju eest, mis on tingitud paigaldusnõuete eiramisest või väärast kasutusest. Hoidke kasutusjuhend kindlas kohas alles, et saaksite seda vajadusel vaadata. Laste ja haavatavate inimeste turvalisus Vähemalt 8-aastased ja vanemad lapsed ning piiratud füüsiliste, sensoorsete või vaimsete võimete või väheste kogemuste ja teadmistega isikud tohivad seda seadet kasutada järelevalve all või kui neid on õpetatud seadet ohutul viisil kasutama ja mõistma kaasnevaid ohte. Lapsed vanuses 3 kuni 8 aastat ning raske või keerulise puudega isikud tuleks hoida seadmest eemal, kui neil ei saa pidevalt silma peal hoida. Alla 3-aastased lapsed tuleks seadmest eemal hoida, kui täiskasvanu nende tegevust ei jälgi. Tuleb jälgida, et lapsed seadmega ei mängiks. Hoidke pesuained lastele kättesaamatuna. Hoidke lapsed ja lemmikloomad seadmest eemal, kui selle uks on lahti. Lapsed ei tohi ilma järelvalveta seadet puhastada ega hooldustoiminguid läbi viia. Üldine ohutus See seade on mõeldud ainult majapidamis- ja lauanõude puhastamiseks. See seade on ettenähtud kasutamiseks kodumajapidamise siseruumides. Seda seadet võib kasutada kontorites, hotellide külalistetubades, hommikusöögiga külalistetubades, talumajapidamistes ja muudes sarnastes majutusruumides, kui selline kasutamine ei ületa (keskmist) kodumajapidamise kasutuskoormusi.
- Page 31: Ärge muutke seadme tehnilisi omadusi. Kasutatava vee surve peab jääma vahemikku 0.5 / 10 baari. Järgige nõudekomplekti maksimaalset lubatud arvu 14. Kui toitejuhe on kahjustatud, laske see välja vahetada tootja poolt. Nugade ja muude teravate otstega riistade korvi laadimisel suunake nende otsad allapoole. Ärge jätke seadme ust lahti, kui selle juurest ära lähete. Enne mistahes hooldust lülitage seade välja ja eemaldage toitepistik. Ärge kasutage seadme puhastamiseks kõrgsurve vee- ega aurupihustit. Seadme veevarustusega ühendamisel tuleb kasutada uusi voolikukomplekte. Seadet tohib paigaldada ainult kvalifitseeritud tehnik.
- Page 32: Kasutage alati nõuetekohaselt paigaldatud elektriohutut pistikupesa. Ärge kasutage mitmikpistikuid ega pikenduskaableid. Ärge pange tuleohtlikke esemeid seadmesse, selle lähedusse ega peale. Veenduge, et te ei vigastaks toitepistikut ega -juhet. Ärge tõmmake toitekaablist, vaid võtke alati kinni pistikust. Nõudepesumasinate jaoks mõeldud pesuained on ohtlikud. Ärge eemaldage nõusid seadmest enne, kui programm on lõppenud. Vältige veevoolikute kahjustamist. Seadme esmakordsel kasutamisel kontrollige, ega kuskil pole lekkeid. Ohtlik pinge.
- Page 33: Jäätmekäitlus lampide ja eraldi müüdavate varulampide kohta: Need lambid taluvad äärmuslikumaid tingimusi. Need pole mõeldud kasutamiseks muudes rakendustes ega sobi ruumide valgustamiseks. Eemaldage seade vooluvõrgust ja lõigake toitekaabel seadme küljest lahti. Eemaldage seadme ukse fiksaator, et vältida laste ja loomade seadmesse lõksujäämist. Kui seade on kahjustatud, võtke ühendust volitatud teeninduskeskusega. Vt ohutust käsitlevaid peatükke. Avage seadme uks ettevaatlikult, et vältida vigastusohtu. Pärast paigaldamist veenduge, et plastkatted on oma kohale lukustunud. Ukse külgedel olevate plastkatete kahjustamine või eemaldamine võib mõjutada seadme funktsionaalsust. Kui plastkate on kahjustatud, vahetage see uue vastu.
- Page 34: Tootekirjeldus Lae-pihustikonsool Ülemine pihustikonsool Alumine pihustikonsool Filtrid Andmeplaat Soolamahuti Õhuava Loputusvahendi jaotur Pesuainejaotur Beam-on-Floor on tuli, mis kuvatakse seadme ukse ette põrandale. Beam-on-Floor kustub, kui seade lülitatakse välja. Kui AirDry lülitatakse sisse kuivatusfaasi ajal, ei pruugi põrandale projitseeritav info täielikult nähtav olla. Kui programm käivitub, süttib punane tuli, mis põleb kuni programmi lõppemiseni. Kui programm on lõppenud, süttib roheline tuli. Seadme rikke korral punane tuli vilgub.
- Page 35: JUHTPANEEL Sees/Väljas nupp / Lähtestusnupp Viitkäivituse nupp Ekraan Funktsioonide nupud (EXTRAS) AUTO Sense programminupp MY TIME programmi valikuriba ECOMETER näitab, kuidas mõjutab programmivalik energia- ja veetarbimist. Mida rohkem ribasid põleb, seda madalam on tarbimine. Loputusvahendi indikaator. On sees, kui loputusvahendi jaotur vajab täitmist.
- Page 36: PROGRAMMI VALIMINE See on standardprogramm. MY TIME valikuriba võimaldab valida sobiva nõudepesutsükli olenevalt programmi kestusest. Programm AUTO Sense kohandab pesutsüklit automaatselt vastavalt nõude tüübile. Seade tunneb ära korvides olevate esemete määrdumisastme ja koguse. Quick on kõige lühem programm (30min), mis sobib värskelt ja kergelt määrdunud nõude pesemiseks. Eelloputus (15min) on programm nõudelt toidujäätmete mahaloputamiseks. ExtraPower parandab valitud programmi nõudepesutulemusi. GlassCare väldib õrnade nõude, eelkõige klaasesemete kahjustamist. Programmide ülevaade. Seda programmi kasutatakse, et hinnata vastavust komisjoni ökodisaini määrusele.
- Page 37: Programmi etapid Eelpesu ei ole kohaldatav Nõudepesu 60 °C Lõpploputus 50 °C Kuivatus AirDry Automaatne ukse avanemine kuivatusfaasi ajal Tarbimisväärtused Vesi (l) Energia (kWh)
- Page 38: Vesi, energia ja kestus on programmi peamised parameetrid. Eelloputusprogramm kestab 1 tund ja tarbib 4.5 kWh energiat. Programmide väärtused, välja arvatud ECO, on ainult hinnangulised. Vee kareduse tase tuleks valida vastavalt piirkonna veetingimustele. Loputusvahendi indikaatorit saab sisse või välja lülitada. Heli peatamine võimaldab helisignaale sisse või välja lülitada programmi lõpus. Automaatne ukse avamine on saadaval AirDry funktsiooniga. Viimase programmi valik on võimalik lubada või keelata. Täpsema teabe saamiseks lugege käesolevat peatükki. Hooldusjuhend sisaldab teavet seadme kohta ja vastuseid küsimustele.
- Page 39: Üldseadeid saate muuta seadistusrežiimis. Seadistusrežiimi sisenemiseks vajutage ja hoidke korraga vähemalt 3 sekundit. Kui seade on seadistusrežiimis, tähistavad ECOMETER ribad saadaolevaid seadeid. Valikutele Tagasi, OK ja Edasi vastavad märgutuled põlevad. Seade muutmine nõuab, et seade on seadistusrežiimis. Valitud seadele määratud ECOMETER riba vilgub. Uus seade on salvestatud ja seade naaseb põhiseadete loendisse. Veepehmendaja eemaldab vees olevad mineraalid, mis ei mõju hästi pesutulemusele ega seadmele endale. Veepehmendajat tuleks reguleerida vastavalt veevärgivee karedusele teie piirkonnas. Seadistusrežiimi ei saa siseneda ajal, kui programm töötab.
- Page 40: Vee karedus ja erinevad mõõtühikud. Ärge kasutage sellel tasemel soola. Valige õige veekareduse tase, et hoida soolamahuti täitmise indikaatorit sisselülitatult. Soola sisaldavad multitabletid ei ole kareda vee pehmendamiseks piisavalt tõhusad. Veepehmendaja õige toimimise tagamiseks tuleb vaiku regulaarselt uuendada. Regenereerimisprotsess on automaatne ja kuulub nõudepesumasina töö juurde. Seade käivitab uue regenereerimistoimingu, kui on kasutatud ette nähtud kogus vett. Regenereerimine ei mõjuta tsükli pikkust, välja arvatud lühikese kuivatusfaasi korral. Regenereerimine pikendab programmi kogupikkust 5 minuti võrra. Veepehmendaja tase ja vee kogus on omavahel seotud.
- Page 41: Helisignaalid kõlavad ka siis, kui seadmel tekib rike. Neid helisignaale ei ole võimalik välja lülitada. AirDry tõhustab kuivatustulemusi. Kuivatusfaasi ajal avaneb masina luuk automaatselt ja jääb paokile. Veepehmendaja loputamine alata sama tsükli jooksul või järgmise programmi alguses. Iga teostatud veepehmendaja loputus võib pikendada programmi kestust täiendava 5 minuti võrra. Kõik käesolevas jaotises toodud tarbimisväärtused on määratud vastavalt kohaldatavale standardile laboritingimustes. AirDry lülitub automaatselt sisse kõigi programmidega, välja arvatud Eelloputus. Loputusvahend aitab nõusid kuivatada ilma triipude ja plekkideta. Pärast luugi automaatset avanemist ärge üritage seda esimese 2 minuti jooksul sulgeda. Kui loputusvahendi mahuti on tühi, süttib loputusvahendi indikaator. Kui AirDry avab luugi, ei pruugi Beam-on-Floor täielikult nähtav olla.
- Page 42: Salvestatakse viimane, enne seadme väljalülitamist lõpetatud programm. Seadme sisselülitamisel valitakse see siis automaatselt. Juhtpaneeli nupud teevad vajutamisel klõpsuvat heli. Selle heli saate välja lülitada. Viimati kasutatud programmi ja valikute automaatse valimise määramine. Kontrollige, kas veepehmendaja on reguleeritud vastavalt teie piirkonna vee karedusele. Täitke soolamahuti. Täitke loputusvahendi jaotur. Keerake veekraan lahti. Käivitage programm Quick, et eemaldada seadmesse jäänud võimalikud tootmisjäägid. Kasutage ainult nõudepesumasinale mõeldud jämedat soola. Peenike sool suurendab korrosiooniohtu. Vesi ja sool võivad soolamahutist täitmise ajal välja tulla. Soola kasutatakse veepehmendaja vaigu aktiveerimiseks ja igapäevases kasutuses heade pesutulemuste tagamiseks. Käivitage programm kohe pärast soolamahuti täitmist.
- Page 43: Kuidas täita loputusaine jaoturit. Kasutage vaid nõudepesumasinatele mõeldud loputusvahendit. Vajutage vabastusnuppu, et avada kaas. Kallake loputusvahend jaoturisse, kuni vedelik jõuab tasemeni „max“. Eemaldage mahaläinud loputusvahend imava lapiga, et ei tekiks liiga palju vahtu. Sulgege kaas. Veenduge, et vabastusnupp on lukustunud oma asendisse. Lahter on ainult loputusvahendile. Ärge täitke seda pesuvahendiga. Keerake veekraan lahti. Täitke soolamahuti, kui see on tühi. Valige ja käivitage programm.
- Page 44: Programmi käivitamiseks sulgege seadme uks. Seade tunnetab, millist tüüpi pesuga on tegu, ja valib sobiva pesutsükli. Eelloputus valimiseks vajutage ja hoidke 3 sekundit nuppu. Ekraanil kuvatakse programmi kestus. Valige programm ja vajutage korduvalt nuppu, kuni ekraanil kuvatakse soovitud viitkäivituse aeg. Pöördloenduse ajal ei saa viivituse aega ega valitud programmi muuta. Kui pöördloendus on lõppenud, käivitub programm. Viitkäivituse tühistamisel tuleb programm uuesti valida. Valikute sisselülitamine võib sageli mõjutada vee- ja energiatarvet ning programmi kestust. Avades ukse programmi töösoleku ajal, peatub seadme töö.
- Page 45: Programmi lõpp Kui programm on lõppenud, kuvatakse ekraanil 0:00. Funktsioon Auto Off See funktsioon säästab energiat, lülitades seadme välja, kui seda ei kasutata. Vihjeid ja näpunäiteid Järgides järgmisi näpunäiteid, saavutate igapäevasel kasutamisel parimad pesu- ja kuivatustulemused ning aitate säästa keskkonda. Valige nõude tüübile ja määrdumisastmele vastav programm. ECO tarbib vett ja energiat kõige efektiivsemalt. Kasutusjuhendis toodud juhiseid järgides on nõude pesemine nõudepesumasinas tunduvalt vee- ja energiasäästlikum kui nende käsitsi pesemine. Kasutage ainult nõudepesumasina jaoks mõeldud soola, loputusvahendit ja pesuvahendit. Eemaldage suuremad toidujäägid ja kallake tassid ja klaasid tühjaks, enne kui need masinasse panete. Kontrollige, et nõud ei puutu üksteise vastu ega ole üksteise peal. Kareda ja väga kareda vee korral soovitame kasutada tavalist nõudepesuvahendit eraldi. Lühikeste programmidega ei jõua pesuainetabletid täielikult lahustuda.
- Page 46: Kasutage tablette pikkade esemete pesemiseks. Esemete paigutus korvides on õige. Valitud programm sobib pestavate programmidega. Kasutage alati õiges koguses pesuainet. Liiga suur pesuainekogus pehme veega jätab nõudele pesuainejäägid. Kasutage alati õiges koguses loputusvahendit. Ärge peske nõudepesumasinas järgmisi materjale: puit, sarv, tinasulam, vask, alumiinium. Veenduge, et veepehmendaja tase oleks õige. Asetage õõnsad esemed masinasse, avaus allpool. Enne programmi käivitamist veenduge, et pihustikonsoolid saavad takistamatult liikuda.
- Page 47: PUHASTUS JA HOOLDUS Sisemine puhastamine Enne mis tahes hooldust lülitage seade välja ja eemaldage toitepistik. Puhastage seadme sisemust pehme niiske lapiga. Ärge kasutage abrasiivseid puhastuslappe, teravaid esemeid ega tugevaid kemikaale. Pühkige luuki, kaasa arvatud kummist tihendit, üks kord nädalas. Hea toimivuse säilitamiseks puhastage seadet vähemalt kord kahe kuu jooksul. Parimate pesutulemuste saamiseks käivitage Machine Care programm. Machine Care on programm, mis puhastab seadme sisemust parimate tulemustega. Lahtised detailid halvendavad pesutulemusi ja võivad seadme tühjenduspumpa kahjustada. Kui seade tuvastab puhastusvajaduse, süttib indikaator. Kasutage spetsiaalselt nõudepesumasinale mõeldud katlakivieemaldit või puhastusvahendit.
- Page 48: Veenduge, ega settevanni äärte ümber pole kogunenud toidujäätmeid või mustust. Pöörake filtrit (B) vastupäeva ja võtke välja. Asetage lame filter tagasi (A). Veenduge, et see paikneb õigesti kahe juhiku all. Pange uuesti kokku filtrid (B) ja (C). Pange tagasi filter (B) lameda filtri sees (A). Keerake päripäeva, kuni see kohale lukustub. Eemaldage filter (C) filtrist (B). Eemaldage lame filter (A). Peske filtrid puhtaks.
- Page 49: Filtrite ebaõige asend võib põhjustada kehva pesutulemust ja kahjustada seadet. Alumise pihustikonsooli puhastamine on soovitatav regulaarselt, et vältida avade ummistumist. Ummistunud avad võivad põhjustada kehvi pesutulemusi. Alumise pihustikonsooli eemaldamiseks tõmmake seda ülespoole. Ärge eemaldage ülemist pihustikonsooli. Kui avad pihustikonsoolis on ummistunud, eemaldage järelejäänud mustuseosad peenikese terava esemega. Lae-pihustikonsooli on soovitatav regulaarselt puhastada, et vältida avade ummistumist. Peske pihustikonsool voolava vee all puhtaks. Kasutage peenikest teravat eset, et eemaldada avadesse kogunenud mustus. Vabastage söögiriistade sahtli liugsiinidel olevad tõkised ja tõmmake sahtel välja.
- Page 50: Viige ülemine korv madalamale tasemele, et pääseda pihustikonsooli tagasiasetamiseks. Kinnituselement pihustikonsooli ja sisselasketoru külge kinnitage päripäeva keerates. Veenduge, et kinnituselement lukustub oma kohale. Peske pihustikonsool jooksva vee all puhtaks. Kasutage peenikest teravat eset, et eemaldada avadesse kogunenud sodi. Lükake söögiriistade sahtel liugsiinidele ja kinnitage tõkised. Vaadake alltoodud tabelit, et leida teavet võimalike probleemide kohta. Masina ebaõige remont võib ohustada masina kasutajat. Remonditöid võib teha ainult kvalifitseeritud töötaja. Enamiku probleemide lahendamiseks ei ole vaja pöörduda teeninduskeskuse poole.
- Page 51: Probleem ja häirekood Masin ei täitu veega. Veenduge, et veekraan on avatud. Veenduge, et veesurve ei ole liiga madal. Veenduge, et veekraan ei ole ummistunud. Masin ei tühjene veest. Veenduge, et valamu äravoolutoru ei ole ummistunud. Veenduge, et sisemine filtrisüsteem ei ole ummistunud. Veenduge, et tühjendusvoolikul ei ole väändeid ega kõverusi. Masinas oleva vee temperatuur on liiga kõrge või on veeanduri rike. Lülitage masin välja ja sisse.
- Page 52: Probleem ja häirekood Kuvatav programmi kestus erineb tarbimisväärtuste tabelis toodud kestusest. Ekraanil olev järelejäänud aeg pikeneb ja liigub edasi hüplikult kuni programmi lõpuni. Masin ei ole loodis. Reguleerige tugijalgu vastavalt vajadusele. Masina luuk ei ole sisemuse suhtes tsentreeritud. Masina luuki on raske sulgeda. Funktsioon AirDry on aktiveeritud. Nõud ei ole korvidesse õigesti paigutatud. Masin põhjustab kaitsme väljalülitumise. Toote numbriline kood (PNC) peab olema käepärast volitatud hoolduskeskusesse pöördumisel. Eemaldage masin vooluvõrgust ja ärge seda enne sisse lülitage, kuni probleem on täielikult kõrvaldatud.
- Page 53: Nõudepesu- ja kuivatustulemused ei vasta ootustele Kehvad pesutulemused võivad olla tingitud tõhusama pesuprogrammi mittekasutamisest. Aktiveerige funktsioon ExtraPower, et tõhustada valitud programmi pesutulemusi. Puhastage pihustikonsool ja filter. Kehvad kuivatustulemused võivad tuleneda nõude liiga pikast sulgemisest seadmes. Aktiveerige funktsioon AirDry, et valida ukse automaatne avamine ja tõhustada kuivatamist. Loputusvahendit pole kasutatud või on seda lisatud liiga vähe. Seadme sisemus on märg, mis ei ole seadme defekt. Pesemisel tekib liiga palju vahtu, kui ei kasutata nõudepesumasinate jaoks mõeldud pesuainet. Pesutablett võib jääda jaoturisse kinni ja mitte veega ära uhutud.
- Page 54: Probleem Ebameeldiv lõhn masina sees. Käivitage programm Machine Care koos katlakivieemaldi või nõudepesumasinate puhastusvahendiga. Katlakivijäägid nõudel, sisemusel ja ukse siseküljel. Soolatase on madal, kontrollige soola lisamise indikaatorit. Soolamahuti kork on lahti. Kohalik kraanivesi on kare. Kasutage soola ja seadke veepehmendaja ka siis, kui kasutate multitablette. Käivitage programm Machine Care koos nõudepesumasinate katlakivivahendiga. Veenduge, et peseksite masinas ainult nõudepesumasinakindlaid nõusid. Aktiveerige funktsioon GlassCare, et tagada spetsiaalhooldus klaasidele ja õrnadele nõudele.
- Page 55: Link EL EPREL-i andmebaasile Seadme energiamärgisel olevalt QR-koodilt leiate veebilingi selle seadme registreerimiseks EL EPREL-i andmebaasis. Hoidke energiamärgis koos kasutusjuhendi ja kõigi muude seadmega kaasas olnud dokumentidega alles. Täpsema teabe saamiseks energiamärgise kohta külastage www.theenergylabel.eu. Toote jõudlusega seotud teavet on võimalik leida EL EPREL-i. Jäätmekäitlus sümboliga tähistatud seadmeid Sümboliga tähistatud materjalid võib muude majapidamisjäätmete hulka. Viige seade kohalikku ringluspunkti või pöörduge abi saamiseks kohalikku omavalitsusse. Aidake hoida keskkonda ja inimeste tervist ja suunake elektri- ja elektroonilised jäätmed ringlusse. Ärge visake seadmeid tavalisse prügi.
- Page 56: Page 56

LG Electronics LDPS6762S 23.75 in. PrintProof Smart Dishwasher

Fisher and Paykel DW60UN2X2 Built-Under Dishwasher

AEG FBB32607ZW Dishwasher

FISHER PAYKEL DD24DCTW9 N Drawer Dishwasher

FISHER AND PAYKEL DD24SDFTX9 N Tall Dish Drawer Dishwasher

BOSCH 100 Series Dishwasher

BOSCH SHE53C82WH Dishwasher

IKEA TORSBODA Dishwasher

HOBART AM16 Commercial Dishwasher

element ENB6632PEBB Dishwasher