Home > GE Appliances > GE APPLIANCES JGP3030DLWW 30 Gas Cooktop with Dishwasher
GE APPLIANCES JGP3030DLWW 30 Gas Cooktop with Dishwasher


D. 8VLQJꢂDꢂꢅPPꢂRUꢂꢆꢇꢈꢀ´ꢂQXWꢂGULYHUꢄꢂLQVWDOOꢂWKHꢂSURSDQHꢂRUL¿FHVꢂ
SPECIAL NOTE:
PROPANE CONVERSION INSTRUCTIONS
CONVERTING THE COOKTOP BURNERS
in their precise locations.
To convert the cooktop back to natural gas, reverse the
instructions given in making propane adjustments.
ꢂ
7RꢂSUHYHQWꢂOHDNDJHꢄꢂPDNHꢂVXUHꢂWKHꢂRUL¿FHVꢂDUHꢂVHFXUHO\ꢂꢂ
WARNING
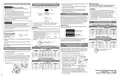
$ꢁꢂ5ꢂ HPRYHꢂWKHꢂWRSꢂJUDWHVꢄꢂEXUQHUꢂFDSVꢂDQGꢂEXUQHUꢂKHDGVꢁꢂ
Explosion Hazard
screwed into the gas injets.
Death or serious injury can result from failure to follow
these instructions.
NOTICE:
E. ,QVWDOOꢂWKHꢂROGꢂRUL¿FHVꢂLQWRꢂWKHꢂPHWDOꢂEUDFNHWꢂDORQJꢂZLWKꢂ
these instructions, and replace onto the regulator for
SRVVLEOHꢂIXWXUHꢂFRQYHUVLRQꢁ
Burner cap
2QFHꢂWKHꢂFRQYHUVLRQꢂLVꢂFRPSOHWHꢂDQGꢂFRQ¿UPHGꢄꢂ¿OOꢂRXWꢂ
the propane sticker and include your name, organization
DQGꢂGDWHꢂFRQYHUVLRQꢂZDVꢂPDGHꢁꢂ$SSO\ꢂWKHꢂVWLFNHUꢂWRꢂWKHꢂ
cooktop near the regulator to alert others in the future
WKDWꢂWKLVꢂDSSOLDQFHꢂKDVꢂEHHQꢂFRQYHUWHGꢂWRꢂSURSDQHꢁꢂ,Iꢂ
FRQYHUWLQJꢂEDFNꢂWRꢂQDWXUDOꢂJDVꢂIURPꢂSURSDQHꢄꢂSOHDVHꢂ
UHPRYHꢂWKHꢂVWLFNHUꢂVRꢂRWKHUVꢂNQRZꢂWKHꢂDSSOLDQFHꢂLVꢂVHWꢂWRꢂ
use natural gas.
ꢂ6HUYLFHꢂE\ꢂDꢂTXDOLILHGꢂVHUYLFHꢂWHFKQLFLDQꢂRQO\ꢁ
ꢂ6KXWꢂRIIꢂJDVꢂVXSSO\ꢂDQGꢂGLVFRQQHFWꢂSRZHUꢂEHIRUHꢂVHUYLFLQJꢁ
ꢂ5HFRQQHFWꢂDOOꢂJURXQGLQJꢂGHYLFHVꢂDIWHUꢂVHUYLFHꢁ
• Replace all parts and panels before operating.
2UL¿FHꢂORFDWHGꢂ
through this
opening
Burner head
CHECK SURFACE BURNERS
Push and turn a knob to the LITE position. A clicking sound
indicates proper operation of the ignition system. When lighting
DQ\ꢂEXUQHUꢄꢂVSDUNVꢂZLOOꢂDSSHDUꢂDWꢂDOOꢂEXUQHUVꢂEXWꢂJDVꢂÀRZVꢂ
from only the one selected. Once air is purged from the supply
line, burner should light within 4 seconds. After burner lights,
rotate the knob out of the LITE position. Try each burner in
VXFFHVVLRQꢂXQWLOꢂDOOꢂEXUQHUVꢂKDYHꢂEHHQꢂFKHFNHGꢁ
7KHꢂSUHVVXUHꢂUHJXODWRUꢂDQGꢂWKHꢂEXUQHUꢂRUL¿FHVꢂDUHꢂVHWꢂIRUꢂ
natural gas. To use propane gas, the regulator and burner
RUL¿FHVꢂPXVWꢂEHꢂFRQYHUWHGꢁꢂ
Base
Round burner
ADDITIONAL INFORMATION
WARNING
%ꢁꢂ8ꢂ VLQJꢂDꢂꢅPPꢂRUꢂꢆꢇꢈꢀ´ꢂQXWꢂGULYHUꢄꢂUHPRYHꢂWKHꢂWRSꢂEXUQHUꢂ
RUL¿FHVꢁꢂ7KHVHꢂPD\ꢂEHꢂDFFHVVHGꢂWKURXJKꢂWKHꢂEXUQHUꢂ
opening in the base.
Do not operate the cooktop when using
SURSDQHꢂꢌERWWOHGꢍꢂJDVꢂEHIRUHꢂFRQYHUWLQJꢂWKHꢂSUHVVXUHꢂ
UHJXODWRUꢂDQGꢂEXUQHUꢂRUL¿FHVꢂIRUꢂSURSDQHꢂJDVꢂXVHꢁꢂ)DLOXUHꢂWRꢂ
GRꢂVRꢂFRXOGꢂFDXVHꢂKLJKꢂÀDPHVꢂDQGꢂWR[LFꢂIXPHVꢂZKLFKꢂFDQꢂ
result in serious injury.
Quality of Flames
'HWHUPLQHꢂWKHꢂTXDOLW\ꢂRIꢂÀDPHVꢂYLVXDOO\ꢁꢂ1RUPDOꢂEXUQHUꢂÀDPHVꢂ
should look like (A) or (B).
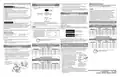
JGP3530 - BURNER OUTPUT RATINGS: BTU/HR
NG (Natural) Gas 5” W.C.P.
NOTICE:
ORIFICE SIZE
6DYHꢂWKHVHꢂRUL¿FHVꢂUHPRYHGꢂIURPꢂWKHꢂDSSOLDQFHꢂIRUꢂIXWXUHꢂXVHꢁ
BTU RATE
18,000
(mm)
1.93
MARKING
193N
BURNER
(A) Soft blue flames—
LF
7KHꢂSURSDQHꢂRUL¿FHVꢂDUHꢂDWWDFKHGꢂWRꢂWKHꢂUHJXODWRUꢂZKLFKꢂLVꢂ
packaged with the unit.
Normal for natural gas
&ꢁꢂꢂ5HPRYHꢂWKHꢂSURSDQHꢂRUL¿FHVꢂ
LR
RR
RF
5,000
0.97
97N
from the bracket attached to
12,000
1.52
152N
LR
RR
RF
TOOLS REQUIRED:
the regulator. The top surface
RIꢂWKHꢂRUL¿FHꢂLVꢂHQJUDYHGꢂIRUꢂ
LGHQWL¿FDWLRQꢁꢂ8VHꢂWKHꢂWDEOHꢂ
DQGꢂ¿JXUHꢂWRꢂGHWHUPLQHꢂWKHꢂ
placement of the propane
RUL¿FHVꢁ
(B) Yellow tips on
outer cones—
9,500
1.33
133N
• )ODWꢂEODGHGꢂVFUHZGULYHUꢂ
(blade approximately
3/32” across)
• 1XWꢂGULYHUVꢉꢂꢊꢇꢋ´ꢄꢂꢆꢇꢈꢀ´
or 7mm
Normal for propane gas
LF
JGP3030, PGP6030, CGP6030
- BURNER OUTPUT RATINGS: BTU/HR
NG (Natural) Gas 5” W.C.P.
ORIFICE SIZE
/RQJꢄꢂEULJKWꢂ\HOORZꢂÀDPHVꢂDUHꢂQRWꢂQRUPDOꢁꢂ1RUPDOꢂÀDPHVꢂPD\ꢂ
show signs of an orange tint when well heated or signs of
ÀLFNHULQJꢂRUDQJHꢂGXHꢂWRꢂSDUWLFOHVꢂLQꢂWKHꢂJDVꢂRUꢂDLUꢁ
To adjust your cooktop for use with propane gas, follow these
instructions:
1. Disconnect all electrical power, at the main circuit breaker or
fuse box.
95
III
Denotes 0.95mm Orifice size opening
Denotes LP (Propane)
BTU RATE
(mm)
MARKING
BURNER
LF
15,000
1.73
173N
ADJUSTING LOW FLAME SETTING
ON COOKTOP BURNERS
ꢀꢁꢂ6ꢂ KXWꢂRႇꢂWKHꢂJDVꢂVXSSO\ꢂWRꢂWKHꢂFRRNWRSꢂE\ꢂFORVLQJꢂWKHꢂPDQXDOꢂ
VKXWꢃRႇꢂYDOYHꢁ
LR
RR
RF
5,000
0.97
97N
12,000
1.52
152N
JGP3530 - BURNER OUTPUT RATINGS: BTU/HR
Propane Gas 10” W.C.P.
9,500
1.33
133N
Low setting adjustments must be made with 2 other burners
LQꢂRSHUDWLRQꢂRQꢂDꢂPHGLXPꢂVHWWLQJꢁꢂ7KLVꢂSURFHGXUHꢂSUHYHQWVꢂWKHꢂ
ORZꢂÀDPHꢂIURPꢂEHLQJꢂVHWꢂWRRꢂORZꢄꢂUHVXOWLQJꢂLQꢂWKHꢂÀDPHꢂEHLQJꢂ
extinguished when other burners are turned on.
CONVERTING THE PRESSURE REGULATOR
198
III
Denotes 1.98mm Orifice size opening
Denotes Natural Gas
ORIFICE
N
BTU RATE SIZE (mm)
MARKING
125L
BURNER
1. Use an adjustable wrench to unscrew the hex-nut cap from
the pressure regulator.
LF
18,000
1.25
0.66
1.02
0.91
LR
RR
RF
5,000
66L
A. Turn on surface burners to medium setting.
2. Turn the plastic cap 1/4 turn to disassemble.
12,000
9,500
102L
B. Turn the knob on the burner being adjusted to “LO”.
ꢈꢁꢂ ꢂ7XUQꢂWKHꢂSODVWLFꢂFDSꢂRYHUꢂDVꢂLQGLFDWHGꢂLQꢂWKHꢂSLFWXUHꢁꢂ$OLJQꢂ
the tabs of the plastic cap with the slots of the hex-nut cap.
Insert cap and rotate 1/4 turn to reassemble. The letters
³/3´ꢂVKRXOGꢂQRZꢂEHꢂYLVLEOHꢂRQꢂWKHꢂWRSꢂRIꢂWKHꢂSODVWLFꢂFDSꢁ
91L
Round Burners
&ꢁꢂꢂ5HPRYHꢂWKHꢂNQREꢂDQGꢂLQVHUWꢂDꢂVPDOOꢂ
ÀDWꢂEODGHꢂVFUHZGULYHUꢂLQꢂWKHꢂYDOYHꢂ
shaft as shown. Turn clockwise as
far as possible while maintaining a
VWDEOHꢂÀDPHꢁꢂ5HSHDWꢂIRUꢂDOOꢂYDOYHVꢁ
JGP3030, PGP6030, CGP6030
Inside shaft
- BURNER OUTPUT RATINGS: BTU/HR
Propane Gas 10” W.C.P.
ORIFICE
4. Screw the hex-nut cap back onto the pressure regulator.
Rotate cap counter-
clockwise to loosen
'ꢁꢂꢂ,IꢂÀDPHꢂDSSHDUVꢂWRRꢂORZꢂRUꢂXQVWDEOHꢄꢂ
slowly turn adjustment screw
NAT
BTU RATE SIZE (mm)
MARKING
PROPANE
BURNER
LF
15,000
1.15
0.66
1.02
0.91
115L
Center adjustment screw
for all burners except the
Multi-Ring Burner
FRXQWHUFORFNZLVHꢂXQWLOꢂDꢂVWDEOHꢂÀDPHꢂ
exists for each burner.
LR
RR
RF
5,000
66L
12,000
9,500
102L
91L
E. Additionally, for each burner being adjusted, quickly
RSHQꢂDQGꢂFORVHꢂWKHꢂFDELQHWꢂGRRUVꢂZKLOHꢂREVHUYLQJꢂWKHꢂ
ÀDPHꢁꢂ,IꢂÀDPHꢂLVꢂH[WLQJXLVKHGꢄꢂWXUQꢂDGMXVWPHQWꢂVFUHZꢂ
FRXQWHUFORFNZLVHꢂIRUꢂDꢂODUJHUꢂÀDPHꢁꢂ5HSHDWꢂGRRUꢂRSHQLQJVꢂ
XQWLOꢂÀDPHꢂLVꢂVWDEOHꢁ
PROPANE CONVERSION INSTRUCTIONS
31-2001092 Rev. 1 11-22 GEA
JGP3530, JGP3030, PGP6030, CGP6030

| General | Details |
|---|---|
| Name | GE APPLIANCES JGP3030DLWW 30 Gas Cooktop with Dishwasher |
| Make | GE Appliances |
| Language | English |
| Filetype | PDF (Download) |
| File size | 0.25 MB |


GE APPLIANCES GTW845 Dishwasher

GE APPLIANCES GSD2100VBB Dishwasher

GE APPLIANCES GDF550PGR Plastic Interior Dishwasher with Front Controls

GE APPLIANCES PDT755SYV/BTV UltraFresh System Dishwasher with Interior

GE APPLIANCES GDT670SGV Interior Dishwasher with Hidden Controls

GE APPLIANCES GDT650SYV Interior Dishwasher with Hidden Controls

GE APPLIANCES PDP715SYVFS GE Profile Series Interior Dishwasher

GE APPLIANCES PDT715SYV Interior Dishwasher with Hidden Controls

GE APPLIANCES PDT705SYWFS Dishwasher

GE APPLIANCES GDT565HSYSS Energy Star Hybrid Tub Dishwasher

GE APPLIANCES JGP3030DLWW 30 Gas Cooktop with Dishwasher Overview
Summary of Contents
- Page 1: Special note: Propane conversion instructions Converting the cooktop burners To convert the cooktop back to natural gas, reverse the instructions given in making propane adjustments. Warning: Explosion hazard Death or serious injury can result from failure to follow these instructions. Check surface burners Push and turn a knob to the LITE position. A clicking sound indicates proper operation of the ignition system. To use propane gas, the regulator and burner orifices must be converted. Quality of flames should look like (A) or (B). Normal for natural gas flames is soft blue flames. Normal for propane gas flames may show signs of an orange tint when well heated. Adjusting low flame setting on cooktop burners must be made with two other burners in operation. Converting the pressure regulator involves unscrewing the hex-nut cap from the pressure regulator.
- Page 2: Instructions pour la conversion au propane. Retirez les grilles supérieures ainsi que les chapeaux et les têtes des brûleurs. Pour reconvertir la table de cuisson au gaz naturel, inversez les instructions fournies pour les réglages du propane. Risque d’explosion. L’omission d’observer ces instructions peut causer des blessures sévères, voire fatales. Une fois la conversion terminée et validée, remplissez l’étiquette adhésive pour le propane. Apposez l’étiquette adhésive sur la table de cuisson près du régulateur. L’appareil doit être réparé par un technicien qualifié seulement. Coupez l’alimentation électrique et du gaz avant le service. Vérification des brûleurs de surface.
- Page 3: INSTRUCCIONES DE CONVERSIÓN A PROPANO CONVERSIÓN DE LOS QUEMADORES DE LA SUPERFICIE DE COCCIÓN ADVERTENCIA Riesgo de Explosión Control de las cabezas de los quemadores Calidad de las Llamas TASA DE BTU Gas NG (Natural), 5” W.C. Llamas azul claro— Gas NG (Natural) Ajuste la configuración de llama baja en los quemadores de la superficie de cocción

BOSCH SMP4ECS79S Dishwasher

FISHER PAYKEL DW60FC1X2 Dishwasher

EQUATOR 1840 WB 18 Inch Dishwasher

Centerline CDH ML-130374 Commercial Dishwasher

Amana ADB1400PY Undercounter Dishwasher

BOSCH SPS4HMW61E Dishwasher

Whirlpool W2IHKD526A Fully Integrated Dishwasher

LG LSDT990 Dishwasher

FISHER AND PAYKEL DD24STI9N Dishwasher

BOSCH SBD6ECX12E Dishwasher