Home > KitchenAid > KitchenAid KDFE204KPS Dishwasher
KitchenAid KDFE204KPS Dishwasher


SAFETY AND INSTALLATION INSTRUCTIONS
IMPORTANT TO BE READ AND OBSERVED:
Before using the appliance, read these safety instructions. Keep them nearby for future reference. These instructions and the
appliance itself provide important safety warnings, to be observed at all times. The manufacturer declines any liability for failure to
observe these safety instructions, for inappropriate use of the appliance or incorrect setting of controls.
NOTE: For Operating Instructions, refer to the Quick Start Guide provided with the product and online documentation. How to
access the online documentation is located on the Quick Start Guide along with QR code on the product for future reference.
Your safety and the safety of others are very important.
We have provided many important safety messages in this manual and on your appliance. Always read and obey all safety
messages.
This is the safety alert symbol.
This symbol alerts you to potential hazards that can kill or hurt you and others.
All safety messages will follow the safety alert symbol and either the word “DANGER” or “WARNING.”
These words mean:
You can be killed or seriously injured if you don't immediately
follow instructions.
DANGER
You can be killed or seriously injured if you don't
instructions.
follow
WARNING
All safety messages will tell you what the potential hazard is, tell you how to reduce the chance of injury, and tell you what can
happen if the instructions are not followed.
IMPORTANT SAFETY INSTRUCTIONS
WARNING: When using your dishwasher, follow basic precautions, including the following:
n
n
n
Read all instructions before using the dishwasher.
Use the dishwasher only for its intended function.
n
n
n
This product is intended for residential use only.
Do not tamper with controls.
Use only detergents or wetting agents recommended
for use in a dishwasher and keep them out the reach of
children.
Do not abuse, sit on, or stand on the door or dish racks of
the dishwasher.
n
n
To reduce the risk of injury, do not allow children to play in
or on a dishwasher.
n
When loading items to be washed:
1. Locate sharp items so that they are not likely to
Under certain conditions, hydrogen gas may be produced
in a hot-water system that has not been used for two
weeks or more. HYDROGEN GAS IS EXPLOSIVE. If the
hot-water system has not been used for such a period,
before using the dishwasher, turn on all hot-water faucets
and let the water flow from each for several minutes. This
will release any accumulated hydrogen gas. As the gas is
flammable, do not smoke or use an open flame during this
time.
damage the door seal; and
2. Load sharp knives with the handles up to reduce the
risk of cut-type injuries.
n
Do not wash plastic items unless they are marked
"dishwasher safe" or the equivalent. For plastic items not
so marked, check the manufacturer's recommendations.
n
n
n
Do not touch the heating element during or immediately
after use.
n
n
Remove the door to the washing compartment when
removing an old dishwasher from service or discarding it.
Do not operate your dishwasher unless all enclosure
panels are properly in place.
Do not use replacement parts that have not been
recommended by the manufacturer (e.g. parts made at
home using a 3D printer).
Do not leave the dishwasher open when not loading or
unloading dishes.
SAVE THESE INSTRUCTIONS
W11651308C
1

| General | Details |
|---|---|
| Name | KitchenAid KDFE204KPS Dishwasher |
| Make | KitchenAid |
| Language | English |
| Filetype | PDF (Download) |
| File size | 1.9 MB |


KitchenAid KDTE304RBS Third Level Jet Rack Dishwasher

KitchenAid KDTF324PPA Dishwasher

Kitchenaid MVWC565FW1 Dishwasher

KitchenAid w11323304 Dishwasher

KitchenAid KDFE104KWH Two Rack Dishwasher

KitchenAid KDTE104KPS Dishwasher

KitchenAid KDFE104KBL Front Dishwasher

KitchenAid KDTF924PPS Flush Cabinet Dishwasher

KitchenAid KDTE304RBS Level Jet Rack Dishwasher

KitchenAid KDF Series Dishwasher

KitchenAid KDFE204KPS Dishwasher Overview
Summary of Contents
- Page 1: Safety and installation instructions are crucial to read and observe before using the appliance. Keep safety instructions nearby for future reference. The manufacturer declines liability for failure to observe safety instructions or incorrect use of the appliance. Refer to the Quick Start Guide for operating instructions and online documentation access. Your safety and the safety of others are very important. The safety alert symbol indicates potential hazards that can cause injury or death. All safety messages will specify the hazard, how to reduce the risk, and the consequences of not following instructions. Basic precautions include reading all instructions before using the dishwasher and using it only for its intended function. Do not tamper with controls or use unapproved detergents. Ensure sharp items are loaded safely to prevent injuries, and do not wash non-dishwasher safe plastics.
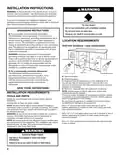
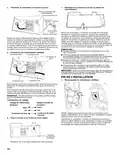
- Page 2: Installation instructions To reduce the risk of fire, electric shock, or injury to persons, read the installation, user maintenance, and operating instructions before installing this appliance. Do not use dishwasher until completely installed. The dishwasher must be grounded to reduce the risk of electric shock. Check with a qualified electrician if you are in doubt whether the dishwasher is properly grounded. Gather the recommended tools and parts before starting installation. Moisture barrier tape is recommended if installing a dishwasher under a wooden or laminate countertop. The installer must ensure that the dishwasher is completely enclosed at the time of installation. Use two or more people to move and install the dishwasher to avoid injury. Be sure to purchase only factory-certified parts and accessories for your appliance. Drill a 1/2 (1.27 cm) water supply hose hole in the side or rear of the cabinet.
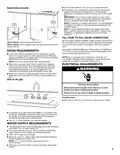
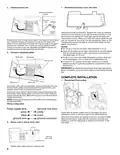
- Page 3: Do not solder within 6 (15.2 cm) of the water inlet valve. If installed in new construction, make sure the house water supply lines have been flushed prior to connecting the dishwasher. Do not kink or pinch water line, drain hose, power cord, or direct wire between dishwasher and cabinet. If replacing an existing dishwasher, it is recommended to install a new water line and drain hose. If using a flexible braided hose, replace inlet hose after 5 years to reduce the risk of hose failure. A new drain hose is supplied with your dishwasher. Make sure to connect drain hose to waste tee or disposer inlet above drain trap in house plumbing. Make sure to use an air gap if the drain hose is connected to house plumbing lower than 20 (50.8 cm) above subfloor or floor. This dishwasher has a water heating feature and also requires a connection to a hot water supply line. A hot water line with 20 psi to 120 psi (138 kPa to 862 kPa) water pressure can be verified by a licensed plumber.
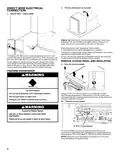
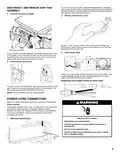
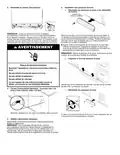
- Page 4: Put the dishwasher on its back. Remove all internal shipping material, drain hose, installation kit, and handle before laying on its back. Place cardboard under the dishwasher until installed in the cabinet opening to avoid damaging floor covering. Using two or more people, grasp sides of the dishwasher door frame, and place the dishwasher on its back. If installing with direct wire, route the cable as shown. Do not use the door panel as a worktable without first covering it with a towel to avoid scratching. Remove access panels. Do not use the dishwasher until completely installed. Use two or more people to move and install the dishwasher. Leave the service connection wire unplugged and placed out of the way when reinstalling the access panel.
- Page 5: To remove the terminal box, depress the plastic latch, slide the box toward the left of the unit along the metal tube and rotate the left side of the box forward. Make sure that the product wiring is still attached within the terminal box. To remove the drip tray assembly, press the snap at each side of the plastic tray in toward the center of the product and pull toward yourself. Be sure not to pull too far or too hard as the float switch wire is still connected at this time. Install a UL Listed/CSA Approved metallic strain relief. Select UL Listed/CSA Approved power cord for the dishwasher. Power cord kit typically includes power cord, metallic strain relief, grommet, and twist-on wire connectors. Electrically ground dishwasher. Connect ground wire to green ground connector in terminal box. Do not use an extension cord.
- Page 6: Connect ground wire. Reinstall terminal box cover and wires. Place wires inside terminal box and ensure they are not pinched by the cover. Route power cord through strain relief in the back of the terminal box. Do not plug cord into an outlet until instructed to do so. A maximum of 2 power cord supply conductors plus 1 grounding conductor are permitted in the terminal box. No additional connections other than dishwasher power connection are to be made inside the dishwasher terminal box. Reconnect float switch by aligning connector and pushing in until the locking tab is visible. Check that the power supply wire does not touch dishwasher motor or lower part of the dishwasher tub. Tighten strain relief screws to secure cord.
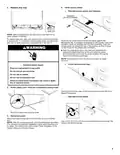
- Page 7: Install access panels. Replace the drip tray and ensure no water is present in the tray before replacement. Align the drip tray with snaps in side members and ensure hoses are above the tray. Place the toe panel behind the access panel against the dishwasher leg. If insulation is included, ensure it does not interfere with the float assembly. Align the rectangular slot in the foam and assemble the toe/access panel assembly using the screw. Plug into a grounded 3 prong outlet and do not remove the ground prong. Check that the lower edge of the access panel touches the floor and adjust if necessary. Reconnect electrical power at the fuse box or circuit breaker box. Start the dishwasher and allow it to complete the shortest installation cycle while checking for leaks.
- Page 8: Energy saving tips The government energy certifications are based off of the normal cycle only. Be sure the incoming water temperature is set at 120°F (49°C). Using any other cycle, including sensing cycles, may increase your energy usage. This dishwasher’s government energy certifications were based on the Normal Cycle with only the Heat Dry option selected. To reduce risk of property damage during vacation or extended time without use, turn off the water and power supply to the dishwasher. Make sure the water supply lines are protected against freezing conditions. Damage from freezing is not covered by the warranty. Sanitized cycles sanitizes dishes and glassware in accordance with NSF International NSF/ANSI Standard 184 for Residential Dishwashers. Only sanitizing cycles have been designed to meet the requirements of the NSF/ANSI 184 performance standard for soil removal and for sanitization efficacy. If your dishwasher did not properly sanitize your dishes, the Sanitized indicator flashes at the end of the cycle. The light goes off when you open and close the door or press CANCEL.
- Page 9: Instructions d'installation Avertissement : Pour réduire les risques d'incendie, d'électrocution ou de blessure, lire les instructions d'installation, d'entretien et d'utilisation avant d'installer cet appareil. Utiliser deux personnes ou plus pour déplacer et installer le lave-vaisselle. Ce lave-vaisselle doit être relié à la terre pour réduire le risque de décharge électrique. Le lave-vaisselle doit être raccordé à un système de câblage permanent en métal relié à la terre. Rassembler les outils et composants nécessaires avant d'entreprendre l'installation. Du ruban de barrière anti-humidité est recommandé si le lave-vaisselle est installé sous un comptoir en bois ou en stratifié. Percer un trou de 1 1 po (3,8 cm) pour le tuyau de vidange sur le côté ou l'arrière de l'armoire. L'installateur doit s'assurer que le lave-vaisselle est complètement encastré au moment de l'installation. S'assurer d'acheter uniquement des pièces et des accessoires certifiés par le fabricant de l'appareil. Percer un trou de 1/2 po (1,27 cm) pour le tuyau d'arrivée d'eau sur le côté ou l'arrière de l'armoire.
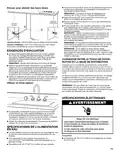
- Page 10: Tube de cuivre de 3/8 po (0,95 cm) de diamètre externe avec raccord de compression ou canalisation d’alimentation en eau flexible à tresse d’acier. L’emploi d’un tuyau de plastique d’un minimum de 1/2 po (1,3 cm) n’est pas recommandé. Ne pas souder à moins de 6 po (15,2 cm) de l’électrovanne d’admission d’eau. S’assurer que l’entrée d’eau de la maison a été nettoyée avant de brancher le lave-vaisselle. Veiller à ne pas coincer la canalisation de cuivre, le tuyau d’évacuation, le cordon d’alimentation ou le câble de raccordement direct. Il est recommandé d’installer une nouvelle entrée d’eau et de vider le tuyau de vidange avec le nouveau lave-vaisselle. Utiliser un dispositif de brise-siphon si le tuyau d’évacuation est raccordé à moins de 20 po (50,8 cm) au-dessus du sous-plancher. Interrompre l'alimentation électrique avant d'installer le lave-vaisselle. Ce lave-vaisselle est doté d’une fonction de chauffage de l’eau et doit être raccordé à la canalisation d’alimentation en eau chaude. Alimentation de 120 V CA à 60 Hz et protégée par un fusible de 15 ou 20 A.
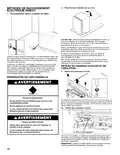
- Page 11: Placer le lave-vaisselle sur son dos. Retirer tout le matériel d’expédition interne avant de le coucher sur le dos. Placer une feuille de carton sous le lave-vaisselle pour éviter d’endommager le revêtement de sol. À l’aide d’au moins deux personnes, saisir les côtés de l’encadrement de la porte du lave-vaisselle. Ne pas se servir du panneau de porte comme planche de travail sans l’avoir recouvert d’une serviette. Acheminer le câble de l’alimentation électrique à travers le trou dans l’armoire. Ne pas utiliser le lave-vaisselle jusqu’à ce qu’il soit complètement installé. Utiliser deux personnes ou plus pour déplacer et installer le lave-vaisselle. Un câble de connexion de service avec connecteur à 3 broches est laissé volontairement débranché. Laisser ce câble débranché et le placer hors du chemin pendant la réinstallation du panneau d’accès.
- Page 12: Pour retirer le boîtier de raccordement, appuyer sur le fermoir en plastique, glisser la boîte vers la gauche de l’appareil contre le tube de métal et faire tourner le côté gauche de la boîte vers l’avant. S’assurer que le câblage du produit reste attaché dans le boîtier de raccordement. Enlever le plateau d’écoulement. À l’aide d’un tourne-écrou de 1/4 po (6,4 mm), retirer la vis fixant le couvercle du boîtier de raccordement. Pour retirer le fil du contacteur à flotteur, pousser doucement sur l’onglet de fermeture du connecteur, puis tirer le connecteur à l’extérieur du boîtier. Ne pas installer le plateau d’égouttement avant d’en être instruit. Utiliser un cordon d’alimentation homologué UL/CSA pour le lave-vaisselle. L’ensemble comprend habituellement un cordon d’alimentation, un serre-câbles métallique, un œillet et des connecteurs de fils. Relier le lave-vaisselle à la terre d’une méthode électrique. Ne pas utiliser un câble de rallonge.
- Page 13: Connecter le conducteur de liaison à la terre. Réinstaller le couvercle et les fils du boîtier de raccordement. Placer les conducteurs à l’intérieur du boîtier de connexion. S’assurer que les câbles sont bien logés à l’intérieur du boîtier. Passer le cordon d’alimentation dans le serre-câbles situé à l’arrière du boîtier. Un maximum de 2 cordons d’alimentation plus 1 conducteur de mise à la terre est autorisé dans le boîtier de connexion. Aucune autre connexion que celle du raccordement d’alimentation du lave-vaisselle ne peut être effectuée à l’intérieur du boîtier de raccordement. Reconnecter le contacteur à flotteur. Pour brancher les fils aux cosses rondes, retirer les vis du bornier. Vérifier l’absence de tout contact entre le conducteur ou le cordon d’alimentation et le moteur du lave-vaisselle.
- Page 14: Réinstaller le plateau d’écoulement. Installation des panneaux d’accès. Placer le panneau d’accès contre le pied du lave-vaisselle. S’assurer que l’isolation ne cause aucune interférence avec le flotteur. Pour replacer le plateau, l’aligner avec les boutons dans les parties latérales. Aligner la fente rectangulaire de la mousse et du panneau inférieur/d’accès avec l’appareil. Brancher l’appareil sur une prise à 3 alvéoles reliée à la terre. Ne pas enlever la prise de liaison à la terre. Vérifier que la rive inférieure du panneau d’accès est au contact du plancher. Reconnecter l’alimentation électrique du tableau de distribution.

BOSCH SGV2ITX22G Fully Integrated Dishwasher

INDESIT 3727714 Dishwasher

NEFF S195HCX02G Fully Dishwasher

MAYTAG W11680100A Dishwasher

SIEMENS SN67ZX86DM Dishwasher

FISHER AND PAYKEL DD24DV2T9 Dishwasher

FISHER PAYKEL DD60STX6I1 FP AA Dishwasher

BOSCH SMS6ZCI15E Dishwasher

omega ODWF6015BXCOM Dishwasher

SAMSUNG DW90F89 Dishwasher