
Miele G7936us Dishwasher






Operating Instructions
Dishwashers
To prevent accidents and machine damage, read these instructions
before installation or use.
en-US
HG07-W
M.-Nr. 12 515 390


| General | Details |
|---|---|
| Name | Miele G7936us Dishwasher |
| Make | Miele |
| Language | English |
| Filetype | PDF (Download) |
| File size | 6.66 MB |
 (1 votes, average: 5.00 out of 5)
 Loading...

Miele PFD 103 SCi XXL XXL Dishwasher

Miele PFD 101 i Dishwasher

Miele AK-CC 550A APFD 102 Dishwasher

Miele PFD 102 APFD 102 Dishwasher

Miele 11 836 740 Dishwasher

Miele PFD 401 U Commercial Dishwasher

Miele PLW 8683 Laboratory Dishwasher

Miele PFD 100 SmartBiz Free-Standing Dishwasher

Miele 12 668 930 Dishwasher

Miele PFD 102 i Dishwasher

Miele G7936us Dishwasher Overview
Summary of Contents
- Page 1: Operating instructions for dishwashers are provided. It is important to read these instructions before installation or use to prevent accidents and machine damage.
- Page 2: Important safety instructions Notes on the operating instructions Scope of delivery Guide to the appliance Appliance overview Control panel Caring for the environment Before using for the first time Activating the safety lock Miele@home (depending on model)
- Page 3: Remote update (depending on the model) SmartStart (depending on the model) EcoStart Temperature Display Brightness Color scheme Volume Refill indicators AutoOpen
- Page 4: Manual detergent dispensing Adding detergent Turning on the dishwasher Selecting a program Starting a program End of the program Energy management Unloading the dishwasher Cleaning the wash cabinet Frequently asked questions
- Page 5: General dishwasher problems Noises Poor cleaning results Contact in the event of a fault Appliance warranty and product registration Optional accessories Installation Water inlet Water drainage Sound emission testing
- Page 6: Important safety instructions This dishwasher complies with all current local and national safety requirements. Inappropriate use can lead to personal injury and material damage. Please observe the installation sheet and read the operating instructions carefully before setting up the dishwasher. Both documents contain important information on installation, safety, use, and maintenance. This prevents both personal injury and damage to the dishwasher. Miele advises that you read and follow the instructions on installing the dishwasher and the important safety instructions. Miele cannot be held liable for injury or damage caused by non-compliance with these instructions. Keep the installation sheet and the operating instructions in a safe place. Pass them on to any future owner.
- Page 7: Important safety instructions This dishwasher is intended for use in the home and in similar environments, such as shops, offices, and agricultural estates. This dishwasher is not suitable for outdoor use. This dishwasher is intended for use at altitudes of up to 13,000 ft (4,000 m) above sea level. This dishwasher must only be used for cleaning domestic dishes and cutlery. All other types of use are not permitted. This appliance is not intended for use by persons with reduced physical, sensory or mental capabilities, or lack of experience and knowledge.
- Page 8: Important safety instructions include keeping children away from the dishwasher unless supervised. Children must not clean or maintain the appliance. Supervision is necessary in the vicinity of the dishwasher. Children should not play with the dishwasher due to the risk of injury. If the automatic door opening mechanism is active, young children should be kept away from the area. There is a danger of suffocation from packaging materials, which should be kept away from children. Detergents can cause severe skin burns and eye damage, so children should be kept away when the door is open. Detergent residues may still be present in the machine. Immediate medical advice is necessary if a child has swallowed or inhaled any detergents.
- Page 9: Important safety instructions Unauthorized installation, maintenance, and repairs can cause considerable danger for the user. Damage to the dishwasher can compromise your safety. Before using the dishwasher, check it for any visible damage. The electrical safety of the dishwasher can only be guaranteed when correctly grounded. Temporary or permanent operation on an autonomous power supply system is possible, provided it complies with national and local codes. The function and operation of the protective measures in the domestic electrical installation must be maintained in isolated operation. The electrical socket must be easily accessible after the dishwasher is installed for disconnection from the electricity supply. There must be no electrical sockets behind the dishwasher to prevent overheating and fire risk.
- Page 10: IMPORTANT SAFETY INSTRUCTIONS The dishwasher must not be installed underneath a cooktop. Ensure that the connection data on the dishwasher’s data plate match the electricity supply. Do not connect the dishwasher to the electricity supply until it has been fully installed. The dishwasher may only be operated if the door opening mechanism is working correctly. Power bars and extension cords do not guarantee the required safety of the appliance. The dishwasher must not be used in a non-stationary location. Do not install the dishwasher in a room where there is a risk of frost.
- Page 11: Important safety instructions To avoid any damage to the dishwasher, it must only be operated when it is connected to a fully vented plumbing system. The built-in Miele Waterproof system offers reliable protection against water damage if the installation has been carried out correctly and the dishwasher is properly maintained. The water supply faucet should be turned off during longer absences from the home. The Waterproof system will work even when the dishwasher is switched off, but it must remain connected to the electricity supply. A damaged dishwasher could be dangerous; turn it off at the electricity supply immediately if damaged. The manufacturer’s warranty may be invalidated if the appliance is not repaired to Miele authorized service standards. It is recommended to replace defective components with original parts to ensure compliance with safety requirements. During installation, maintenance, and repair work, the dishwasher must be disconnected from the electricity supply. If the power cord is damaged, it must only be replaced with a specific cord of the same type available from Miele Customer Service.
- Page 12: Important safety instructions Do not place the dishwasher on the water inlet hose. The water inlet hose must be free of kinks and able to move freely after installation. Do not install the water inlet hose or the power cord next to a heat source. Do not expose the water inlet hose or the power cord to household cleaners or corrosive substances. Check the water inlet hose or the power cord for leaks and damage after installation. This dishwasher is supplied with a special bulb for specific conditions. The bulb is not suitable for room lighting and must be installed by an authorized technician. The dishwasher must be installed and connected in compliance with the supplied installation sheet. Wear protective gloves when installing the dishwasher to avoid injury. Ensure that the dishwasher is installed in a way that does not block the automatic door opening mechanism.
- Page 13: Important safety instructions The dishwasher must be correctly aligned horizontally to ensure problem-free operation. Built-under and integrated dishwashers must only be installed under a continuous countertop secured to adjacent cabinetry. A sink in the adjacent cabinet of the dishwasher must be carefully sealed, and leaks should be regularly checked to avoid damage. The dishwasher must only be built into a tall cabinet if additional safety precautions are taken, using the tall cabinet installation kit. The door springs must be evenly adjusted on both sides to ensure the door remains stationary when left half open. The machine must only be operated with properly adjusted door springs. Do not use solvents in the dishwasher due to the danger of explosion. Dishwasher detergents can cause burning on the skin and in the eyes, nose, mouth, and throat. Avoid leaving the dishwasher door open unnecessarily to prevent injury or tripping.
- Page 14: Important safety instructions Do not sit, stand, or lean on the opened door. The dishwasher can tip over. Dishes may be very hot at the end of the program. Allow the dishes to cool before unloading them. Only use detergent and rinse aid formulated for domestic dishwashers. Do not use liquid dish soap. Do not use any commercial or industrial detergents. These may cause material damage and pose a risk of a severe explosive chemical reaction. Do not fill the rinse aid reservoir with powder or liquid detergent. This will cause damage to the rinse aid reservoir. Do not fill the AutoDos with powder or liquid detergent. Loose detergent will damage the AutoDos. Do not fill the salt reservoir with powder or liquid detergent. Dishwasher detergent will damage the softener assembly. Use only special, coarse-grained reactivation salt. Other types of salt may cause the water softener to malfunction. Knives and forks should be placed with the handles upwards in the cutlery basket for safety reasons. Plastic items that cannot withstand hot water should not be cleaned in the dishwasher.
- Page 15: Important safety instructions Only use original Miele accessories. If other parts are used, warranty, performance, and product liability claims will be invalidated. Damage to the dishwasher can compromise your safety. Before using the dishwasher, check it for any visible transport damage. Never use a damaged dishwasher. Only transport the dishwasher in an upright position so that no water flows into the electrical controls. If you wish to transport the dishwasher, empty it and securely fasten all loose parts such as baskets, hoses, and power cords. Remove the door of the dishwasher so that children cannot become trapped inside. This product can expose you to chemicals known to the State of California to cause cancer and birth defects or other reproductive harm.
- Page 16: Important safety instructions These devices comply with FCC Rules Part 15. This equipment has been tested and found to be in compliance with the limits for a Class B digital device. These devices may not cause harmful interference. These devices must accept any interference received, including interference that may cause undesired operation. This equipment complies with FCC radiation exposure limits set forth for an uncontrolled environment. This equipment should be installed and operated with minimum distance 8 (20 cm) between the radiator and your body. This digital apparatus does not exceed the Class B limits for Radio Noise Emissions. Complies with Canadian ICES-003 Class B specifications.
- Page 17: Notes on the operating instructions apply to several different dishwasher models of different heights. The specific dishwasher models are referred to as Standard and XXL. Instructions on how to operate the dishwasher are identified by marked operating steps. Operating steps are indicated by a black square bullet point. Warnings important for safety are highlighted to alert you to potential danger. Read the warnings carefully and follow the instructions and directions. Information shown in the dishwasher display appears in a special font. Notes contain information that is particularly important to follow. They are highlighted in a thick framed box.
- Page 18: Scope of delivery The following items are supplied: - Dishwasher - Operating instructions for using the dishwasher - Installation sheet for installing the dishwasher - Other installation accessories for installing the dishwasher - Funnel for filling the reactivation salt (if available) - Additional printed matter and add-ons if required
- Page 19: Guide to the appliance Appliance overview Door locking pins Salt reservoir Top spray arm 3D MultiFlex cutlery tray Rinse aid reservoir Detergent compartment AutoDos detergent outlet Filter combination
- Page 20: Guide to the appliance Lower basket Glass holder FlexCare Glass & Bottle MultiClip XL-Assist Hinged spikes StrawClean
- Page 21: Guide to the appliance Control panel On/Off sensor button for turning the dishwasher on and off. For further information, see “Display functions” under “Guide to the appliance.” Optical interface for Miele Customer Service. Back sensor button for navigating back to the previous menu or deleting values which have been set previously. Remote sensor button for activating/deactivating the Remote start option. Start sensor button for starting the selected program.
- Page 22: Guide to the appliance The sensor button on the control field and in the display react to fingertip contact. Display functions The display is used to select or set the program, options, timer, and settings. Only touch the display with your fingers. The display can show the program name, program stage, estimated time left for the program to run, and any relevant fault messages and information. The currently selected setting is marked in orange and can be changed. The OK sensor button in the display is used to confirm a message or setting and to move to another menu level. To exit a sub-menu, use the Back sensor button. To save energy, the dishwasher turns off after a few minutes if you do not press any sensor buttons during this time. Touch the sensor button to turn the dishwasher back on. If you do not press any sensor buttons for several seconds, the display will revert to the previous menu.
- Page 23: Guide to the appliance You can scroll to the right or the left by swiping your finger across the display. Use the Back sensor control to switch from the Programs menu to the main menu. The orange scroll bar at the bottom of the display indicates that further options are available. You can change the order of programs listed in the Programs menu by pressing and holding a program name and dragging it to the place you want. In the main menu, you can select between the Programs, Settings, and Information menus. In the Programs menu, you can select the programs. After selecting a program, the Extras menu is displayed. You can alter the dishwasher’s controls to suit changing requirements in the Settings menu. You can display a variety of information about your dishwasher in the Information menu.
- Page 24: Guide to the appliance You can set numerical values in some menus. The roll-down menu can be used to display information about the selected program. You can set the numbers by swiping your finger up and down on the display. To open the roll-down menu, touch the orange bar at the top edge of the screen and swipe down with your finger. Use the OK sensor control to accept the set numerical value. Briefly touching the numbers will bring up the numerical keypad. Once a valid number has been entered, the OK sensor control will be highlighted in green. The energy and water consumption as well as any selected options and the dishwasher network status are displayed in the roll-down menu.
- Page 25: Guide to the appliance You can use the sensor control in the display to show the status of your Miele domestic appliances. All Miele domestic appliances that are connected to your Wi-Fi network and that have SuperVision display activated are displayed in the appliance list.
- Page 26: Caring for the environment Disposal of the packing material Disposal of your old appliance The cardboard box and packing materials protect the appliance during shipping and are designed to be biodegradable and recyclable. Electrical and electronic appliances contain valuable materials and certain substances that are essential for proper functioning and safe use. Improper disposal of these materials can be harmful to health and the environment. Do not dispose of your old appliance with regular household waste and follow local regulations on proper disposal. Ensure that any plastic wrappings and bags are disposed of safely and kept out of the reach of children to avoid suffocation hazards. Consult with local authorities, dealers, or Miele for proper disposal and recycling of electrical and electronic appliances. Miele assumes no responsibility for deleting any personal data left on the appliance being disposed. Ensure that your old appliance is kept away from children until removal. Observe safety requirements for appliances that may tip over or pose an entrapment hazard.
- Page 27: Before using for the first time, if the door is opened during operation, all functions are automatically interrupted. Every dishwasher is tested at the factory, and there will be residual water in the machine from this test. Risk of scalding due to hot water exists, as water in the dishwasher may be very hot during operation. In some programs, the door automatically opens slightly to assist the drying process, and this function can be deactivated. The door may open automatically at the end of the program, so keep the area around the door free of obstructions. Caution: Avoid blocking doors, as the automatic door opening function could cause doors to be blocked. To open the door, reach under the recessed grip and pull the handle hard. Open the door fully to disengage the locking mechanism. At the end of the program, if the AutoOpen function is on, the door locking rail automatically retracts. The door locking rail must be fully retracted before you close the door again. To prevent a technical fault, do not hold the door locking rail when retracting.
- Page 28: Before using for the first time Closing the door Activating the safety lock Use the safety lock to prevent children from opening the dishwasher door. The door can then only be opened by using a lot of force. At the end of the program, if the AutoOpen function is on, the door locking rail must be fully retracted before the door is closed. Risk of crushing due to the door closing. When closing the door, you are at risk of shutting your fingers in it. Do not put your hand inside the door as it is closing. To lock the door, push the slide underneath the recessed grip to the right. To unlock the door, push the slide to the left.
- Page 29: Before using for the first time The Wi-Fi connection shares a frequency range with other appliances, which can cause sporadic or complete connection failures. Your dishwasher is equipped with an integrated WiFi module. To use this feature, you will need a WiFi network and the Miele app. A Miele user account can be created via the Miele app. The ability to use the Miele app depends on the availability of the Miele@home service in your country. The Miele app will guide you as you connect your dishwasher to your home WiFi network. Once your dishwasher is connected to your WiFi network, you can control your dishwasher remotely. Connecting your dishwasher to your WiFi network will increase energy consumption, even when the dishwasher is turned off. Make sure that your WiFi network signal strength is strong enough at the installation site of your dishwasher.
- Page 30: Before using for the first time Setting up Miele@home (depending on model) Turning on the dishwasher The message Set up Miele@home? will appear on the display. Turn the dishwasher on using the sensor control. If you want to set up Miele@home now, select the Continue option. Tip: To postpone setup until later, select the Skip option. There are 2 ways of connecting your dishwasher to your WiFi network. Setting the language You will then be guided by the display and the Miele app.
- Page 31: Before using for the first time Setting the time Setting the water hardness The dishwasher must be programmed to the correct water hardness for your area. Your local water authority will be able to advise you of the water hardness level in your area. The current time of day must be set before you can use the timer option. Where the water hardness fluctuates, always program the dishwasher to the higher value. It is useful to know your water hardness so that you can provide the service technician with this information. The dishwasher is programmed at the factory for a water hardness level of 1 gpg (1 °dH). See “Water hardness” under “Settings” for more information.
- Page 32: Before using for the first time Activating AutoDos Prompts will then appear in the display. The display changes to the settings screen for AutoDos. After confirming these prompts with OK, the messages Refill salt and start the “Rinse salt” program and Refill rinse aid may appear. Even if you do not wish to use AutoDos, you must remove the tab from the AutoDos lid before running the first program sequence. Add salt and rinse aid if necessary. Select OK to confirm the messages. You can activate AutoDos. If you do not wish to use AutoDos, you can manually dispense the detergent via the detergent compartment. The display will change to the Programs menu.
- Page 33: Before using for the first time If the water in your area is very soft and constantly lower than 5 gpg (5 °dH – German scale), you do not need to add reactivation salt. In order to achieve good cleaning results, the dishwasher needs to operate with soft water. Hard water results in the build-up of calcium deposits on dishes and on the inner surfaces of the machine. Domestic water with a hardness level higher than 5 gpg (5 °dH – German scale) must be softened. The water softener is suitable for a water hardness level of up to 73 gpg (70 °dH – German scale). Dishwasher detergent will damage the softener assembly. Do not fill the salt reservoir with powder or liquid detergent. Use only special, coarse-grained reactivation salt. If you only ever use combination detergent products in your dishwasher, you can turn off both refill reminders if you wish. Please make sure that if you stop using combination detergents, you refill the reactivation salt and rinse aid.
- Page 34: Before using for the first time, fill the salt reservoir with approximately 1.5 L of water to enable the salt to dissolve. Remove the lower basket from the wash cabinet and unscrew the salt reservoir cap. Risk of corrosion due to saline solution. Place the funnel provided over the salt reservoir and carefully fill with dishwasher salt until the reservoir is full. The salt reservoir holds up to 4.4 lb (2 kg) of salt, depending on the type of salt used. Water or saline solution will run out of the reservoir when the cap is opened, which can cause corrosion in the wash cabinet and to the wash items. Clean off salt residues from around the salt reservoir opening and screw the salt reservoir cap on again firmly. Fill the salt reservoir with approximately 1.5 L of water (first use only). Immediately after filling the salt reservoir and each time you remove the salt reservoir cap, run the rinse salt program without wash items in the dishwasher.
- Page 35: Before using for the first time Refilling the salt The refill indicator may still appear in the display if the salt concentration has not yet reached the correct level. When the refill reminder appears in the display, wait until the end of the program and then refill the salt reservoir. The salt refill reminder will be turned off if you have programmed the dishwasher for a water hardness below 5 gr/gal. The salt refill indicator will go out. Risk of corrosion due to saline solution. Saline solution that runs out can cause corrosion in the wash cabinet and to the wash items. Run the Rinse salt program without wash items in the dishwasher to dissolve and remove any traces of salt from the wash cabinet.
- Page 36: Before using for the first time Rinse aid is necessary to ensure that water does not cling and leave marks on dishes during the drying phase. For optimum rinsing and drying results, use dishwasher detergent and add reactivation salt and rinse aid separately. Rinse aid helps dishes dry faster after they have been washed. Rinse aid is poured into the container and the amount set is dispensed automatically. Liquid dish soap and detergent can damage the rinse aid reservoir. Only fill the rinse aid reservoir with rinse aid formulated for domestic dishwashers. If you stop using combination detergents, refill the reactivation salt and rinse aid. Turn the refill reminders back on if required. The dishwasher can be damaged by high concentrations of acid. Under no circumstances should you use citric acid with a higher acid content.
- Page 37: Before using for the first time Adding rinse aid Wipe up any spilled rinse aid to prevent excess foam during the next program. You can adjust the rinse aid dosage for best wash results. When Refill rinse aid appears in the display, the reservoir contains sufficient rinse aid for 2–3 programs only. Add rinse aid in plenty of time. Press the yellow button on the lid of the rinse aid reservoir. The rinse-aid refill indicator will go out when filled. Fill with rinse aid until the filling level indicator changes to a dark color. The rinse aid reservoir holds approximately 110 ml. Close the lid firmly until you hear it click into place to prevent water from entering the reservoir.
- Page 38: Changing settings You can alter the dishwasher’s controls to suit changing requirements by adjusting the settings. The selected setting is marked in orange. The settings can be altered at any time. Change the value displayed and confirm with OK. Opening the Settings menu Turn the dishwasher on using the sensor control. The Programs menu will appear in the display. To exit a sub-menu again, use the Back sensor button. For more information about the display functionality, see “Display functions” under “Machine description.” Closing the settings menu
- Page 39: Settings Language The current time of day must be set before you can use the timer option. The display can be set to appear in one of several different languages. You can change the language used in the display and also the country via the Language sub-menu. You can select either a 24-hour or 12-hour clock. The flag after the word Language serves as a guide if a language that you do not understand has been set. Keep selecting the menu option that has a flag after it until you reach the Language sub-menu. Select the setting you want for the clock format. You can set the current time of day. Set the hours and the minutes and confirm by pressing OK. The time of day has now been saved.
- Page 40: Your dishwasher is fitted with a water softener. The dishwasher must be programmed to the correct water hardness for your area. Your local water authority will be able to advise you of the water hardness level in your area. Where the water hardness fluctuates, always program the dishwasher to the higher value. If the water hardness in your area is available in a unit other than °dH, you can convert the values. 1 °dH = 1.04 gpg = 0.18 mmol/l = 1.78 °fH.
- Page 41: Settings Setting the water hardness You can adjust the rinse aid dosage for best results. Select the water hardness level in your area and confirm with OK. The rinse aid dosage can be set from 0 to 6 ml. AutoDos automatically adjusts the amount of detergent to the selected program. 3 ml is the factory default setting. If spots appear on dishes and glassware, increase the rinse aid dosage. If clouding or smearing appears on dishes and glassware, decrease the rinse aid dosage. For best results, you can adjust the dispensing quantity of the PowerDisk. Select the Dosage amount menu option.
- Page 42: Settings Your dishwasher is equipped with an integrated Wi-Fi module. The Miele app is available to download free of charge from the Apple App Store or from the Google Play Store. You can connect your dishwasher to your Wi-Fi network. This will increase the energy consumption, even when the dishwasher is turned off. Select the App menu option and confirm with OK. Make sure that your Wi-Fi network signal strength is strong enough at the installation site of your dishwasher. Once your dishwasher is connected to your Wi-Fi network, you can use the app to control your dishwasher remotely. Call up information on the operating status of your dishwasher. Call up information on the program sequence of your dishwasher. Set up a Miele@home network with other WiFi-enabled Miele appliances.
- Page 43: Settings WPS Deactivate You can connect your dishwasher to your Wi-Fi network using WPS (Wireless Protected Setup). If you do not wish to use the Wi-Fi module of your dishwasher, you can turn it off. Your WiFi router must support WPS. If you wish to connect your dishwasher to your Wi-Fi network, you can turn on the Wi-Fi module. Activate the WPS function on your router within 2 minutes. If the connection fails, you have probably not activated WPS on your router quickly enough.
- Page 44: Displaying the connection status allows you to call up the current connection status of your dishwasher. This menu option only appears if you have already connected your dishwasher to your Wi-Fi network. You can use this menu option to reset all Wi-Fi module settings to the factory default settings. The network configuration should be reset whenever a dishwasher is being disposed of or sold, or if a used dishwasher is being put into operation. This is the only way to ensure that all personal data has been removed. Select the App menu option to connect via the app. Follow the user navigation in the app for setup. Select the WPS menu option to connect via WPS. Follow the instructions on the display for WPS connection.
- Page 45: Settings Remote control (depending on the model) This menu option will only be displayed if you have connected your dishwasher to your Wi-Fi network. If you wish to permanently turn off the Remote control option, you can do this under this menu option. If you have connected your Miele domestic appliances to your Wi-Fi network, you can use your dishwasher as the SuperVision master appliance. Even if the Remote control option is switched off, you can use the Miele app to call up information about your appliance. SuperVision display In order to use your dishwasher as the SuperVision master appliance, you have to activate the SuperVision display. When you have activated the SuperVision display, the symbol appears in the display. The status of the Miele domestic appliances in your Wi-Fi network is displayed when the SuperVision display is activated.
- Page 46: Settings Appliance list Remote Update (depending on the model) You can specify which appliances in the Miele@home network should be displayed on your dishwasher. You can specify whether the audible signals of those appliances should be replicated by your dishwasher. The RemoteUpdate menu option is only displayed if the requirements for using Miele@home have been met. The RemoteUpdate function is used for updating the software in your dishwasher. If an update is available for your dishwasher, it will automatically download it. Updates will not be installed automatically. They must be initiated manually. If you have connected your Miele domestic appliances to your Wi-Fi network via WPS, the appliances are not automatically displayed in the appliance list. You can include these appliances in the list using the appliance search function. Miele recommends installing updates.
- Page 47: Settings Running RemoteUpdate Information about the content and scope of a RemoteUpdate will be provided in the Miele app. This menu option will only be displayed if you have connected your dishwasher to your Wi-Fi network. A message will appear in your dishwasher display if a software update is available. The SmartStart function is used for starting your dishwasher automatically at a time when your power supplier’s electricity rates are most economical. You can install the update immediately or postpone this until later. Deactivate RemoteUpdate if you do not want to install the update. If you have activated SmartStart, the Timer menu will show SmartStart. The update may take several minutes. Do not turn the dishwasher off during the update.
- Page 48: Settings Setting the electricity-rate times Before you can use the EcoStart option, you must set at least one electricity-rate time. This option is not available in all areas. You can use the EcoStart option to take advantage of your electricity supplier’s cheaper energy tariffs. Select an electricity-rate time from R1–R3 to set. With this option selected, your dishwasher will start automatically at your electricity supplier’s cheapest rate times. You can now select the priority of the saved electricity-rate time. To use this option, you must first set up to 3 electricity rate time zones in which the dishwasher can start. Contact your electric supplier to find out the times of the cheapest electricity rates. The program will end at the set finish time at the latest.
- Page 49: Changing the electricity-rate times You can change the start, finish, or priority of an electricity-rate time. You can set whether the temperature should be displayed in °F/Fahrenheit or °C/Celsius. Select an electricity rate time from R1–R3 to change. The factory default setting is °C/Celsius. You can set the display brightness and the type of display. You can set the display brightness to one of 7 different levels. You can select a bright or dark color scheme for the display. You can delete the settings for an electricity-rate time and deactivate the EcoStart option for this time zone. Select an electricity-rate time from R1–R3 to delete. The settings for the electricity-rate time selected will be reset.
- Page 50: Settings Volume A sequence of audible signals will sound at the end of the program or if there is a fault. You can turn off the refill reminders for reactivation salt and rinse aid if you wish. In the event of a fault, the alarm tone will sound 4 times at intervals with a short pause between each set of tones. Please make sure that if you stop using combination detergents, you refill the reactivation salt and rinse aid. The alarm tone that sounds when there is a fault cannot be deactivated. The volume of the audible signals at the end of the program can be set to one of 7 different settings. An audible tone sounds each time a sensor button outside of the touch display is pressed. The volume for the keypad tone can be set to one of 7 different settings. If you turn the dishwasher on or off, a brief melody will sound. You can turn the melody off.
- Page 51: AutoOpen In some programs, the door automatically opens slightly to assist the drying process. You can choose this function to increase the cleaning performance of the programs with a second interim rinse. When this function is activated, water consumption may increase. The door may open automatically at the end of the program. Keep the area around the door free of obstructions. BrilliantLight This dishwasher is equipped with interior lighting. Steam from the dishwasher could damage the edges of delicate cabinets and countertops. If you mainly use low-temperature programs, there is a risk of bacteria and unpleasant odors building up in the wash cabinet. If this function is switched on, a message will be displayed recommending the use of a high-temperature program after several low-temperature programs have been run.
- Page 52: Settings You can set your water connection type. The system lock prevents your dishwasher being used without your knowledge. If you select Automatic, the dishwasher detects which water connection is currently being used and automatically selects the right setting. If an attempt is made to turn the dishwasher on when the system lock is activated, the symbol will appear in the display. Select Cold water, if you are only using a cold water connection. The lock must be deactivated before the dishwasher can be used. Select Warm water, if you are only using a hot water connection. The appliance will lock each time it is switched on while the system lock is activated. The appliance is delivered with the system lock deactivated. You can view legal information about the open source licenses for your dishwasher.
- Page 53: Settings Copyrights and licenses for operator and control software Miele uses their own and third party software which is not subject to any open source license. This software is protected by copyright. The copyright powers of Miele and third parties must be respected. This device contains software components distributed under open source license conditions. Please refer to menu item for the open source components contained in the appliance. The corresponding copyright notices and copies of the licensing terms are available. The liability and warranty provisions of the open source licensing conditions apply only in relation to the respective rights holders. Additional information can be accessed locally via the specified IP address. The liability and warranty arrangements for the open source licenses apply only in relation to the respective rights holders.
- Page 54: You can display information about your dishwasher. The dishwasher is equipped with a demo mode for showroom use. You can reset all dishwasher settings to the factory default settings. WiFi module settings have to be reset separately. Touch the sensor control to access settings. Select Reset settings? and confirm with OK. Switch to the main menu using the sensor control. Select the Information menu option. Select the information you want and confirm your choice with OK. Operating hours, program sequences, total consumption, and fault memory can be displayed.
- Page 55: Caring for the environment Energy-saving dishwashing This dishwasher is exceptionally economical in its use of water and electricity. Washing in a dishwasher generally uses less water and energy than washing by hand. There is no need to pre-rinse items under running water, and this unnecessarily increases water and energy consumption. Make full use of the basket capacity without overloading the dishwasher. Choose a program that best suits the degree of soiling and the type of dishes being washed. Select the Normal program for energy-saving dishwashing. If you have a hot water connection, choose the Energy Saver program. Follow the detergent manufacturer’s recommendations on detergent dosage. Reduce the amount of detergent by 1/3 when using powder or liquid detergent if the baskets are only half full.
- Page 56: Loading the dishwasher The spray arms must not be blocked by items which are too tall or hang through the baskets. Remove coarse food residues from dishware. There is no need to pre-rinse items under running water. Make sure that small items cannot fall through the holders in the baskets. Damage can be caused by ash, sand, wax, lubricant, or paint. Some foods may contain natural dyes that can discolor plastic items in the dishwasher. Do not wash items soiled with these substances in the dishwasher. Dishes can be loaded anywhere in the baskets, but certain notes should be observed. Load the dishware so that water can access all surfaces. Hollow items such as cups and glasses must be inverted in the baskets.
- Page 57: Loading the dishwasher Wash items not suitable for dishwashers: - Wooden cutlery and dishes or items with wooden parts may discolor and fade. - Aluminum parts can be damaged by caustic alkaline detergents, risking an explosive chemical reaction. - Craft items, antiques, valuable vases, and decorative glasses are not dishwasher-safe. - Plastic items that are not heat resistant may melt or lose shape. - Copper, brass, tin, and aluminum items may discolor or become dull. Tip: When purchasing new dishware and cutlery, ensure they are dishwasher-safe. - Colors painted over a glaze may fade after a number of rinses. - Delicate glasses and glassware containing lead crystal may cloud over time. Glass care Clouding may occur on glasses after frequent washing in the dishwasher. When washing delicate glassware, select a special glass-care program with very low temperatures to reduce the risk of clouding. Damage caused by using unsuitable cleaning agents can irreparably damage silverware. Use detergents with glass protective additives.
- Page 58: Loading the dishwasher Loading examples Loading for 10 standard place settings with cutlery tray Upper basket Lower basket Cutlery tray
- Page 59: Loading the dishwasher involves organizing for 16 standard place settings with a cutlery tray. The upper basket is designated for specific items, while the lower basket accommodates larger dishes. The cutlery tray is used for utensils.
- Page 60: Loading the dishwasher You can put cups, small bowls, and flat dishes on the FlexCare cup rack. Glasses can be arranged along the FlexCare cup rack so they sit securely during the program. If you run the dishwasher without the upper basket, water can leak out of the dishwasher. Only run the dishwasher with the upper basket in place. Use the upper basket for small, lightweight, and delicate items such as cups, saucers, glasses, and dessert bowls. Shallow pans or casserole dishes can also be placed in the upper basket. Long items such as soup ladles and mixing spoons should be placed lying down across the front of the upper basket. Lower the FlexCare cup rack to do so. Raise the FlexCare cup rack upward to make room for tall items.
- Page 61: Loading the dishwasher Adjusting the FlexCare cup rack You can set the height and depth of the cup rack at 2 different levels to accommodate larger cups. The silicone elements in the cup rack are designed to hold tall glasses with long stems securely. Lower the cup rack and lean the glasses against the openings. Pull the cup rack upwards and click it into the desired position. You can adjust the left insert of the 3D MultiFlex Tray to make space for taller glasses.
- Page 62: Loading the dishwasher involves lowering the spikes on both right-hand rows to arrange larger dishes. You can lower every other spike to accommodate items like cereal bowls. To lower the spikes, press the yellow lever downward and then lower the dark gray spikes. Place the bowls vertically in the row of spikes.
- Page 63: Loading the dishwasher Lower the upper basket. The upper basket can be adjusted on 3 levels with 3/4 (2 cm) between each level. The upper basket can also be set at an angle so that water can run off freely. Make sure that the basket can slide smoothly in and out of the wash cabinet. Pull out the upper basket. Pull upwards on the levers at either side of the upper basket. Lift the basket until it clicks into place. Adjust the basket to the desired height and then push the levers securely back down into position. When adjusting the upper basket, make sure that tall plates in the lower basket do not block the middle spray arm.
- Page 64: Loading the dishwasher involves several steps for optimal organization. The lower basket is designed for larger and heavier items such as plates, serving platters, and saucepans. Glasses, cups, and small plates can also be placed in the lower basket. The row of spikes in the lower basket can be lowered to create more space for large items like pots and pans. The rear section of the lower basket is designated for washing cups, glasses, plates, and pots. To lower the row of spikes, press the yellow lever downward. Very large plates should be placed in the center of the lower basket. When tilted, plates up to 13 3/4 in diameter can be accommodated. Proper loading ensures effective cleaning and maximizes space. Consider the arrangement of items to enhance washing efficiency.
- Page 65: Loading the dishwasher FlexCare Glass & Bottle The glass and bottle holders are used to wash stemware, tall glasses, and bottles. The silicone elements in the glass holder provide a stable and secure hold for delicate stemware. You can set the glass and bottle holders at 2 different heights. Stemware such as wine glasses, champagne flutes, and beer glasses can be pinned into the openings of the glass holders. Slide the glass and bottle holder to the desired height until the catches click into place at the top or the bottom. The glass and bottle holders can be raised to make more room for tall items.
- Page 66: Loading the dishwasher Loading the FlexCare Glass & Bottle The glass and bottle holders can be used to keep tall, narrow, and hollow containers secure during a program. Lean the containers into the holders. For the best cleaning results, use the “BottleClean” extras. The inserts in the glass and bottle holders can be raised to make more room for tall glasses or bottles.
- Page 67: Loading the dishwasher involves using MultiClips to fasten light wash items made from plastic. The XL-Assist is designed to secure large wash items, such as pots and pans, allowing for better drying results. Ensure that dishware does not obstruct the middle spray arm when loading. Smaller items of dishware can be positioned under larger items for optimal space usage. To use the XL-Assist, slightly lift it, fold it out, and hook it back in the new position. Secure light items to the MultiClips for effective washing. Unfold the XL-Assist to support large items of dishware. Place the edges of large dishware on the XL-Assist for stability. Proper loading techniques enhance washing efficiency and drying results. Ensure all items are securely positioned to avoid movement during the wash cycle.
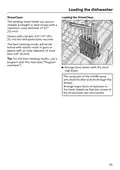
- Page 68: Loading the dishwasher The drinking straw holder can accommodate 5 straight or bent straws with a maximum outer diameter of 1/2 (12 mm). Straws with a length of 4-10 (10–25 cm) are held particularly securely. The best cleaning results will be obtained with straws made of glass or plastic with an inner diameter of more than 1/4 (6 mm). For the best cleaning results, use a program with Pre-rinse. Arrange bent straws with the short side down. The spray jets of the middle spray arm must be able to flush through the straws. Arrange larger items of dishware in the lower basket so that the straws in the StrawClean are not covered.
- Page 69: Loading the dishwasher Adjusting the StrawClean Removing the StrawClean The adjustable bracket of the StrawClean ensures that the straws are held securely. You can remove the StrawClean to get more space in the lower basket. Unlock the retainers on both sides of the StrawClean and remove it. To accommodate long straws, pull up the StrawClean bracket until it locks into the upper position. When the StrawClean is inserted, one side of the rows of spikes cannot be folded down. To adjust the bracket back to the lower position, press the bracket down against the resistance. When adjusting the upper basket, make sure that a straw does not block the middle spray arm.
- Page 70: Loading the dishwasher involves specific instructions for filters. You can wash 2 ventilation hood filters in the upper basket and 2 filters in the lower basket at once. Select the Filters program for optimum dishwashing results. If you only want to wash 2 filters, put them in the upper basket. Protruding parts can damage the dishwasher; load the filters so that no corners protrude over the side of the basket. Heavy and sharp wash items can damage the coating of the basket struts; load the filters carefully. Set the upper basket into the top or middle position if you load filters in the lower basket. At the end of the program, the filters may still contain hot water; be careful when unloading the filters.
- Page 71: Loading the dishwasher involves pushing the left insert to accommodate tall items and long stemmed glasses in the upper basket. Cutlery should be arranged in the cutlery tray as shown. For the 3D MultiFlex Tray, utensils should be grouped in zones for easier unloading. Large and long utensils can be placed in the recessed center part of the tray. Tall items should be arranged so they do not block the upper spray arm. Spoon heads should contact at least one of the serrated retainers on the base of the cutlery tray for proper water runoff. The height of the right-hand insert can be adjusted for larger utensil items or smaller dishes. If spoon handles do not fit between the holders, they can be laid the other way round. The insert can be pulled inward by the yellow handle and clicked into place in one of the two positions.
- Page 72: Detergents There are different types of cleaning agents. Damage caused by using unsuitable cleaning agents. Cleaning agents that are not suitable for domestic dishwashers can cause damage to the dishwasher or to the wash items. Powder and liquid gel cleaning agents allow you to adjust the amount dispensed according to the load size and the level of soiling. Tab cleaning agents are suitable for most levels of soiling. Only use cleaning agents formulated for domestic dishwashers. Combination products contain rinse aid and water softener. Modern cleaning agents contain various active ingredients. The cleaning and drying performance of combination cleaning agents can vary greatly. For optimum cleaning and drying results, use dishwasher cleaning agent and add salt and rinse aid separately.
- Page 73: Detergent dispensing There are 2 ways of dispensing the detergent. Risk of chemical burns from detergent. Dishwasher detergents can cause burning on the skin and in the eyes, nose, mouth, and throat. Avoid contact with detergents. Do not inhale or ingest powder detergents. Seek medical attention immediately if detergent has been swallowed or inhaled. During automatic dispensing, the AutoDos function will automatically dispense the required amount of detergent. If you do not wish to use AutoDos, you can manually dispense the detergent into the detergent compartment. Keep children away from detergents.
- Page 74: Detergents Activating AutoDos Before you can use AutoDos, you must insert a PowerDisk containing powder detergent into the PowerDisk compartment. Before you first use AutoDos, remove the tab from the AutoDos lid and dispose of the tab appropriately. One PowerDisk contains enough detergent for approx. 20 rinse cycles, depending on the chosen program. Insert a PowerDisk. PowerDisks are available to order directly from Miele’s online store, Miele Customer Service, or from your Miele dealer. The AutoDos function will be activated automatically. This setting applies to all programs and you can change it in a program’s Options menu. Risk of chemical burns from residual detergent. Always remove residual detergent from in front of the dishwasher immediately.
- Page 75: Detergents Only replace the PowerDisk when the message PowerDisk empty. Deactivate AutoDos with OK. appears. Insert the new PowerDisk and press it evenly downward until it sits flush. Turn the AutoDos lid to the indicated position and open it. The message AutoDos lid open will appear on the display. Remove the empty PowerDisk.
- Page 76: Detergents The detergent powder must be dry so that it does not clump together. Do not fill the AutoDos system with any type of fluid. It is not permitted to refill the PowerDisk with powder detergent. This will invalidate the warranty. In order to ensure that the AutoDos function works at its best, check it each time you replace the PowerDisk and clean it if needed. Close the AutoDos lid and turn it until the lid handle is directly below the symbol. This activates the AutoDos function. The AutoDos lid must be closed to prevent damage to the AutoDos. Always close the AutoDos lid before you close the dishwasher door. Programs cannot start when the AutoDos lid is open.
- Page 77: Detergents Adding detergent Manual detergent dispensing Detergent must be manually dispensed if you have deactivated AutoDos in a program's Options menu. The detergent compartment holds a maximum of 3 1/2 tablespoons. There are marks in the detergent compartment to aid with dispensing: 1 1/4, 2 tablespoons (20, 30 ml). Follow the detergent dosage recommended by the manufacturer on the packaging. Unless directed otherwise, use one detergent tab or add 1 1/4 to 2 tablespoons (20 to 30 ml) of detergent to the detergent compartment. If you use less than the recommended amount of detergent, the dishware may not get properly clean. Some tabs may not dissolve completely when the program QuickIntenseWash is used. Push the lid shut until you hear it click into place.
- Page 78: Detergents The detergent must not cause the detergent compartment lid to get stuck. Do not overfill the detergent compartment. If you wish, deactivate automatic dispensing/AutoDos. Ensure that the detergent packaging is properly closed after use. This prevents the detergent from getting damp and clumping together. You can also apply a small amount of detergent to the inner panel of the door in programs that have a pre-rinse stage.
- Page 79: Operation Turning on the dishwasher Turn on the faucet if it is turned off. Choose your program according to the type of load and the degree of soiling. Make sure the spray arms can rotate freely. The different programs and their uses are described under Program overview. Close the door. Select the program you want in the display. Touch the sensor control. If the dishwasher has been turned off for longer than 1 minute, you will need to hold the sensor control for a bit longer. To select a different program, touch the Back sensor button to return to the Programs menu.
- Page 80: Operation Display of program duration Starting a program The estimated duration of the selected program appears on the display before the program begins. During the program sequence, the time left until the end of the program and the current program stage are displayed. Touch the Start sensor control. If necessary, confirm the previously displayed message with OK. The displayed duration may vary for the same program. As long as this message is showing, dishware can be added without compromising wash results. Risk of scalding due to hot water. When a program is selected for the first time, the display will show the average program duration for a cold water connection.
- Page 81: Operation End of the program The audible signal might sound at the end of the program. To save energy, the dishwasher will turn off automatically 10 minutes after the last time a sensor button is pressed or after the end of a program. The program has ended when the display shows the message Finished. You can turn the dishwasher back on again with the sensor button. In some programs, if the AutoOpen function is activated, the door will automatically open slightly. This improves the drying process. The drying fan may continue to run for a few minutes at the end of the program. If you are not satisfied with the cleaning or drying results, you can activate the Extra Clean or Extra Dry functions to boost the performance of the programs. Risk of damage due to steam.
- Page 82: Operation Turning off the dishwasher The dishwasher can be turned off at any time using the sensor control. Turning the dishwasher off during a program stops the program. The dishes will cool much faster if you open the door when the program has ended. First unload the lower basket, then the upper basket, and finally the 3D MultiFlex Tray (if present). This will prevent water drops from the upper basket and 3D MultiFlex Tray from falling onto the dishes in the lower basket. Risk of damage from leaking water. Leaking water can cause damage. If the dishwasher is not going to be used for a longer period of time, the faucet should be turned off.
- Page 83: Operation Interrupting a program A program will be interrupted as soon as the door is opened. If the door is closed again, the program will continue from the point it was at before the door was opened. Canceling or changing a program If a program is canceled, important program stages may be missed. A program should only be canceled in the first few minutes. Risk of scalding due to hot water. During operation, water in the dishwasher may be very hot. During operation, only open the door with extreme caution. If a program has already started and you wish to cancel it, proceed as follows: Select the Cancel option.
- Page 84: Activating the timer The timer gives you several options for starting a program at a later time. The start or finish time of a program can be delayed. You can also use the EcoStart or SmartStart functions to benefit from lower electricity rates at night. When using the timer function, make sure that the detergent compartment is dry before adding detergent. Do not use any liquid detergents. These can leak out. To prevent children coming into contact with dishwasher detergent, do not fill the detergent dispenser until just before starting the program. Use the safety lock to secure the dishwasher door. After you have activated the timer, all the displays will turn off after a few minutes to save energy. You can also activate a timer via the Miele app.
- Page 85: Options Setting “Start at” With the Start at function, you set the exact time at which you want the program to start. The EcoStart function enables you to benefit from cheaper electricity rates at night. Before you can use this option, you need to set up to 3 electricity-rate time zones. Set the start time and confirm with OK. The dishwasher will then start automatically in the most economical rate zone within the time set. Setting “Finish at” Use the Finish at function to set the latest time by which the program selected has to be finished. Waiting for EcoStart will appear in the display. The program will start automatically when the estimated start time is reached. Set the finish time and confirm with OK.
- Page 86: Options Setting SmartStart The SmartStart function is used for starting your dishwasher automatically at a time when your energy costs are most economical. You can change the time set for the timer or delete it in order to start the selected program immediately. If you have activated the SmartStart function in the Settings menu, the Timer menu will no longer show the EcoStart function but will instead show SmartStart. If your energy provider offers this service, they will send a signal to your dishwasher when energy costs are at their most economical. The program starts within one minute after the signal is received. You can set the time by which the program selected has to be finished, and the dishwasher will calculate the latest possible start time. The timer stops if you switch off the dishwasher while a timer is running or select the Cancel option. You can also change the time set for the timer or delete it using the Miele@mobile app. Waiting for SmartStart will appear in the display. The selected program will start automatically as soon as the energy provider has sent the signal or the latest possible calculated start time has been reached.
- Page 87: The MobileStart option will remain activated until you deactivate it again using the sensor control. You can start your dishwasher remotely using the Miele app. To do this, you first need to install the app on your mobile device and connect the dishwasher to your Wi-Fi network. If applicable, activate the MobileStart option. Even if the MobileStart option is not active, you can display the status of your dishwasher and apply settings using the Miele app. Turn the dishwasher on using the sensor control. If you start a program using the Start sensor control, the MobileStart option will automatically be activated for the duration of the program. Touch the sensor control to activate it. Turn the dishwasher off using the sensor control. The dishwasher can now be operated remotely using the Miele app.
- Page 88: Operating hours display You can display how many hours the dishwasher has been in operation so far. Turn the dishwasher on using the sensor control. If necessary, confirm the messages and refill reminders with OK. Use the Back sensor control to switch from the Programs menu to the main menu. Select the Information menu. The dishwasher’s operating hours are indicated in a footnote on the display. Touch the Back sensor control to return to the main menu.
- Page 89: Program overview Program when to use Program sequence Normal wash a full load of normally soiled dishware with the ability to adjust energy and water consumption based on the soil load of the dishes. For heavily soiled dishware and normally soiled pots, pans, and cutlery with dried on residue; use 20% more detergent than recommended. For temperature-sensitive glasses and dishware with light soiling. Use 50% of the recommended detergent. Quick program for standard dishware soiling that has not dried on. To sanitize dishes, e.g., baby bottles, cutting boards, and preparation dishware. This program is used for energy labeling purposes.
- Page 90: Program overview Consumption Duration Values were calculated under standardized testing conditions. In practice there may be variations to these figures due to variable conditions and data recorded by the sensors. Durations shown will reflect your household conditions. In practice, the selected settings, extras, or operating conditions may result in different values. The energy consumption with a hot water supply includes the energy used to heat the water.
- Page 91: Program overview Pro- When to use Program sequence Pre-rinse Main wash Final rinse Extra quiet program for mixed dishware with standard, slightly dried-on residue. Economy water and energy saving program for standard dishware soiling that has not dried on. The water intake temperature must be 115°F (45°C) for light to normally soiled dishware. Wash program for cleaning Miele ventilation hood filters.
- Page 92: Program overview Values were calculated under standardized testing conditions. In practice there may be variations to these figures due to variable conditions and data recorded by the sensors. Durations shown will reflect your household conditions. In practice, the selected settings, extras, or operating conditions may result in different values. The energy consumption with a hot water supply includes the energy used to heat the water.
- Page 93: Program overview Program sequence Pre-wash Main wash Interim rinse Final rinse Drying Special cleaning program to remove machine grease deposits from the dishwasher. Sensor-wash program for dried-on residue and non-sensitive dishware. Program for especially large, temperature-resistant wash items such as very large pots/pans. To wash glasses without detergent and rinse aid; rinse cycle with warm water. Program for rinsing the wash cabinet after filling the salt reservoir.
- Page 94: Program overview Consumption Duration Values were calculated under standardized testing conditions. In practice there may be variations to these figures due to variable conditions and data recorded by the sensors. Durations shown will reflect your household conditions. In practice, the selected settings, extras, or operating conditions may result in different values. The energy consumption with a hot water supply includes the energy used to heat the water. Minimum value: partial load with light soiling Maximum value: full load with heavy soiling
- Page 95: Options allow you to adjust the programs for optimum wash results. The temperature and energy consumption may slightly increase with the selected options. You can select or deselect options in the Options menu before running a program. Not all options can be selected in every program or used in combination. Options that are not available are grayed out and cannot be selected. Selected options are marked in orange. To cancel the selection of an option, touch the sensor control for that option again. The selected extras remain active for that program until the settings are changed. The selected options are displayed in the roll-down menu. You can reduce the program cycle time using the Express extra.
- Page 96: Options AutoDos The AutoDos extra can be used to switch automatic dispensing on or off. You can select this option to increase the cleaning performance of the program. BottleClean You can select the BottleClean extra to increase the cleaning performance of the programs for tall, narrow hollow containers. Extra Dry You can select this option in order to increase the program drying performance. When this extra is activated, the program cycle time is extended and the final rinse temperature increases. IntenseZone You can select the IntenseZone extra to increase the cleaning performance of the programs in the lower basket. When this extra is activated, the program cycle time is extended and the cleaning temperature increases.
- Page 97: Cleaning and care The wash cabinet is largely self-cleaning, provided that the correct amount of detergent is always used. Check the condition of your dishwasher regularly (approx. every 4–6 months) to avoid faults and problems. The frequent use of low-temperature wash programs increases the risk of bacteria and odors inside the wash cabinet. Run the Pots & Pans program once per month to clean the wash cabinet and prevent odors from developing. All surfaces are susceptible to scratching. Contact with unsuitable cleaning agents can alter or discolor all surfaces. Only use cleaning agents formulated for use on the relevant surfaces. If residues such as limescale or grease have been deposited, use the Clean Machine program to clean the dishwasher. Follow the dosage recommended by the manufacturer on the packaging. Clean the filters in the wash cabinet regularly.
- Page 98: Cleaning and care Hygiene cycle The door seal and the sides of the dishwasher door are not accessed and cleaned by the spray arm jets. Mold can develop in these areas. Frequent use of low-temperature wash programs increases the risk of bacteria and odors. Regularly run a high-temperature program to prevent contamination and odors. Wipe the door seals regularly with a damp cloth to remove food deposits. You can activate or deactivate a Hygiene info message. If you deactivate this message, run the Pots & Pans program once per month. Wipe off any food or drink residues which may have dripped onto the sides of the dishwasher door. The control field should only be wiped with a clean, damp cloth.
- Page 99: Cleaning and care To avoid damaging the external surfaces, do not use cleaning agents containing soda, ammonia, acids, or chloride. Soiling that is left too long might become impossible to remove and could cause the external surfaces to alter or discolor. It is therefore best to remove any soiling immediately. Clean the appliance front with a clean soft sponge and a solution of warm water and liquid dish soap. After cleaning, wipe the front dry using a soft cloth. A clean, damp microfiber cloth without detergent can also be used.
- Page 100: Cleaning and care Turn the AutoDos lid to open it. If the Clean AutoDos message is displayed, check that the AutoDos is clean, and clean it if necessary. Remove the PowerDisk if appropriate. Check the AutoDos each time you replace the PowerDisk and clean it if needed. Unlock the PowerDisk holder by pulling the yellow pull tab and simultaneously pull the PowerDisk holder upward using the yellow tabs. Clean the AutoDos housing and the PowerDisk holder with a damp cloth. Dry all parts well so that the detergent powder does not clump together. It is very important that no moisture stays inside the AutoDos system during cleaning.
- Page 101: Cleaning and care The AutoDos lid must close tightly so that the detergent powder does not get wet and clump together. Make sure that all seals are clean and clean them if necessary. Insert a filled PowerDisk and press it evenly downward until it sits flush. Close the AutoDos lid and turn it until the lid handle is directly below the symbol. Regularly check the lower spray arm for any blockages to ensure that the detergent outlet of the AutoDos can be fully flushed out. Pull the yellow pull tab in the direction of the arrow and reinsert the PowerDisk holder at the same time. The arrows in the PowerDisk holder and in the viewing window must point toward each other. The holder must lie flat.
- Page 102: Cleaning and care Removing the cutlery tray (if present) Cleaning the spray arms Particles of food can get stuck in the spray arm jets and bearings. The spray arms should therefore be inspected regularly (approx. every 2–4 months). Never run a wash program without using the spray arms. Damage due to soiling entering the circulation system. Without filters, soiling can enter the circulation system and cause a blockage. Do not run a wash program without the lower spray arm or without the filters. When cleaning the filters and spray arms, make sure that coarse soiling cannot get into the circulation system. Turn off the dishwasher.
- Page 103: Cleaning and care Removing the upper spray arm Remove the lower basket. Push the upper spray arm upward to engage the inner ratchet. Then unscrew the spray arm by rotating the screw thread counterclockwise. Rotate the screw thread of the lower spray arm counterclockwise and pull the spray arm upward to remove. Removing the middle spray arm Rotate the screw thread of the middle spray arm clockwise and remove the spray arm.
- Page 104: Cleaning and care Cleaning the spray arms Reinstall the upper spray arm and tighten it by hand. Use a pointed object to push food particles that are stuck in the spray arm jets into the spray arm. Rinse the spray arm thoroughly under running water. Replace the middle spray arm and turn the screw thread counterclockwise until it engages. Make sure that the recesses in the lock line up.
- Page 105: Cleaning and care Reinstall the lower spray arm and ensure that the filter combination lies flat in the base of the wash cabinet. Slide the cutlery tray back onto the rails from the front. Replace the safety clips in the rails on both sides of the cutlery tray. Rotate the screw thread of the lower spray arm clockwise until the arrow in the viewing window points to the lock symbol. Make sure the spray arms can rotate freely. Damage due to soiling entering the circulation system. The lower spray arm is used to secure the filter combination. Without filters, coarse soiling can enter the circulation system and cause a blockage. Do not run a wash program without the lower spray arm or without the filters.
- Page 106: Cleaning and care Checking the filters in the wash The filter combination in the base of the wash cabinet retains coarse soil from the suds solution. This prevents soiling from getting into the circulation system. Remove any coarse soiling before removing the filter combination. Damage can occur due to soiling entering the circulation system. Do not run a wash program without the lower spray arm or without the filters. The filters can become blocked by soiling that collects over time. The level of soiling and time it takes before the filters need cleaning will vary depending on use. The message to remove filters and clean them will appear in the display after every 50 program sequences. Check the filter combination and clean if necessary. Confirm the message with OK.
- Page 107: Cleaning and care In order to clean the inside of the filter, pull the microfilter on the plastic ring downwards and away from the filter combination. Rotate the screw thread clockwise until the arrow in the viewing window points to the lock symbol. Damage due to soiling entering the circulation system. The lower spray arm is used to secure the filter combination. Rinse all of the filters under running water. If necessary, use a soft cleaning brush to remove soiling. Do not run a wash program without the lower spray arm or without the filters. Reinstall the filter combination so that it lies flat in the base of the wash cabinet. Refit the lower spray arm to the filter combination using the screw thread.
- Page 108: Cleaning and care Cleaning the drain pump If water remains in the wash cabinet after the end of a program, the water has not been drained off. The drain pump may be blocked by foreign objects. These foreign objects are easy to remove. Disconnect the dishwasher from the power supply. Take the filter combination out of the wash cabinet. Press the catch of the drain pump cover inward. Scoop the water out of the wash cabinet using a small container. Tip the cover inward until it is released. Rinse the cover thoroughly under running water and remove any foreign objects.
- Page 109: Cleaning and care Damage due to incorrect cleaning. The components are delicate and can be damaged during cleaning. Take care when cleaning the drain pump. The drain pump is underneath the cover. Risk of injury from glass splinters. It is especially difficult to see glass splinters in the drain pump. Carefully remove any foreign objects from the drain pump. Check the drain pump impeller by manually turning it. You will feel a little resistance when you turn the impeller. Reinstall the cover by pushing down.
- Page 110: Frequently asked questions Many malfunctions and faults that can occur in daily operation can be easily remedied. You can save time and money in many cases, as you do not need to contact Miele Customer Service. Information to help you rectify faults yourself can be found at www.miele.com/service. The following tables are designed to help you to find the cause of a malfunction or a fault and to resolve it. This section only lists faults that you can remedy yourself. The display remains dark after the sensor control has been pressed long enough. The electrical plug is not plugged in. The circuit breaker has tripped. The dishwasher stops during a program.
- Page 111: Frequently asked questions Fault messages Problem Possible cause and solution The alarm tone is sounding. Before remedying the fault: Turn off the dishwasher. One of the following faults appears in the display: Fault F: Technical fault. There may be a technical fault. Waterproof fault: Turn the appliance off, close the water supply and contact Miele Service.
- Page 112: Frequently asked questions Door release The alarm tone is sounding. The following fault is indicated via the display: Door opening fault. The door does not open automatically. There may be a technical fault. Open the door manually and turn the dishwasher back on again. If the same fault message appears again, contact Miele Customer Service. The door does not close automatically. The door might be obstructed by an item inside the appliance. If this is the case, remove the item causing an obstruction and turn the dishwasher on again.
- Page 113: Frequently asked questions Water intake fault The alarm tone is sounding. One of the following messages appears in the display: Open the water supply. The water supply is turned off. Insufficient water. Open the water supply all the way. Before remedying the fault: Turn off the dishwasher. Water inlet fault. Clean the water inlet filter. The water connection pressure is lower than 7.25 psi (50 kPa). The intake water has not reached the required temperature of 115 °F (45 °C).
- Page 114: Frequently asked questions Water drainage fault The alarm tone is sounding. The following message appears on the display: Water was not pumped away, see Operating Instructions. There might be water in the wash cabinet. Clean the filter combination. Clean the drain pump. Remove any kink or loop in the drain hose.
- Page 115: Frequently asked questions Fault in the AutoDos (automatic dispensing) The AutoDos function is activated. There is no PowerDisk or an empty PowerDisk has been inserted. Insert a filled PowerDisk and confirm with Yes. If you do not wish to use automatic dispensing, deactivate the function using No. The AutoDos lid has not been closed properly. Close the AutoDos lid and lock it fully. If the lid cannot be fully closed, check whether the PowerDisk holder is lying flat. The program does not start or a program that has already started stops. The AutoDos function is active and the PowerDisk is empty. Replace the PowerDisk. If you do not wish to use AutoDos, deactivate the function using OK.
- Page 116: Frequently asked questions The display shows the following message: Fault F: Technical fault. Switch the appliance off and back on again. Read the Operating Instructions for additional details. There is a fault in the AutoDos or the PowerDisk holder has not been inserted. If the fault message appears again, there is a technical fault. You can continue using your dishwasher by removing the PowerDisk holder again and reinserting it. The AutoDos function was automatically deactivated. AutoDos requires maintenance. Please check AutoDos system. The dishware may not be clean because an insufficient amount of detergent was dispensed. Clean the AutoDos. Insert a full PowerDisk and close the AutoDos lid.
- Page 117: Frequently asked questions Spray arm fault Possible cause and solution The lower spray arm is blocked or the jets of the lower spray arm are clogged. The AutoDos detergent outlet may not be completely flushed out. Turn the dishwasher off and back on again. Perform a rotation check of the lower spray arm and rearrange the wash items if they are blocking the spray arm. Clean the lower spray arm. The dishwasher does not turn off at the end of the program. The dishware may not be clean because no detergent was dispensed. Confirm the message with OK. Restart the program.
- Page 118: Frequently asked questions General dishwasher problems The dishwasher has turned off automatically to save energy. Turn the dishwasher back on using the sensor button. The wash cabinet lighting has been turned off permanently. Turn the lighting back on again. The detergent compartment was still damp when detergent was added. Only add the detergent when the detergent compartment is dry. Residual detergent is blocking the catch. Remove the residual detergent. This is part of the normal function of the drying system. Water remains in the wash cabinet at the end of a program.
- Page 119: Frequently asked questions Build-up of odors in the wash cabinet The frequent use of low-temperature wash programs increases the risk of contamination and odors inside the wash cabinet. Regularly run a high-temperature program to prevent contamination and odors.
- Page 120: Frequently asked questions Noises There is a knocking noise in the wash cabinet. A spray arm is knocking against a wash item. Carefully open the door and rearrange the wash items that are obstructing the spray arm. There is a rattling noise in the wash cabinet. Wash items are not secure in the wash cabinet. Carefully open the door and rearrange the wash items so that they sit securely. There is a foreign object (e.g., glass shard) in the drain pump. Remove the foreign object from the drain pump. Knocking noise in the water pipes may be caused by the on-site installation or the cross-section of the piping. This will not affect the functioning of the dishwasher in any way.
- Page 121: Frequently asked questions Poor cleaning results The dishware is not clean. The dishware was not loaded correctly. The program was not powerful enough. Not enough detergent was dispensed. Items are blocking the path of the spray arms. The filter combination in the wash cabinet is not clean or was incorrectly installed. There are smears on glassware and cutlery. The rinse aid dosage is set too high.
- Page 122: Frequently asked questions The dishware is not dry Replenish the reservoir, increase the dosage, or change the brand of rinse aid. Leave the dishware in longer. Select the Extra Dry function. Switch to another detergent or replenish the rinse aid. Glassware has a brown or blue tinge. Switch to another detergent straight away. Glassware is dull and discolored. Purchase glassware which is dishwasher-safe. Tea or lipstick stains have not been completely removed. Select a program with a higher wash temperature. Switch to another detergent. White residue is visible on the dishware. Increase the dosage of rinse aid. The salt reservoir is empty.
- Page 123: Frequently asked questions Problem Possible cause and solution Fill the salt reservoir. The salt-reservoir cap has not been screwed on correctly. Unsuitable combination detergents were used. The water softener is programmed to too low a water hardness level. Too much detergent was dispensed. Not enough combination detergent was dispensed. The water softener performance is not sufficient. Plastic parts are discolored. Natural dyes may be the cause. Parts that are already discolored will not revert to their original color.
- Page 124: Frequently asked questions There are rust stains on the cutlery. The affected items are not corrosion resistant. No remedy. Purchase cutlery which is dishwasher-safe. A program was not run after reactivation salt was added. Traces of salt have got into the normal wash cycle. Immediately after filling the salt reservoir, run the rinse salt program without wash items. The salt reservoir cap has not been screwed on correctly. Replace it, making sure that it screws back on correctly.
- Page 125: Customer service information is available for Miele appliances and vacuum cleaners. You can register your product and view warranty terms at the manufacturer's website. Information for self-repair and spare parts is accessible online. For faults that cannot be resolved independently, contact your Miele dealer or Customer Service. Miele Service Calls can be booked online. Contact details for Customer Service are provided at the end of the document. When reaching out to Customer Service, provide the model identifier and serial number. The data plate containing this information is located on the right side of the door.
- Page 126: Optional accessories are available for the dishwasher, including detergent, rinse aid, and cleaning products designed for Miele appliances. Detergent tabs provide sparkling results even with stubborn food deposits and are phosphate-free, kind to the environment, and water-soluble. It is important to use the right dishwasher detergents for optimum results, as not all off-the-shelf products deliver the same performance in all dishwashers. Miele offers dishwasher products specifically designed for Miele appliances to ensure effective cleaning. Rinse aid helps achieve sparkling glasses and assists in drying dishes. PowerDisk is formulated for outstanding cleaning results in Miele dishwashers with AutoDos automatic dispensing. Reactivation salt protects silver and glass while preventing limescale buildup in the appliance. In hard water areas, using the complete Miele system of PowerDisk, rinse aid, and salt is recommended for optimal performance. Miele products contain active oxygen and enzymes for thorough cleaning, even at low temperatures. The special Miele formula ensures compatibility and effectiveness when used with Miele dishwashers.
- Page 127: Optional accessories Miele cleaning and care products provide optimum care for your dishwasher. Dishwasher cleaner cleans the dishwasher effectively and thoroughly. Descaling agent removes heavy limescale deposits. Dishwasher conditioner maintains the elasticity and leak tightness of the seals. Dishwasher freshener neutralizes unpleasant odors. Fresh, pleasant lime and green tea scent. Easy and convenient to attach to the dishwasher basket. Very economical; lasts for 60 rinses.
- Page 128: Installation The dishwasher may be connected to cold or hot water supplies. It is recommended to connect to a cold water connection to reduce energy consumption. If energy-saving water-heating sources are used, it is recommended to connect to the hot water connection. Water in the dishwasher must not be used as drinking water. The quality of the incoming water must correspond to the drinking water regulations of the country. The EnergySaver program requires a hot water connection between a minimum of 113°F/45°C and a maximum of 140°F/60°C. Connect the dishwasher to a drinking water supply. The higher the water intake temperature, the better the cleaning and drying results. The water inlet hose is approximately 5 ft (1.5 m) long. A flexible metal extension hose is available as an optional accessory.
- Page 129: Installation The dishwasher is supplied with a 3/8 diameter inlet and requires an on-site water connection with a 3/8 compression fitting and shut-off valve. A brief increase in the water pressure can damage components of the dishwasher. This dishwasher must only be operated when it is connected to a fully vented plumbing system. The water connection pressure needs to be between 7.25 and 145 psi (50 and 1,000 kPa). If the water connection pressure is too high, a pressure reducing valve must be installed. Damage to the power cord or water inlet hose can lead to electric shocks or water damage. The water inlet hose must not be shortened or damaged in any way. Do not place the dishwasher on the water inlet hose. You should open the faucet slowly and check for leaks.
- Page 130: Installation Water drainage Lay the drain hose so that it does not kink and is not being subjected to pressure or tugged. The appliance drainage system has a non-return valve, which prevents dirty water from flowing back into the dishwasher via the drain hose. Risk of damage from leaking water. Leaking water can cause damage. The dishwasher is supplied with approx. 5 ft (1.5 m) of flexible drain hose with an internal diameter of 7/8 (22 mm). The drainage length must not be longer than 13 ft (4 m) and the delivery head no higher than 3 ft (1 m). Only use a Miele approved connection piece when extending the drain line. Only use a Miele extension drain hose.
- Page 131: Installation Venting the water drain If the on-site drainage connection is situated lower than the guide path for the lower basket rollers in the open door, the drainage system must be vented. Otherwise, a siphoning effect during a program can cause the wash cabinet to empty itself of water. Open the dishwasher door fully. Remove the lower basket. Insert a screwdriver into the middle opening of the vent valve in the left wash cabinet wall. Press the screwdriver further into the opening and push it through the membrane behind. The vent opening for the water drain is now open.
- Page 132: Installation, repairs and other work by unqualified persons could be dangerous. Improper connection of the equipment grounding conductor can result in electric shock. Check that the voltage, frequency and fuse rating shown on the data plate match the household power supply. Do not modify the plug provided with the appliance; if it will not fit the outlet, have a proper outlet installed by a qualified electrician. The power outlet must be accessible after installation. Do not use an extension cord to connect the dishwasher to the electrical supply. A damaged power cord must only be replaced with a genuine Miele cord by a Miele service technician. If there is any question concerning the proper electrical connection or grounding of this appliance to the power supply, please consult a licensed electrician. The dishwasher comes equipped with a 4 ft (1.2 m) power cord with a molded plug for connection to 120 V, 60 Hz, 15 A grounded receptacle. This appliance must be grounded.
- Page 133: Installation It is possible to hardwire this appliance to an existing power cable. Prior to making a hardwire connection to the terminal, remove the power cord. CAUTION: Before servicing, disconnect the power supply by either removing the fuse, shutting off the power main, or manually “tripping” the circuit breaker. An existing flexible supply cord or cable shall have a minimum thickness of AWG 14. Installation work and repairs should only be performed by a qualified technician in accordance with all applicable codes and standards. Before connecting the appliance to the power supply, make sure that the voltage and frequency listed on the data plate correspond with the household electrical supply. After attaching the permanent power supply cord, check that all wires are correctly and securely placed in the connector and the strain relief is tightened. This appliance must be grounded. This appliance must be connected to a grounded metal, permanent wiring system, or an equipment-grounding conductor must be run with the circuit conductors.
- Page 134: Sound emission testing Prerequisites for sound emission tests Load the dishwasher with 16 standard place settings and use the Normal program. Setup for sound emission tests The dishwasher must be set up according to the following specifications. Install the dishwasher into an analyzing unit. Secure the front panel. Push the provided fleece strips (depending on model) under the base until it is flush with the appliance feet. Push the toe-kick into place in such a way that it is flush with the door panel.
- Page 135: Sound emission testing involves removing the protective film from the insulating strip. The insulating strip should be stuck onto the front top edge of the toe-kick board.
- Page 136: Please have the model and serial number of your appliance available when contacting Customer Service.
- Page 137: Page 137

IKEA 804.621.67 Lagan Dishwasher

BOSCH SMI6ZCS13E Dishwasher

Whirlpool FB4Y7S Dishwasher

IKEA 9001774318 Dishwasher

FISHER AND PAYKEL DD24DI9N Dishwasher

Amana 6000 Master Clean Dishwasher

Hisense HS643D60WUK Dishwasher

BOSCH SPI2HKS42E Dishwasher

Fisher and Paykel DD24DCTW9 N Dishwasher

FISHER PAYKEL DD24DAX9N Dishwasher