
Home > RANGEmaster > RANGEMASTER RDWP6015-I54 Integrated Dishwasher
RANGEMASTER RDWP6015-I54 Integrated Dishwasher









P60
Dishwasher
User Guide
&
Installation & Service Instructions
U111338-01


| General | Details |
|---|---|
| Name | RANGEMASTER RDWP6015-I54 Integrated Dishwasher |
| Make | RANGEmaster |
| Language | English |
| Filetype | PDF (Download) |
| File size | 1.11 MB |
 (1 votes, average: 5.00 out of 5)
 Loading...

RANGEMASTER RDWT6012-I1E Integrated Dishwasher

RANGEMASTER RDWP6015-I54 Integrated Dishwasher Overview
Summary of Contents
- Page 1: Dishwasher user guide Installation and service instructions
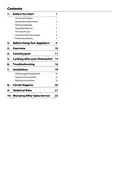
- Page 2: Before you start At time of delivery About these instructions During installation During normal use If a fault occurs Caring for the environment Recommendations Overview Control panel
- Page 3: This dishwasher is for use in GB and IE only. After sales service applies to GB and IE only. Do not connect the dishwasher to the electricity supply with an extension cable. Built-under and built-in dishwashers should always be installed under a continuous work surface attached to adjacent cupboards. Check packaging and dishwasher immediately for signs of transport damage. The mains plug should be easily accessible after installation. The water pressure should be between 0.03 Mpa and 1Mpa. Following installation, the first wash cycle must be with the dishwasher unloaded. The dishwasher must only be used for washing household dishes and cooking utensils. The water inside the dishwasher is not suitable for drinking.
- Page 4: Use only detergent and rinse aid specifically designed for use in domestic dishwashers. Keep detergents out of reach of children. The suitability of plastic items must be checked before placing them in the dishwasher. Keep children away from the dishwasher when the door is open. Do not place items in the dishwasher that are not suitable for dishwashing. The dishwasher door should not be left open. Sharp ended objects and knives should be placed into the cutlery basket with the blade or sharp end facing down. Call only service centres authorized by the manufacturer for repairs. This appliance can be used by children aged from 8 years and above with supervision. Dispose of packaging materials appropriately to protect the environment.
- Page 5: Disposing of your old dishwasher Old dishwashers still have some residual value. An environmentally friendly method of disposal will make sure that valuable raw materials can be recovered and used again. When your dishwasher has reached the end of its working life, unplug it from the mains. Cut off the mains cable and dispose of it together with the plug. Destroy the door locking mechanism so that children and pets cannot accidentally lock themselves in. This symbol on the product indicates that the product may not be treated as household waste. Instead, it should be handed over to your local community waste collection/recycling centre. By disposing of this product correctly, you will help prevent potential negative consequences for the environment and human health. Removing coarse residue from items before placing them into the dishwasher will save energy and water. Try only to use your dishwasher when it is fully loaded. Use the pre-wash program only whenever necessary. Place hollow items such as bowls, glasses and pots face down into the dishwasher. Do not overload your dishwasher.
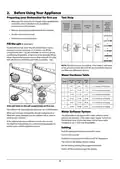
- Page 6: Before using your appliance, ensure the electricity and water supply specifications match the installation instructions. Remove all packaging material inside the machine. Set the water softener level and fill the rinse aid compartment. To add softener salt, open the salt compartment cap and fill it with 1 kg of salt and water until almost overflowing. The default water softener level is set to 3. Use filter and refinement devices if the water hardness level is above 90 dF. Only add water to the salt compartment on first use. Use softener salt specifically produced for use in dishwashers. The dishwasher is equipped with a water softener that reduces the hardness in the mains water supply. If the softener salt has overflowed, run a short washing program to protect your machine against corrosion.
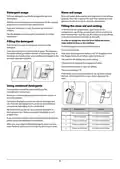
- Page 7: Detergent usage Only use detergents specifically designed for domestic dishwashers. Add the recommended amount of detergent for the selected programme to ensure the best performance. Rinse-aid makes dishes sparkle and helps them to dry without spotting. Use only rinse-aid for domestic dishwashers. To fill the rinse aid compartment, open the rinse-aid compartment cap. The dispenser should be refilled just before the start of each programme. If the dishes are heavily soiled, place additional detergent in the display. Never put combined detergents into the interior section or the cutlery basket. We recommend you do not use combined detergents in short programmes. When you stop using combined detergents, make sure that water hardness and rinse aid settings are set to correct level.
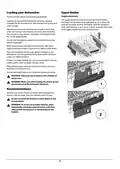
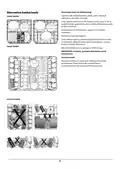
- Page 8: Loading your dishwasher For best results, follow these loading guidelines. The upper basket includes a mechanism which enables the height of the basket to be adjusted. Loading the household dishwasher up to the capacity indicated by the manufacturer will contribute to energy and water savings. Manual pre-rinsing of tableware items leads to increased water and energy consumption and is not recommended. You can place cups, glasses, stemware, small plates, bowls, etc. in the upper basket. Place all containers such as cups, glasses and pots in the dishwasher with the opening facing downwards. If there is a cutlery basket, you are recommended to use the cutlery grid in order to obtain the best result. Place all large items and very dirty items in the lower rack. WARNING: Take care not to obstruct the rotation of spray arms. WARNING: Make sure after loading the dishes do not prevent opening the detergent dispenser.
- Page 9: Height adjustable rack (peg type) Two folding racks (10 pc) The height adjustable racks enable glasses and cups to be placed on or under the racks. The racks can be adjusted to 2 different heights. Cutlery and utensils can also be placed on the racks horizontally. The folding racks allow easier placement of larger items, such as pots and pans. Each section can be folded separately. The racks can be raised up, or folded down. The foldable racks in the upper basket enable the placement of large items such as pots and pans. The foldable racks can be either raised up or folded down.
- Page 10: Unsuitable items for dishwashing include cigarette ash, candle leftovers, polish, paint, and chemical substances. Lower basket items should not include forks, spoons, and knives with wooden, bone, ivory, or nacre coated handles. Avoid loading glued items and items soiled with abrasive, acidic, or base chemicals. Temperature-sensitive plastics, copper or tin coated containers, aluminium and silver objects should not be washed. Some delicate glasses, ornamental printed porcelains, and lead crystal glasses are unsuitable for dishwashing. Upper basket should not contain absorbent items such as sponges or kitchen rugs. It is important to purchase dishwasher-proof kitchenware in the future. Incorrect loading can lead to poor washing and drying performance. Follow the manufacturer’s recommendations for optimal performance results.
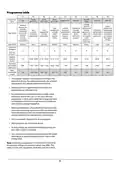
- Page 11: Programme table includes various washing programs such as Eco, Smart, Dual Pro, Hygiene, Super, Quick, and Mini. Eco program is suitable for normally soiled tableware and is the most efficient in terms of energy and water consumption. The program duration may change based on the amount of dishes, water temperature, ambient temperature, and selected additional functions. Washing tableware in a household dishwasher usually consumes less energy and water than hand dishwashing when used according to the manufacturer’s instructions. Only use powder detergent for short programs, which do not include drying. To assist drying, it is recommended to slightly open the door after a cycle is complete. You can access the product database by reading the QR code on the energy label. Values for programs other than the eco program are indicative only. Note that Eco program energy consumption values may differ according to regulations. This table is in line with regulations 2019/2022 and 2017/2022.
- Page 12: Overview of the RDW459 dishwasher includes key components such as the upper basket with racks, upper spray arm, lower basket, lower spray arm, filters, rating plate, control panel, detergent and rinse-aid dispenser, salt dispenser, and upper cutlery basket. The Turbo Drying Unit provides better drying performance for your dishes.
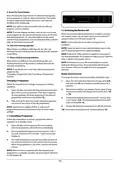
- Page 13: Control panel On/Off touch button Programme touch button Display Delay touch button Energy Save touch button Half Load touch button Extra Fast touch button Extra Silent touch button Extra Dry touch button The Display shows the number and total time of the selected programme alternately and the remaining time during operation. Press the Energy Save touch button to activate the automatic door opening system at the end of a programme. Press the Half Load button to select the area of the dishwasher that contains the dishes to be washed. Select a suitable programme for your dishes by touching the Programme button. Press the Extra Fast touch button to reduce the programme duration. Press the Extra Silent touch button to decrease the water pressure, providing a more sensitive and silent wash. Press the Delay Start touch button to delay the start time of a programme for 1 hour up to 19 hours.
- Page 14: Extra dry touch button Press the Extra Dry touch button to add extra drying steps to a programme in order to obtain drier dishes. This option increases water temperature of the final rinse step and duration of the drying step. Switching the machine off If an extra feature has been used on the most recent wash programme, this feature will remain active on the next selected programme. Salt lack warning indicator When there is insufficient softening salt, the Salt Lack Warning Indicator will illuminate to indicate the salt chamber needs filling. Rinse aid lack warning indicator When there is insufficient rinse aid, the Rinse Aid Lack Warning Indicator will illuminate to indicate the rinse aid chamber needs filling. Changing a programme Open the door and press Extra Dry / Energy Save and Half Load touch buttons simultaneously for 3 seconds. Cancelling a programme Open the door of the machine, the most recently selected programme will be shown on the display. Buzzer sound control To change the buzzer sound level, follow the steps below. Sound level settings ‘S0’ level means all voices are off. Factory setting is “S3”. Programme termination If the power is cut or the machine door is opened during the drying process, the programme will terminate. Door operation note Do not open the door before a programme is complete.
- Page 15: Power save mode can be activated or deactivated by following specific steps. When power save mode is activated, the interior lights will turn off after 4 minutes of the door being opened, and the machine will turn off after 15 minutes of inactivity. If power save mode is deactivated, the interior lights will remain on as long as the door is open, and the machine will stay on unless turned off by the user. The natural ion tech function provides extra hygiene through ion technology and is activated by pressing the half load button for 3 seconds. The ionizer function will automatically cancel 24 hours after activation if not intervened by the user. The crystalight technology uses ion and light technology to prevent bad odor during washing programs that include drying. Crystalight function is activated or deactivated by pressing the half load button for 6 seconds. If the crystalight function is not deactivated at the end of the program, it will remain active until the machine is turned off. The default setting for crystalight is UO. If either the crystalight or ionizer function is active, the ionizer LED will light up dimly when the door is open.
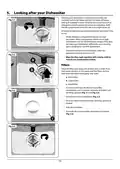
- Page 16: Looking after your dishwasher is important to maintain the machine’s service life. Make sure that the water softening setting is done correctly and the correct amount of detergent is used to prevent limescale accumulation. Refill the salt compartment when the salt sensor light comes on. Oil and lime may build up in your dishwasher over time. To extend the life of your dishwasher, clean the appliance regularly; once a month. Wipe the door seals regularly with a damp cloth to remove any accumulated residue. Clean the filters and spray arms at least once a week. If any food waste remains on the coarse and fine filters, remove them and clean them thoroughly with water. Rinse the filters with lots of water until they are free of residue. Refit the metal filter and insert the Micro/Coarse filter and rotate it clockwise.
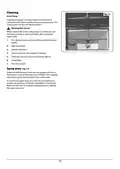
- Page 17: Cleaning Drain pump Large food residues or foreign objects may block the waste water pump. Warning: Risk of cuts when cleaning the waste water pump. Always disconnect the appliance from the power supply before cleaning. Remove the baskets and filters before cleaning. Scoop out water and check the area for foreign objects. Install filters and re-insert baskets after cleaning. Ensure that the spray holes are not clogged and clean the spray arms if necessary. To remove the upper spray arm, undo the nut by turning it clockwise. Make sure the nut is properly tightened when re-fitting the upper spray arm.
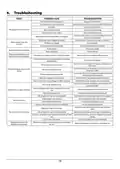
- Page 18: Troubleshooting Possible causes for issues with the dishwasher include being unplugged, not switched on, or having a blown fuse. If the programme does not start, check if the water inlet tap is closed or if the dishwasher door is open. Clogged water inlet hose and machine filters can prevent proper operation. Water remaining inside the machine may indicate that the programme is not finished or there is a power failure. Shaking and hitting noises during operation may be caused by items blocking the spray arm. Dishes may not be cleaned properly if they are placed incorrectly or if not enough detergent is used. Whitish stains on dishes can result from high water hardness levels or improper rinse aid dosage. Dishes not drying may be due to low rinse aid dosage or insufficient stainless-steel quality of the dishes. Rust stains can form if the salt compartment cap is not closed properly or if too much salt is spilled. Detergent remaining in the detergent compartment may occur if it was added when the compartment was wet.
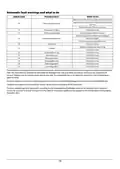
- Page 19: Automatic fault warnings and what to do Error codes and possible faults are listed with corresponding actions to take. Ensure the water inlet tap is open and water is flowing. For water inlet system failure, contact for service if the error continues. Pressure system failure requires closing the tap and contacting for service. Inability to discharge water may indicate clogged hoses and filters. Unplug the machine and close the tap for heater errors and overflow issues. The installation and repair procedures should always be carried out by the Authorised Service Agent. Improper repairs or use of non-original spare parts may cause considerable damage. Function-relevant genuine spare parts can be obtained from Customer Service for at least 10 years.
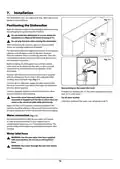
- Page 20: Installation This dishwasher is for use in GB and IE only. Read all warnings located on the packaging before removing the packaging and positioning the machine. Do not install the dishwasher in a room where the temperature is likely to fall below freezing (0 °C). When positioning the machine, place it in an area where dishes can be easily loaded and unloaded. Before installing the dishwasher into a kitchen cabinet, holes must not be drilled into the sides or door. A plastic self-adhesive anti-condensation strip is supplied with the dishwasher. Connect up the cold water supply, the drain hose, and the electrical connections. Ensure the water inlet and outlet hoses are not squeezed or trapped. We recommend fitting a filter to your water inlet supply to prevent damage to your machine. Use the new water inlet hose supplied with your machine, do not use an old machine’s hose.
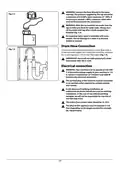
- Page 21: Connect the hose directly to the water inlet tap. The pressure supplied by the tap should be a minimum of 0.03 MPa and a maximum of 1 MPa. If the pressure exceeds 1 MPa, a pressure relief valve must be fitted between the connection. After the connections are made, turn the tap on fully and check for water leaks. Always turn off the water inlet tap after a wash program has finished. An Aquastop water spout is available with some models. Connect the water drain hose directly to the water drain hole or to the sink outlet spigot. This connection should be a minimum of 50 cm and a maximum of 110 cm from the floor plane. Items will not wash properly if a drain hose longer than 4m is used. Your machine is set to operate at 220-240 V. If the mains voltage supply to your machine is 110 V, connect a transformer of 110/220 V and 3000 W between the electrical connection.
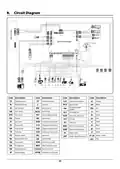
- Page 22: Circuit diagram Code description Turbidity sensor Circulation pump Liquid crystal display Rinseaid indicator Flow meter BLDC pump Automatic open door Water hardness sensor
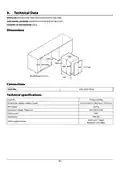
- Page 23: Technical data Installer: Please leave these instructions with the user. Data badge location: Inside face on the side of the door. Country of destination: GB, IE. Dimensions: 598 mm, 570 min mm, 600 min mm, 820-870 max mm, 647-717 max mm. All dimensions in mm. Capacity: 15 place settings. Net weight: 42.8 kg. Operating voltage/frequency: 220-240V 50 Hz. Total power: 1900 W. Water supply pressure: Maximum 1 (Mpa), Minimum 0.03 (Mpa).
- Page 24: Product information includes the supplier's trade mark and model. The capacity of the dishwasher is 15. The energy efficiency class is D. The cleaning performance index is 49.9. The drying performance index is 1.13. Energy consumption is 0.846 kWh per cycle. Water consumption is 9.0 litres per cycle. The programme duration is 4 hours and 14 minutes. The dishwasher is built-in. The airborne acoustical noise emission class is B. The Eco programme is suitable for normally soiled tableware and is the most efficient in terms of energy and water consumption.
- Page 25: Warranty/After Sales Service If consultation or technical assistance is needed, please provide the local authorised service agent with the purchase invoice and the product code/serial number. The 2 years free maintenance for the operation of the appliance started from the date of purchase of this product. Any cosmetic damage to the appliance must be reported within 30 days of delivery. AGA Rangemaster Limited have appointed Pacifica to administer in warranty repairs on our behalf. If you make a request for an in warranty repair, your details will be held by Pacifica.
- Page 26: Page 26

FISHER and PAYKEL DW60UZT4B2 Built Under Dishwasher

FISHER PAYKEL WB60S Double Drawer Dishwasher

BOSCH SMS2HKW66G 12 Place Settings Dishwasher

FISHER AND PAYKEL DD24DTX6HI1 Dishwasher

BOSCH SMI4EAS23E Dishwasher

BOSCH SMS4HDW52G Dishwasher

IKEA ÖSTVEDA Integrated Dishwasher

AEG FSK94858P Sliding Door Dishwasher

BOSCH SHXM4AY55N Dishwasher

FISHER PAYKEL DD24SI9 N Dishwasher