Whirlpool WFC 3C26 Dishwasher


EN
CARE AND MAINTENANCE
ATTENTION: Always unplug the appliance when cleaning it and when
performing maintenance work.Do not use flammable liquids to clean the
machine.
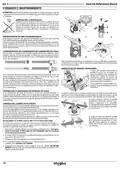
CLEANING THE DISHWASHER
Any marks on the inside of the appliance may be removed
using a cloth dampened with water and a little vinegar.
The external surfaces of the machine and the control pan-
el can be cleaned using a non-abrasive cloth which has
been dampened with water. Do not use solvents or abra-
sive products.
B
A
A
PREVENTING UNPLEASANT ODOURS
1
Always keep the door of the appliance ajar in order to avoid moisture from
forming and being trapped inside the machine. Clean the seals around the
door and detergent dispensers regularly using a damp sponge. This will
avoid food becoming trapped in the seals, which is the main cause behind
the formation of unpleasant odours.
2
CHEKING THE WATER SUPPLY HOSE
Check the inlet hose regularly for brittleness and cracks. If damaged, re-
place it by a new hose available through our After-Sales Service or your
specialist dealer. Depending on the hose type:
C
4
3
After cleaning the filters, replace the filter assembly and fix it in position cor-
rectly; this is essential for maintaining the efficient operation of the dishwasher.
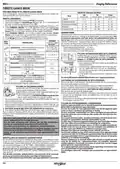
CLEANING THE SPRAY ARMS
On occasions, food residue may
become encrusted onto the
spray arms and block the holes
used to spray the water. It is
therefore recommended that
you check the arms from time
to time and clean them with
a small non-metallic brush.
If the inlet hose has a transparent coating, periodically check if the colour
intensifies locally. If yes, the hose may have a leak and should be replaced.
For water stop hoses: check the small safety valve inspection window (see
arrow). If it is red, the water stop function was triggered, and the hose must
be replaced by a new one. For unscrewing this hose, press the release but-
ton while unscrewing the hose.
CLEANING THE WATER INLET HOSE
If the water hoses are new or have not been used for an extended period of
time, let the water run to make sure it is clear and free of impurities before
performing the necessary connections. If this precaution is not taken, the
water inlet could become blocked and damage the dishwasher.
To remove the upper spray you
must remove it together with
the manifold.
CLEANING THE FILTER ASSEMBLY
Regularly clean the filter assembly so that the filters do not clog and that
the waste water flows away correctly.
Using the dishwasher with clogged filters or foreign objects inside the fil-
tration system or spray arms may cause unit malfunction resulting in loss of
performance, noisy work or higher resources usage.
The filter assembly consists of three filters which remove food residues
from the washing water and then recirculate the water.
The dishwasher must not be used without filters or if the filter is loose.
At least once per month or after every 30 cycles, check the filter assembly
and if necessary clean it thoroughly under running water, using a non-me-
tallic brush and following the instructions below:
The Top Rack has a fixed wash tube with all the wash nozzles facing up-
ward. To clean it you can slide the rack out and with a tweezer remove items
that may be lodged in the nozzles.
The lower spray arm may be removed by
pulling it upwards and rotating it an-
ti-clockwise. Mounting back the spray
arm is by pulling it down and rotating it
clockwise.
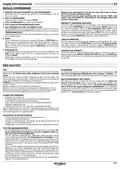
1. Turn the cylindrical filter A in an anti-clockwise direction and pull it out
(Fig 1). It is important when reinstalling the filter that the two trian-
gles shown on the zoom meet.
The ceiling spray arm may be removed
by pressing it up and then rotating it
anti-clockwise. Mounting back the spray
arm is by pulling it upwards and rotating
it clockwise.
2. Remove the cup filter B by exerting a slight pressure on the side flaps
(Fig 2).
3. Slide out the stainless-steel plate filter C (Fig 3).
4. In case you find foreign objects (such as broken glass, porcelain, bones,
fruit seeds etc.) please remove them carefully.
5. Inspect the trap and remove any food residues. NEVER REMOVE the
wash-cycle pump protection (shown by an arrow) (Fig 4).
6
| General | Details |
|---|---|
| Name | Whirlpool WFC 3C26 Dishwasher |
| Make | Whirlpool |
| Language | English |
| Filetype | PDF (Download) |
| File size | 135.73 MB |


Whirlpool 2B19 Dishwasher

Whirlpool WFO3O33PLAUS Standard Dishwasher

Whirlpool W11323304G Dishwasher

Whirlpool WH7IPC15BM60 Dishwasher

Whirlpool FINPUTSAD Dishwasher

Whirlpool W7U HS31 X Dishwasher

Whirlpool Thron Dishwasher

Whirlpool WDF332PAMS 24 Front Tall Tub Dishwasher

Whirlpool WRF540CWHZ Dishwasher

Whirlpool WDF130PAHB Dishwasher


Whirlpool W11602471 Dishwasher

BOSCH SMS4HVC03E Dishwasher

indesit 15B1 S Dishwasher

BOSCH SGI4HCS48E Dishwasher

GE APPLIANCES DT605PSMSS with Plastic Interior Dishwasher

FISHER and PAYKEL DD24STX6PX1 DishDrawer Sanitize Dishwasher

BOSCH SMD6ZCX60G Full Size Dishwasher

BOSCH SPS2IKI04E Free Standing Dishwasher

FISHER PAYKEL DW60FC4X2 Sanitise Dishwasher

FRIGIDAIRE PDSH4816AF Professional Dishwasher