Whirlpool WFO3O41PLXUK Thron Vaporera Dishwasher


Owner’s Manual
EN
THANK YOU FOR BUYING A WHIRLPOOL PRODUCT
In order to receive a more complete assistance, please
register your product on www.register10.eu
PLEASE SCAN THE QR CODE ON
YOUR APPLIANCE IN ORDER TO
REACH MORE INFORMATION
Before using the appliance carefully read the Safety
Instruction.
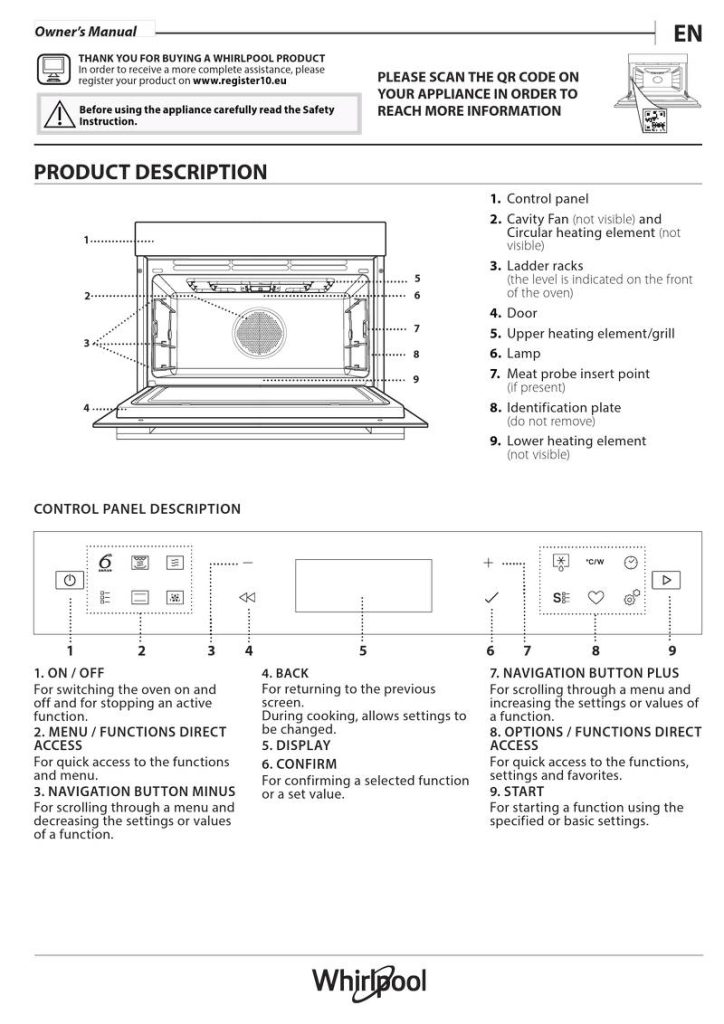
PRODUCT DESCRIPTION
1. Control panel
2. Cavity Fan (not visible) and
Circular heating element (not
visible)
1
3. Ladder racks
5
6
(the level is indicated on the front
of the oven)
2
3
4. Door
7
8
9
5. Upper heating element/grill
6. Lamp
7. Meat probe insert point
(if present)
4
8. Identification plate
(do not remove)
9. Lower heating element
(not visible)
CONTROL PANEL DESCRIPTION
1
2
3
4
5
6
7
8
9
1. ON / OFF
4. BACK
7. NAVIGATION BUTTON PLUS
For returning to the previous
screen.
During cooking, allows settings to
be changed.
For switching the oven on and
off and for stopping an active
function.
2. MENU / FUNCTIONS DIRECT
ACCESS
For scrolling through a menu and
increasing the settings or values of
a function.
8. OPTIONS / FUNCTIONS DIRECT
ACCESS
5. DISPLAY
For quick access to the functions
and menu.
3. NAVIGATION BUTTON MINUS
For quick access to the functions,
settings and favorites.
9. START
6. CONFIRM
For confirming a selected function
or a set value.
For scrolling through a menu and
decreasing the settings or values
of a function.
For starting a function using the
specified or basic settings.

| General | Details |
|---|---|
| Name | Whirlpool WFO3O41PLXUK Thron Vaporera Dishwasher |
| Make | Whirlpool |
| Language | English |
| Filetype | PDF (Download) |
| File size | 8.06 MB |


Whirlpool 2B19 Dishwasher

Whirlpool WFO3O33PLAUS Standard Dishwasher

Whirlpool W11323304G Dishwasher

Whirlpool WH7IPC15BM60 Dishwasher

Whirlpool FINPUTSAD Dishwasher

Whirlpool W7U HS31 X Dishwasher

Whirlpool Thron Dishwasher

Whirlpool WDF332PAMS 24 Front Tall Tub Dishwasher

Whirlpool WRF540CWHZ Dishwasher

Whirlpool WDF130PAHB Dishwasher
Whirlpool WFO3O41PLXUK Thron Vaporera Dishwasher Overview
Summary of Contents
- Page 1: Thank you for buying a Whirlpool product. In order to receive more complete assistance, please register your product. Before using the appliance, carefully read the safety instruction. Product description includes the control panel, cavity fan, circular heating element, ladder racks, door, upper heating element/grill, lamp, meat probe insert point, identification plate, and lower heating element. Control panel description includes ON/OFF, menu/functions direct access, navigation button plus, options/functions direct access, display, navigation button minus, confirm, and start. Each button has specific functions for controlling the oven and accessing settings.
- Page 2: Accessories should be heat-resistant and suitable for steaming. Ensure a gap of at least 30 mm between the top of any container and the walls of the cooking compartment. The wire shelf is suitable for all cooking modes, except for microwave functions. The baking tray is suitable for all cooking modes. The Crisp plate must always be placed in the center of the wire shelf. Food can be placed directly on the wire shelf when pre-heated and empty. To steam foods, place them in the basket and add drinking water to the bottom of the steamer. For boiling foods, place them directly on the bottom of the steamer and add appropriate water. Always place the steamer on the wire shelf at level 1 and use it with the appropriate cooking functions. Other accessories can be purchased separately from the After-sales Service.
- Page 3: Removing and refitting the ladder racks involves gripping the external part of the guide and pulling it upwards to extract it from the frontal support. The ladder racks are removable to make cleaning more convenient. For first-time use, you need to select the language and set the power consumption. The oven is programmed to consume a level of electrical power compatible with a domestic network that has a rating of more than 3 kW. A new oven may release odors that have been left behind during manufacturing, which is normal. It is recommended to heat the oven empty to remove any possible odors before cooking food. After selecting the language, you will need to set the current time. With the 6th Sense functions, select the type and weight of the food items to obtain the best results. The oven will automatically calculate the optimum settings and adjust them as cooking progresses. Always check the internal doneness of food and prolong the cooking time if necessary.
- Page 4: 6th sense reheat allows for reheating ready-made food that is either frozen or at room temperature. The oven automatically calculates the settings required for optimal results in the shortest time. Food should be placed on a microwave-safe and heatproof dinner plate or dish directly on the wire shelf at level 1. At the end of the reheating process, a standing time of 1-2 minutes always improves the result. 6th sense melt & soft is for melting and softening food, with the oven calculating the necessary settings for best results. Butter should be placed on a container directly on the wire shelf for optimal results. Ice cream containers must be microwave safe if placed directly in the oven. 6th sense cook table is designed for cooking various dishes and achieving optimal results easily and quickly. To get the best from this function, follow the indications on the cooking table. For pasta, add salted water and pasta into the steamer bottom and cover with the lid. For rice, add water and rice into the steamer bottom and cover with the lid.
- Page 5: Weight/portions Brush with oil and rub with salt and pepper. Season with garlic and herbs as you prefer. At the end of cooking let rest for at least 15 minutes before carving. The crisp plate needs to be preheated before inserting the food. The oven will notify you when it's time to insert the food. To get perfect results, during cooking you will be asked to turn food. Distribute evenly in the crisp plate. Pierce the sausages with a fork to prevent bursting. Add around 200g of water in the steamer bottom and distribute evenly the food in the steamer basket. Cover with lid. Brush with oil. Distribute evenly in the crisp plate. Consider around 100g of fish and 100g of chips for each portion. Distribute evenly in the crisp plate. To get perfect results, during cooking you will be asked to turn food. ACCESSORIES Heathproof tray on Drip tray / Baking wire shelf tray.
- Page 6: Weight/portions Cut in pieces, season with oil, salt and flavor with herbs. Distribute evenly in the crisp plate. Scoop out the vegetable and fill with a mixture of the vegetable flesh itself, minced meat and shredded cheese. Add around 200g of water in the steamer bottom. Prepare dough according to your favorite recipe for a light bread. Prepare pizza dough according to your favorite recipe. Take out from packaging being careful to remove any aluminium foil. Line a pie dish for 8-10 portions with a pastry and pierce it with a fork. Prepare a fatless sponge cake batter. Make a batch of 500g flour, 200g salted butter, 200g sugar, 2 eggs. Line a pie dish with the pastry and sprinkle the bottom with bread crumbs to absorb the juice from the fruit.
- Page 7: Weight/portions Always place the bag directly on the wire shelf. Pop only one bag at a time. Distribute evenly in the crisp plate. Prepare according to your favorite recipe into a single container. For perfectly browning a dish, both on the top and bottom of the food. This healthy and exclusive function combines the quality of crisp function with the properties of warm air circulation. For quickly preheating the oven before a cooking cycle. We recommend turning the food during cooking. Use microwave function only with food or beverages inside to preserve the correct functionality of the product. To achieve best results this function has the preheating phase: wait for the end of preheat to insert the food. For quickly cooking and gratinating dishes, combining the microwave and grill functions.
- Page 8: Turbo grill and microwave combination for cooking and browning food. Timed defrost options for various types of meat, poultry, and fish. Required accessories include a wire shelf and microwave-safe containers. Special functions include turning food halfway through cooking. Conventional and microwave combination for quicker baked dishes. Keep warm function for maintaining temperature of just-cooked food. Rising function for optimal proving of dough. Dehydration function for fruits and vegetables. ECO cycle for energy-efficient cooking with no light during operation. Hydro self-clean function using steam for easy cleaning.
- Page 9: Take the three trays out of the oven at the same time. Use this function to cook three trays of similar frozen pizzas to maximize results. Prepare pesto lasagna or cannelloni according to your preference in a metal or pyrex tray. Prepare fish fillets in foil with sliced vegetables directly in the baking tray. After preheating, bake all the dishes at the same time. This cycle is designed to cook a complete meat-based meal and a dessert. Prepare a fruit tart according to your preferences in a round pan. For keeping time without activating a function. For retrieving the list of 9 favorite functions. When ECO mode is active, the brightness of the display will be reduced to save energy.
- Page 10: Place the food in the oven and close the door: The function will start automatically after the calculated time for cooking to finish. Programming a delayed cooking start time will disable the oven preheating phase. Once the preheating phase has finished, an audible signal will sound and the display will indicate that the oven has reached the set temperature. Placing the food in the oven before preheating has finished may have an adverse effect on the final cooking result. These functions automatically select the best cooking mode, temperature, and duration to cook, roast, or bake all dishes. By opening the door, the cooking will be temporarily paused through deactivating heating elements. Some 6th Sense Cook recipes will require the food to be added after the preheating phase. In some 6th Sense functions, it is possible to adjust the doneness level. At any time, if the default values are those desired, press to activate the function. An audible signal will sound and the display will indicate that cooking is complete.
- Page 11: Door during the cleaning cycle should not be opened to avoid loss of water vapor affecting the cleaning result. An appropriate message will flash on the display once the cycle has finished. The oven can save up to 20 favorite functions for easier use. Once cooking is complete, the display will prompt you to save the function in your favorites. The display can be used as a timer when the oven is switched off. To save a function as a favorite, press the appropriate button and confirm. If the memory is full, the oven will ask to confirm overwriting a previous function. An audible signal will sound when the minuteminder has finished counting down. To lock the keypad, press and hold for at least three seconds. Observe safety instructions when using the microwave to prevent sparks and damage.
- Page 12: Useful tips for microwave cooking include spacing out food items for even heating and cutting food into equal-sized pieces for uniform cooking. Always stir and check the temperature of baby food before serving to avoid burns. Remove container lids or bottle teats before heating, and allow standing time after cooking as food continues to cook. Remove twist ties from bags and score plastic film to prevent bursting from steam. For cakes and bread, use the “Forced Air” function or “Convection bake” for liquid cakes, and opt for dark metal cake tins on the wire shelf. Liquids can overheat without bubbling, so avoid narrow-necked containers, stir before heating, and leave a teaspoon in the container. For meat and fish, use a combination of convection heating and microwave cooking at 160 W for optimal results. When defrosting frozen food, do so on the wire shelf and stir occasionally for better results. Separate food items as they begin to defrost for quicker results.
- Page 13: Cleaning and maintenance should only be performed when the oven has cooled down. Do not use steam cleaners or abrasive cleaning agents, as these could damage the appliance surfaces. The oven must be disconnected from the mains before any maintenance work. For exterior surfaces, activate the “Hydro Self Clean” function for optimal cleaning. Clean surfaces with a damp microfibre cloth and pH-neutral detergent if necessary. Soak accessories in a washing-up liquid solution after use, handling them with gloves if hot. For interior surfaces, clean the oven after every use while it is still warm to remove food residues. If the display shows the letter ‘F’ followed by a different number or letter, contact the Call Center. Check for mains electrical power if the oven is not switching on. For troubleshooting, refer to the Call Center for unclear display text or if the oven does not heat up.
- Page 14: Gracias por adquirir un producto Whirlpool. Antes de usar el aparato, lea atentamente las instrucciones de seguridad. Descripción del producto incluye el panel de control, cavidad del ventilador, guías de bandeja, puerta, resistencia superior, lámpara, punto de inserción de la sonda de carne, placa de características y resistencia inferior. Descripción del panel de control incluye funciones como ON/OFF, acceso directo al menú y funciones, pantalla, botones de navegación, confirmar y acceso a opciones. El botón de navegación más permite volver a la pantalla anterior y cambiar ajustes durante la cocción. El botón de navegación menos sirve para obtener acceso rápido a funciones, ajustes y favoritos. La pantalla proporciona acceso rápido a funciones y al menú. El botón de confirmar se utiliza para confirmar una función o un valor seleccionados. El botón de inicio permite desplazarse por un menú y reducir ajustes o valores de una función.
- Page 15: accesorios Asegúrese de que los accesorios son resistentes al calor y adecuados para la cocción al vapor. Los accesorios pueden subir de temperatura durante la función microondas. Asegúrese de que haya un espacio de al menos 30 mm entre la parte superior del recipiente y las paredes del compartimento de cocción. La bandeja de horno es apta para todos los modos de cocción, excepto para las funciones indicadas. La bandeja Crisp debe colocarse siempre en el centro de la balda de rejilla. Coloque la comida directamente en la bandeja Crisp. Utilice la vaporera para cocinar al vapor alimentos como pescados o verduras. Cubra la vaporera con la tapa suministrada para obtener los mejores resultados. Coloque siempre la vaporera en el estante de alambre del nivel 1. El número de accesorios puede variar de un modelo a otro.
- Page 16: Cómo extraer y volver a colocar las guías de bandejas. Las rejillas de bandeja son extraíbles para facilitar la limpieza. Para retirar las rejillas de bandeja, sujete firmemente la parte externa de la guía y tire de ella hacia arriba. Para reposicionar los portaescaleras, deslice la parte trasera sobre el soporte trasero. Seleccione el idioma y ajuste la hora la primera vez que encienda el aparato. El horno está programado para consumir un nivel de potencia eléctrica compatible con una red doméstica. Caliente el horno a 200 °C durante aproximadamente una hora utilizando la función «Precalentar rápido». Con las funciones 6th Sense, basta con seleccionar el tipo y el peso o la cantidad de los alimentos. El horno calculará automáticamente los ajustes óptimos y seguirá modificándolos a medida que avance la cocción. Recomendamos siempre comprobar el punto de cocción interno de los alimentos.
- Page 17: Recalentar 6th Sense Sirve para recalentar alimentos precocinados que estén congelados o a temperatura ambiente. El horno calcula automáticamente la configuración requerida para obtener los mejores resultados en el menor tiempo posible. Extráigalo del embalaje con cuidado de retirar todo el papel de aluminio. Al final del proceso de recalentamiento, los resultados siempre son mejores si se dejan reposar los alimentos 1 o 2 minutos. Fundir y ablandar 6th Sense Para fundir y ablandar alimentos. Coloque los alimentos en un recipiente apto para microondas y resistente al calor directamente en la balda de rejilla del nivel 1. Corte el chocolate en piezas para mejores resultados. Al final remover el chocolate para completar el proceso de fusión. Tabla de cocción 6th Sense Para cocinar varios tipos de platos y alimentos y obtener unos resultados óptimos de la forma más rápida y fácil posible. Siga las indicaciones de la tabla de cocción correspondiente. Configure el tiempo recomendado para cocer la pasta. Considere unos 100 g de pasta para cada ración. Prepare según su receta preferida.
- Page 18: Alimentos Unte con aceite y añada sal y pimienta. Aderece con ajo y hierbas al gusto. La Bandeja Crisp debe precalentarse antes de introducir los alimentos. El horno le avisará cuando sea el momento de introducir los alimentos. Para obtener resultados óptimos, se le pedirá que gire los alimentos durante la cocción. Distribuya de manera uniforme en la Bandeja Crisp. Añada unos 200g de agua en la base de la vaporera y distribuya uniformemente los alimentos en la cesta de cocción al vapor. Pollo asado, pechuga de ave al vapor, y pescado entero asado son algunas de las opciones. Distribuya uniformemente en la Bandeja Crisp alternando los filetes de pescado y las patatas. Para obtener resultados perfectos, durante la cocción se le pedirá que gire los alimentos.
- Page 19: Categoría: Alimentos Peso/porciones/piezas: 300 g-1,0 kg Corte en trozos, sazone con aceite, sal y aromatice con hierbas. Distribuya de manera uniforme en la Bandeja Crisp. Para obtener resultados óptimos, se le pedirá que remueva los alimentos durante la cocción. Vacíe las verduras y rellénelas con una mezcla de carne, carne picada y queso rallado. Corte en trozos y distribuya uniformemente los alimentos en la cesta de cocción al vapor. Prepare la masa según su receta favorita para elaborar un pan ligero. Utilice la función de leudado especial del horno. Forre un molde con la masa y espolvoree pan rallado en el fondo. Rellene con fruta fresca troceada y mezclada con azúcar y canela.
- Page 20: Categoría: Alimentos Coloque siempre la bolsa directamente sobre el plato de cristal. Cocine sólo una bolsa cada vez. Distribuya de manera uniforme en la Bandeja Crisp. Prepárelo según su receta preferida en un solo recipiente. Accesorios necesarios: Balda de rejilla en el nivel 1, Bandeja Crisp, asa para la Bandeja Crisp. Para dorar perfectamente un alimento, tanto por arriba como por abajo. Función saludable y exclusiva combina la calidad de la función crisp con las propiedades de la circulación de aire caliente. Accesorios recomendados: rejilla. Utilice la función microondas sólo cuando haya alimentos o bebidas en el interior. Para lograr un resultado perfecto, combinando el grill y la convección de aire del horno. Cocción lenta y suave. Perfecta para derretir mantequilla o chocolate.
- Page 21: Turbo grill combina microondas, grill y convección de aire para cocinar y dorar rápidamente. Accesorios necesarios incluyen balda de rejilla y recipiente apto para microondas. Descongelación permite descongelar carne, aves y pescado con tiempos específicos. Funciones especiales combinan horno convencional y microondas para preparar platos más rápido. Mantenimiento caliente mantiene alimentos recién cocinados calientes y crujientes. Fermentar masa optimiza la fermentación de masas dulces o saladas. Deshidratación permite cocinar y dorar platos en un solo estante, ideal para frutas y verduras. Maxi-cocción es para piezas de carne grandes, recomendando dar la vuelta durante la cocción. Ciclo eco optimiza el consumo de energía al cocinar sin abrir la puerta del horno. Sistema de limpieza hydro self clean utiliza vapor para eliminar suciedad y residuos de alimentos.
- Page 22: Prepare una tarta de frutas según sus preferencias en un molde redondo que se colocará en el estante de alambre del nivel 3. Prepare la lasaña al pesto o los canelones según su preferencia en una bandeja de metal o pyrex que se colocará en el nivel dos. Prepare los filetes de pescado en papel de aluminio con las verduras en rodajas directamente en la bandeja de horno que se colocará en el nivel 1. Utilice esta función para cocinar tres bandejas de tartas similares para maximizar los resultados. Este ciclo está diseñado para cocinar una comida completa a base de carne y un postre. Prepare 6-10 muslos de pollo con patatas cortadas en dados directamente en la bandeja de horno que se colocará en el nivel 1. Para controlar el tiempo sin activar una función, use el temporizador. Para recuperar la lista de las 9 funciones favoritas, use la opción de favoritos. Este ciclo está diseñado para cocinar una comida completa de pescado o vegetariana y un postre. Una vez activada la función, se puede cambiar la temperatura.
- Page 23: Pulse para configurar la hora a la que quiere que termine la cocción. Cuando el precalentamiento haya terminado, sonará una señal acústica y la pantalla indicará que el horno ha alcanzado la temperatura establecida. Coloque los alimentos en el horno y cierre la puerta para iniciar la cocción. Esta función se iniciará automáticamente cuando haya transcurrido el periodo de tiempo calculado. Programar una cocción con inicio diferido deshabilitará la fase de precalentado del horno. El tiempo de cocción no incluye la fase de precalentamiento. Las funciones 6th Sense seleccionan automáticamente el mejor modo de cocción y la mejor temperatura. Al abrir la puerta, la cocción se interrumpirá temporalmente y las resistencias se desactivarán. Se emitirá una señal acústica y la pantalla indicará las acciones que deberá realizar. Sonará una señal acústica y la pantalla indicará que la cocción ha terminado.
- Page 24: Nota: Recomendamos no abrir la puerta del horno durante el ciclo de limpieza para evitar la pérdida de vapor de agua, ya que esto podría afectar de forma negativa al resultado final de la limpieza. Cuando termine el ciclo, un mensaje parpadeará en la pantalla. Para que el horno sea aún más fácil de usar, puede memorizar hasta 20 funciones favoritas. Cuando el horno está apagado, la pantalla puede utilizarse como temporizador. Si desea guardar una función como favorita y memorizar los ajustes actuales para el futuro, mantenga pulsado. Para activar las últimas funciones guardadas, pulse. La pantalla mostrará una lista de sus funciones favoritas. Para bloquear el teclado, mantenga pulsado durante al menos tres segundos. Esta función también puede activarse durante la cocción. Tenga en cuenta estas instrucciones cuando utilice el microondas.
- Page 25: Consejos útiles Consejos para cocinar con microondas Las microondas sólo penetran en los alimentos hasta cierta profundidad. Separe los elementos al cocinar para exponer la mayor área de superficie posible a las microondas. Corte los alimentos en piezas de igual tamaño para obtener una cocción uniforme. Deje siempre un tiempo de reposo para finalizar la cocción. Quite los cierres de alambre de las bolsas antes de introducirlas en el horno. Remueva y compruebe la temperatura de los alimentos infantiles o líquidos antes de servir. Para tartas y pan, utilice la función Aire forzado. La película de plástico debe perforarse para evitar que reviente durante la cocción. Los líquidos pueden superar el punto de ebullición sin burbujas visibles. Para obtener un dorado perfecto, use funciones que combinan calentamiento por convección y cocción por microondas.
- Page 26: Limpieza y mantenimiento Asegúrese de que el horno se haya enfriado antes de llevar a cabo las tareas de mantenimiento o limpieza. No utilice estropajos de acero, estropajos abrasivos ni productos de limpieza abrasivos/corrosivos. Active la función «Autolimpieza hidráulica» para unos resultados de limpieza óptimos de las superficies internas. Limpie las superficies con un paño húmedo de microfibra. No utilice detergentes corrosivos ni abrasivos. Después de cada uso, deje que el horno se enfríe y, a continuación, límpielo. La pantalla muestra la letra «F» seguida de un número o letra diferente de F4E1. Compruebe que haya corriente eléctrica en la red y que el horno esté enchufado a la toma de electricidad. El horno no se calienta. Acceda a «DEMO» desde «AJUSTES» y seleccione «Off».
- Page 27: Bedienungsanleitung Danke, dass Sie sich für ein Whirlpool-Produkt entschieden haben. Für eine umfassendere Unterstützung melden Sie Ihr Produkt bitte an. Lesen Sie vor Gebrauch des Geräts die Sicherheitshinweise aufmerksam durch. Produktbeschreibung Bedientafel Innenraum-Gebläse und Ringheizelement Tür Oberes Heizelement/Grill Kerntemperaturfühler Einsteckstelle Typenschild Beschreibung des Bedienfeldes ON / OFF Direktzugriff auf Menü / Funktionen Display Bestätigen Start
- Page 28: Zubehörteile sollten ofenfest und zum Dämpfen geeignet sein. Es wird empfohlen, das Zubehör am Ende des Zyklus mit Handschuhen anzufassen. Der Rost ist für alle Garmodi geeignet, auch für das Garen mit Mikrowelle. Das Backblech ist nur für die Verwendung mit den vorgesehenen Funktionen. Die Crisp-Platte immer in die Mitte des Rostes stellen. Für das Dämpfen von Fisch oder Gemüse Trinkwasser in den Boden des Dampfeinsatzes füllen. Den Dampfeinsatz immer auf den Rost auf Ebene 1 stellen. Die Anzahl der Zubehörteile kann je nach gekauftem Modell variieren. Weitere Zubehörteile sind separat über den Kundenservice erhältlich. Den Rost auf die gewünschte Ebene einschieben, dabei leicht nach oben kippen.
- Page 29: AUSBAU UND ERNEUTES ANBRINGEN DER LEITERGESTELLE Auf beiden Seiten des Garraums befindet sich zwei Leitergestelle, die auf zwei knopfförmigen Haltern verankert sind. Die Leitergestelle sind abnehmbar, um die Reinigung zu erleichtern. Um die Leitergestelle zu entfernen, fassen Sie den äußeren Teil der Führung und ziehen sie nach oben. Um die Leitergestelle wieder anzubringen, schieben Sie das hintere Teil auf den hinteren Halter. ERSTER GEBRAUCH Sprache auswählen Wenn das Gerät zum ersten Mal eingeschaltet wird, muss die Sprache und die Zeit eingestellt werden. Der Ofen ist auf den Verbrauch einer elektrischen Leistung programmiert, die mit einem Haushaltsnetzwerk mit einer Leistung von mehr als 3 kW kompatibel ist. Bitte beachten: Die Sprache kann später durch Auswahl von „SPRACHE“ im Menü „EINSTELLUNGEN“ geändert werden. Ein neuer Ofen kann Gerüche freisetzen, die bei der Herstellung zurückgeblieben sind. Es wird empfohlen, den Ofen in leerem Zustand aufzuheizen, um mögliche Gerüche zu entfernen. Bitte beachten: Es wird empfohlen, den Raum nach dem ersten Gebrauch des Geräts zu lüften. Mit den 6th Sense-Funktionen wählen Sie einfach die Art und das Gewicht oder die Menge der Lebensmittel aus. Folgen Sie den Anweisungen in der jeweiligen Gartabelle, um die Funktion bestmöglich zu nutzen. Wir empfehlen immer, den inneren Gargrad der Speisen zu überprüfen und gegebenenfalls die Garzeit zu verlängern.
- Page 30: 6th sense aufwärmen Der Ofen berechnet automatisch die Einstellungen für die bestmöglichen Ergebnisse in kürzester Zeit. Geben Sie das Gargut auf einen mikrowellengeeigneten und hitzebeständigen Essteller oder in ein entsprechendes Kochgeschirr direkt auf den Rost auf Ebene 1. Am Ende des Aufwärmvorgangs verbessert eine Stehzeit von 1-2 Minuten das Ergebnis. 6th sense melt & soft Der Ofen berechnet automatisch die Einstellungen für die bestmöglichen Ergebnisse in kürzester Zeit. Geben Sie das Gargut in einem mikrowellengeeigneten und hitzebeständigen Behälter direkt auf den Rost auf Ebene 1. Stellen Sie die Butter in einem Behälter direkt auf den Rost, um optimale Ergebnisse zu erzielen. 6th sense gartabelle Für das Garen verschiedener Arten von Gerichten und Speisen und beste Ergebnisse auf einfache und schnellste Weise. Folgen Sie den Anweisungen in der jeweiligen Gartabelle, um die besten Ergebnisse zu erzielen. Rechnen Sie etwa 100 g Nudeln pro Portion. Für jede Portion Nudeln 400 g Wasser verwenden. Stellen Sie die empfohlene Kochzeit für den Reis ein. Rechnen Sie etwa 100 g Reis pro Portion.
- Page 31: Gewicht/Portionen Mit Öl bepinseln und mit Salz und Pfeffer einreiben. Die Crisp-Platte muss vor dem Einlegen der Lebensmittel vorgeheizt werden. Der Ofen meldet Ihnen, wenn es Zeit ist, die Speisen einzulegen. Um perfekte Ergebnisse zu erzielen, werden Sie während des Garens aufgefordert, die Speisen zu wenden. Geben Sie etwa 200 g Wasser in den Dampfgaruntersatz und verteilen Sie die Lebensmittel gleichmäßig im Dampfkorb. Fleisch Fisch Zubehör Hitzebeständiger und Dampfeinsatz Hitzebeständige Form
- Page 32: Gewicht/Portionen In Stücke schneiden, mit Öl, Salz und Kräutern würzen. Gleichmäßig auf der Crisp-Platte verteilen. Höhlen Sie das Gemüse aus und füllen Sie es mit einer Mischung aus Gemüsefleisch, Hackfleisch und geriebenem Käse. Geben Sie etwa 200 g Wasser in den Dampfgaruntersatz und verteilen Sie die Lebensmittel gleichmäßig im Dampfkorb. Bratkartoffeln Gefülltes Gemüse Kartoffelgratin Bereiten Sie Pizzateig nach Ihrem Lieblingsrezept zu. Bereiten Sie einen fettfreien Biskuitteig zu. Eine Kuchenform mit dem Teig auslegen und den Boden mit Brösel bestreuen.
- Page 33: Gewicht/Portionen Geben Sie die Tüte stets direkt auf den Rost. Immer nur eine Tüte in die Mikrowelle geben. Erforderliche Zubehörteile: Grillrost auf Ebene 1, Crisp-Platte, Haltegriff für die Crisp-Platte. Diese Funktion darf nur mit der speziellen Crisp-Platte verwendet werden. Zum schnellen Vorheizen des Ofens vor einem Garzyklus. Diese gesunde und exklusive Funktion kombiniert die Qualität der Crisp-Funktion mit den Eigenschaften der Heißluftzirkulation. Wir empfehlen, die Speisen während des Garens zu wenden. Die Mikrowellenfunktion nur verwenden, wenn sich Lebensmittel oder Getränke darin befinden. Zum Garen von Fleisch, Backen von Kuchen mit und ohne Füllungen auf nur einer Einschubebene. Erforderliche Zubehörteile: Grillrost auf Ebene 1, mikrowellengeeigneter und hitzebeständiger Behälter.
- Page 34: leistungsstufe lebensmittel leistung grill dauer (min) zeitgesteuertes auftauen ober-/unterhitze + mw heißluft + mw + mw warmhalten aufgehen joghurt
- Page 35: Funktion beinhaltet das Vorheizen. Verwenden Sie diese Funktion, um drei Bleche mit gleichartigen Tiefkühlpizzas zu backen, um ein optimales Ergebnis zu erzielen. Bereiten Sie eine Pesto-Lasagne oder Cannelloni nach Ihren Vorlieben in einer Form aus Metall oder feuerfestem Glas zu. Nach dem Vorheizen werden alle Gerichte gleichzeitig gegart. Dieses Programm ist für die Zubereitung einer kompletten Fleischmahlzeit und eines Desserts vorgesehen. Zum Anzeigen der Zeit ohne Aktivierung einer Funktion. Beispiel für eine komplette Mahlzeit: Bereiten Sie einen Obstkuchen nach Ihren Vorlieben in einer runden Form zu. Bei aktiviertem „ÖKO“-Modus wird die Helligkeit des Displays reduziert, um Energie zu sparen. Dieses Programm ist für die Zubereitung einer kompletten Fisch- oder vegetarischen Mahlzeit und eines Desserts vorgesehen. Bitte beachten: Sobald die Funktion aktiviert wurde, kann die Temperatur geändert werden.
- Page 36: Aktivierung der Funktion. Die Speise in den Ofen stellen und die Tür schließen: Die Funktion startet automatisch nach der berechneten Zeit. Sobald diese Phase beendet ist, ertönt ein akustisches Signal und das Display zeigt an, dass der Backofen die eingestellte Temperatur erreicht hat. Bitte beachten: Wird die Speise in den Ofen gestellt, bevor das Vorheizen beendet ist, kann dies negative Auswirkungen auf das endgültige Garergebnis haben. Die Programmierung einer verzögerten Garstartzeit deaktiviert die Ofenvorheizphase. Diese Funktionen wählen automatisch den besten Garmodus, Temperatur und Dauer zum Garen, Braten oder Backen aller verfügbaren Gerichte aus. Durch das Öffnen der Backofentür wird der Garvorgang vorübergehend unterbrochen. Ein akustisches Signal ertönt und das Display zeigt an, welche Tätigkeit auszuführen ist. Wenn gefordert, drücken, um den gewünschten Grad von roh bis durchgebraten auszuwählen. Gegen Abschluss des Garvorgangs sollte Sie der Ofen auffordern, das Gargut zu prüfen. Ein akustisches Signal ertönt und das Display zeigt an, dass der Garvorgang beendet ist.
- Page 37: Drücken Sie, um das Garen manuell fortzusetzen oder die Garzeit zu verlängern. Es wird empfohlen, die Ofentür während des Reinigungszyklus nicht zu öffnen. Eine entsprechende Meldung beginnt auf dem Display zu blinken, nachdem der Zyklus beendet ist. Um die Verwendung des Ofens einfacher zu gestalten, können bis zu 20 Favoriten-Funktionen gespeichert werden. Bei ausgeschaltetem Ofen kann das Display als Timer verwendet werden. Bitte beachten: Ist der Speicher voll oder wurde die Nummer bereits verwendet, verlangt der Ofen die Bestätigung. Zum Sperren der Tastatur, die Taste mindestens drei Sekunden gedrückt halten. Die Funktion kann auch während eines Garvorgangs aktiviert werden. Verwenden Sie den mitgelieferten Rost als Unterlage. Schalten Sie das Mikrowellengerät niemals ein, ohne vorher die Speisen hineinzustellen.
- Page 38: Hilfreiche Tipps Tipps für die Benutzung des Mikrowellengeräts Babynahrung in Behältern oder Getränke in Babyfläschchen müssen nach dem Erwärmen immer umgerührt und auf die richtige Temperatur überprüft werden. Für Kuchen und Brot empfehlen wir die Verwendung der „Heißluft“-Funktion. Mikrowellen durchdringen die Speise nur bis zu einer gewissen Tiefe, daher müssen bei einem gleichzeitigen Garen verschiedener Speisen diese möglichst weit voneinander verteilt werden. Die meisten Lebensmittel garen weiter, wenn das Mikrowellengerät fertig mit dem Garen ist. Entfernen Sie alle Metallteile von Papier- oder Plastikbeuteln, bevor diese zum Garen in die Mikrowelle gelegt werden. Flüssigkeiten können ohne vorherige Blasenbildung überhitzen. Um eine perfekte Bräunung der Oberfläche in kürzester Zeit zu erhalten, wird die Verwendung der Funktionen durch Kombination von Umluftheizung und Mikrowellengaren empfohlen. Für beste Ergebnisse empfehlen wir das Auftauen direkt auf dem Rost. Gekochte Speisen, Geschmortes und Fleischsoßen tauen besser auf, wenn sie während des Auftauvorgangs bisweilen umgerührt werden. Trennen Sie einzelne Speisestücke, sobald diese antauen: die getrennten Portionen werden schneller abtauen.
- Page 39: Reinigung und Pflege Vor dem Ausführen beliebiger Wartungs- oder Reinigungsarbeiten sicherstellen, dass der Ofen abgekühlt ist. Keine Stahlwolle, Scheuermittel oder aggressive/ätzende Reinigungsmittel verwenden, da diese die Flächen des Gerätes beschädigen können. Aktivieren Sie die „Smart Clean“-Funktion für die optimale Reinigung der Innenflächen. Reinigen Sie die Flächen mit einem feuchten Mikrofasertuch. Den Ofen nach jedem Gebrauch abkühlen lassen und anschließend reinigen, vorzugsweise wenn er noch warm ist. Problem: Das Display zeigt ein „F“ gefolgt von anderen Nummern oder Buchstaben. Überprüfen, ob das Stromnetz Strom führt und der Backofen an das Netz angeschlossen ist. Beim Ausschalten des Ofens produziert dieser Geräusche. Wenn „DEMO“ „Ein“ ist, sind alle Steuerungen aktiv und alle Menüs verfügbar, der Ofen heizt sich jedoch nicht auf. Richtlinien, Standarddokumentation und zusätzliche Produktinformationen finden Sie über den QR-Code an Ihrem Gerät.
- Page 40: Merci d’avoir choisi un produit Whirlpool. Veuillez scanner le QR code sur votre appareil afin d’obtenir plus d’informations. Lisez attentivement les consignes de sécurité avant d’utiliser l’appareil. Description du produit inclut le panneau de commandes, ventilateur de la cavité, supports de grille, porte, élément de chauffage supérieur/gril, ampoule, point d'insertion de la sonde à viande, plaque signalétique, et élément chauffant inférieur. Description du panneau de commandes présente les différentes fonctions et boutons, tels que ON/OFF, accès direct au menu, bouton de navigation, écran, confirmer, et démarrer. Le bouton ON/OFF permet d’allumer ou d’éteindre le four. Le bouton de navigation permet de modifier les réglages pendant la cuisson. L’accès direct aux options permet d’accéder rapidement aux fonctions et aux réglages. Le bouton de démarrer lance une fonction en utilisant des réglages de base ou spécifiques. L’écran affiche les informations et les réglages du four.
- Page 41: accessoires Avant d’acheter des accessoires, assurez-vous qu’ils sont résistants à la chaleur et adaptés pour la cuisson vapeur. Les accessoires peuvent monter en température pendant le fonctionnement du four à micro-ondes. Il est recommandé d'utiliser des protections pour manipuler les accessoires en fin de cycle. Laissez un espace d’au moins 30 mm entre le dessus du contenant utilisé et les parois du compartiment. La grille métallique est adaptée à tous les modes de cuisson, y compris la cuisson au micro-ondes. Le plat Crisp doit toujours être placé au centre de la grille métallique. Pour cuire à la vapeur, placez les aliments dans le panier-vapeur et versez de l’eau potable dans la partie inférieure. Pour les meilleurs résultats, couvrez le panier-vapeur avec le couvercle fourni. Le nombre d'accessoires peut varier en fonction du modèle acheté. Insérez la grille métallique au niveau désiré en la tenant légèrement inclinée vers le haut.
- Page 42: Dépôt et repose des supports de grille Les grilles en échelles sont amovibles pour faciliter le nettoyage. Pour retirer les grilles en échelles, tirez vers le haut pour l'extraire du support frontal. Pour repositionner les grilles, faites glisser la partie arrière sur le support arrière. Première utilisation Vous devez régler la langue et l'heure lorsque vous allumez l'appareil pour la première fois. Le four est programmé pour consommer un niveau d'énergie électrique compatible avec un réseau domestique supérieur à 3 kW. Un nouveau four peut dégager des odeurs provenant de la fabrication. Chauffez le four à 200 °C pendant environ une heure pour éliminer les odeurs. Il est conseillé d’aérer la pièce après avoir utilisé l’appareil pour la première fois. Avec les fonctions 6ème sens, le four calcule automatiquement les réglages optimaux.
- Page 43: 6th sense réchauffage Pour réchauffer les repas préparés surgelés ou à la température de la pièce. Le four détermine automatiquement les réglages nécessaires pour les meilleurs résultats. Sortez de l'emballage en veillant à enlever les éventuelles feuilles d'aluminium. À la fin du processus de réchauffage, laissez au repos 1-2 minutes pour améliorer le résultat. 6th sense fondre & ramollir Pour faire fondre et ramollir les aliments. Le four détermine automatiquement les réglages nécessaires pour les meilleurs résultats. Pour de meilleurs résultats, placer le beurre dans un récipient directement sur la grille métallique. Couper le chocolat en morceaux pour obtenir de meilleurs résultats. Tableau de cuisson 6th sense Pour cuire plusieurs sortes d'aliments et atteindre des résultats optimums rapidement. Suivez les indications sur la table de cuisson correspondante. Réglez le temps de cuisson recommandé pour les pâtes. Considérez environ 100 g de pâtes pour chaque portion. Réglez le temps de cuisson recommandé pour le riz. Utilisez 300 g d'eau pour chaque portion de riz.
- Page 44: Poids/portions/morceaux Catégorie Aliments Recommandations Accessoire Appliquez de l'huile avec un pinceau et frottez avec du sel et du poivre. Le plat crisp doit être préchauffé avant d'insérer les aliments. Pour obtenir des résultats parfaits, il vous sera demandé de retourner les aliments pendant la cuisson. Ajoutez environ 200 g d'eau dans le fond du cuiseur vapeur et répartissez uniformément les aliments dans le panier du cuiseur vapeur. Répartissez uniformément sur le plat crisp. Considérez environ 100 g de poisson et 100 g de frites pour chaque portion. Accessoires incluent un plat résistant à la chaleur, un récipient résistant à la cuisson à la vapeur, et une grille métallique. Fruits de mer frits (surgelés) doivent être répartis uniformément sur le plat crisp. Bâtonnets de poisson (surgelés) doivent également être répartis uniformément sur le plat crisp. Appliquez de l'huile avec un pinceau et assaisonnez comme vous le préférez.
- Page 45: Poids/portions/morceaux Catégorie Aliments Recommandations Accessoire Coupez en morceaux, assaisonnez avec de l'huile, du sel et aromatisez avec des herbes. Pour obtenir des résultats parfaits, il vous sera demandé de remuer les aliments pendant la cuisson. Ajoutez environ 200 g d'eau dans le fond du cuit-vapeur. Répartissez uniformément sur le plat crisp. Préparez la pâte en suivant votre recette habituelle de pain léger. Chemisez un plat à tarte pour 8-10 portions avec une pâte et percez-la avec une fourchette. Disposez les cookies sur une lèchefrite. Remplissez la pâte selon votre recette favorite. Enroulez les rebuts de pâtes pour faire un couvercle, scellez les bords et badigeonnez d’œuf. Préparer selon votre recette préférée.
- Page 46: Poids/portions/morceaux Catégorie Aliments Recommandations Placez toujours le sac directement sur la grille métallique. Répartissez uniformément sur le plat crisp. Préparez selon votre recette favorite dans un récipient unique. Accessoires nécessaires : grille métallique au niveau 1, plat Crisp, poignée pour le plat Crisp. Pour dorer un plat à la perfection, autant au-dessus qu’en dessous. La fonction saine et exclusive combine la qualité de la fonction crisp aux propriétés de la circulation d'air chaud. N'utilisez la fonction micro-ondes qu'avec des aliments ou des boissons à l'intérieur afin de préserver le bon fonctionnement du produit. Pour cuire de la viande, des gâteaux et tartes avec garnitures sur une grille uniquement. Cuisson lente et délicate. Idéal pour faire fondre le beurre ou le chocolat.
- Page 47: Gril turbo + mo Dégivrage programmé Pour rapidement cuire et dorer vos aliments, combinez les fonctions four à micro-ondes, grill, et chaleur pulsée. Accessoires nécessaires : grille métallique au niveau 1, récipient résistant aux micro-ondes et à la chaleur. Pour conserver les aliments à peine cuits chauds et croustillants. Pour préparer des plats plus rapidement en combinant le four à convection naturelle et le four à micro-ondes. Pour un levage parfait des pâtes sucrées ou salées. Pour cuire rapidement tous les aliments avec une garniture liquide. Pour déshydrater des fruits et des légumes. Pour cuire de gros morceaux de viande. Lorsque cette fonction ÉCO est utilisée, le voyant reste éteint pendant la cuisson. L'action de la vapeur créée lors de ce cycle de nettoyage à basse température permet d'enlever la saleté et les résidus d'aliments plus facilement.
- Page 48: PIZZA (surgelée) Préparer des filets de poisson en papillote avec des légumes. Utilisez cette fonction pour cuire trois plateaux de pizzas surgelées similaires. Après 45-55 minutes, sortez la tarte; après 55-65 minutes, sortez les lasagnes; après 60-70 minutes, sortez le poisson et les légumes. COOK 3 MENU 1 Ce cycle est destiné à la cuisson d'un repas complet à base de viande et d'un dessert. Préparer des lasagnes selon vos préférences dans un plat à placer sur la grille métallique. Après 50-60 minutes, sortez la tarte; après 60-70 minutes, sortez les lasagnes; après 80-90 minutes, sortez le poulet aux pommes de terre. AUTRES FONCTIONS Minuteur pour garder du temps sans activer de fonction. Favori pour récupérer la liste de 9 fonctions favorites. Réglages pour ajuster les réglages du four. COOK 3 MENU 2 Ce cycle est destiné à la cuisson d'un repas complet à base de poisson ou végétarien et d'un dessert. Préparer des lasagnes au pesto ou des cannelloni selon vos préférences. UTILISATION QUOTIDIENNE Sélectionner une fonction pour allumer le four. Les fonctions peuvent être sélectionnées en appuyant sur l'icône pour une des principales fonctions. Vous pouvez ajuster le temps de cuisson qui a été réglé pendant la cuisson. Dans les fonctions non-micro-ondes, vous n'avez pas besoin de régler le temps de cuisson si vous souhaitez gérer la cuisson manuellement. Dans les fonctions qui n'activent pas le micro-onde, vous pouvez retarder le démarrage de la fonction en programmant son heure de fin.
- Page 49: La fonction démarre automatiquement après une période de temps déterminée pour que la cuisson se termine au moment désiré. Un signal sonore et l’écran indiquent que le four a atteint la température désirée, et les aliments peuvent être ajoutés. La programmation d’un délai pour le début de la cuisson désactive la phase de préchauffage. Placer les aliments dans le four avant la fin du préchauffage peut affecter la qualité de la cuisson. En ouvrant la porte, la cuisson sera temporairement interrompue en désactivant les éléments chauffants. Certaines recettes nécessiteront que des aliments soient ajoutés après la phase de préchauffage. Un signal sonore retentira et l'écran affichera l'action à effectuer. Il est possible d'ajuster le niveau de cuisson désirée dans certaines fonctions. À tout moment, vous pouvez arrêter la fonction qui a été activée. Un signal sonore et l’écran indiquent la fin de la cuisson.
- Page 50: Veuillez noter : Nous vous conseillons de ne pas ouvrir la porte du four durant le cycle de nettoyage pour éviter de perdre les vapeurs d'eau. Un message clignotera à l'écran pour indiquer la fin du cycle. Pour faciliter l'utilisation du four, il peut enregistrer jusqu'à 20 fonctions favorites. Lorsque le four est éteint, l’écran peut être utilisé comme minuterie. Veuillez noter : Si la mémoire est pleine ou si le numéro choisi a déjà été pris, le four vous demandera de confirmer l'écrasement de la fonction précédente. Pour verrouiller le clavier, appuyez sur et maintenez-la enfoncée pendant au moins trois secondes. Respectez ces instructions lors de l'utilisation du micro-ondes. Si du métal entre en contact avec la paroi du compartiment de cuisson, des étincelles se produisent et peuvent endommager l'appareil. Ne mettez jamais le four à micro-ondes en marche sans y avoir placé les aliments. Utilisez un maximum de 600 watts.
- Page 51: conseils pour la cuisson au four à micro-ondes Lorsque vous réchauffez des aliments ou liquides dans un petit pot pour bébé ou un biberon, agitez toujours et vérifiez la température avant de servir. Pour les gâteaux et le pain, nous recommandons d'utiliser la fonction « Chaleur pulsée ». Pour une cuisson uniforme, coupez les aliments en morceaux de taille équivalente. La plupart des aliments continueront de cuire après que le four à micro-ondes a fini de les cuire. Enlevez les fermetures métalliques des sachets en papier ou en plastique avant de les placer dans le four à micro-ondes. Pour obtenir un dorage parfait en surface tout en maintenant l'intérieur de la viande ou du poisson tendre et juteux, nous vous recommandons d'utiliser des fonctions combinant le chauffage par convection et la cuisson au micro-ondes. Les liquides peuvent chauffer au-delà du point d'ébullition sans générer de bulles visibles. Pour des résultats optimum, nous recommandons de dégeler les aliments directement sur la grille métallique. Les aliments bouillis, les ragoûts et les sauces à base de viande se décongèlent mieux s'ils sont remués durant la décongélation. Séparez les morceaux dès qu'ils commencent à se décongeler : les portions séparées décongèlent plus rapidement.
- Page 52: nettoyage et entretien Assurez-vous que le four a refroidi avant d'effectuer tout entretien ou nettoyage. N'utilisez pas de laine de verre, d'éponges abrasives ou d'agents détergents abrasifs/corrosifs, car ils risquent d'endommager les surfaces de l'appareil. L’appareil doit être débranché de l’alimentation principale avant d’effectuer des travaux d’entretien. Activez la fonction « Hydro Self Clean » pour un nettoyage optimal des surfaces internes. Nettoyez les surfaces à l’aide d’un chiffon en microfibre humide. Après chaque utilisation, laissez le four refroidir et ensuite nettoyez-le, de préférence lorsqu'il est encore tiède. Dépannage L’écran affiche la lettre « F » suivi d’un numéro ou d'une lettre différent de F4E1. Défaillance du four. Assurez-vous qu'il n'y a pas de panne de courant et que le four est bien branché. Lorsque le mode « DÉMO » est activé, toutes les commandes sont actives mais le four ne chauffe pas.
- Page 53: Gebruikershandleiding Dank u wel voor uw aankoop van een Whirlpool product. Lees de instructies aandachtig door voordat u het apparaat gebruikt. Productbeschrijving Bedieningspaneel Holteventilator en circulair verwarmingselement Roostergeleiders Deur Bovenste verwarmingselement/grill Lamp Insteekplaats vleessonde (indien aanwezig) Identificatieplaatje (niet verwijderen) Onderste verwarmingselement Beschrijving bedieningspaneel Aan/uit Terug Navigatietoets plus Directe toegang tot menu/functies Navigatietoets min Directe toegang tot opties/functies Bevestig Start
- Page 54: Accessoires moeten hittebestendig zijn en geschikt voor stoombereidingen. Accessoires kunnen tijdens de magnetronfunctie warmer worden. Zorg voor een ruimte van minstens 30 mm tussen de schotel en de wanden van de oven. Het rooster is geschikt voor alle bereidingsmodi, inclusief de magnetron. De bakplaat is alleen geschikt voor specifieke functies, behalve voor magnetronfuncties. De crisperplaat moet altijd in het midden van het rooster worden geplaatst. Gebruik de crisperplaat om voedsel rechtstreeks op het rooster te koken zonder pan. Om voedsel te stomen, plaats het in de mand van de stoompan en voeg drinkwater toe. Plaats de stoompan op het rooster op niveau 1 voor de beste resultaten. Het aantal accessoires is afhankelijk van het aangeschafte model.
- Page 55: De roostergeleiders verwijderen en terugplaatsen De ladderrekken zijn afneembaar om het schoonmaken te vergemakkelijken. Om de ladderrekken te verwijderen, pakt u het externe deel van de geleider stevig vast en trekt u het omhoog. Om de ladderrekken te verplaatsen, schuift u het achterste deel op de achtersteun. Eerste gebruik Stel de taal en tijd in wanneer u het apparaat voor de eerste keer aan zet. De oven is geprogrammeerd om een niveau van elektrisch vermogen te verbruiken dat compatibel is met een huishoudelijk netwerk van meer dan 3 kW. Selecteer VEMOGEN in het menu INSTELLINGEN en kies de gewenste taal. De oven verwarmen Een nieuwe oven kan geuren afgeven die tijdens het productieproces zijn achtergebleven. Verwarm de oven tot 200 °C gedurende ongeveer een uur met de functie Snel voorverw.. Functies Met de 6th Sense-functies hoeft u alleen maar het type en gewicht of de hoeveelheid van het voedsel te selecteren. De oven berekent automatisch de optimale instellingen en blijft deze wijzigen naarmate het koken vordert.
- Page 56: 6th sense opwarmen Voor het opwarmen van kant-en-klaar voedsel, ingevroren of op kamertemperatuur. De oven berekent automatisch de gewenste instellingen voor de beste resultaten. Neem het uit de verpakking en verwijder alle aluminiumfolie. De maaltijd 1-2 minuten laten staan na het opwarmen verbetert altijd het resultaat. 6th sense smelten & zacht Om voedsel te smelten en zacht te laten worden. Plaats voedsel in een magnetron- en hittebestendige bak. Zacht laten worden van boter, ijs, chocolade en kaas. Snijd de chocolade en kaas in stukjes voor het beste resultaat. 6th sense bereidings tabel Om verschillende soorten gerechten en voedsel te bereiden en snel en gemakkelijk optimale resultaten te bereiken. Volg de aanwijzingen in de betreffende bereidingstabel. Stel de aanbevolen bereidingstijd in voor pasta en rijst. Gebruik de juiste hoeveelheden water en ingrediënten voor elke portie. Accessoires zoals een hittebestendige bak en stoompan zijn aanbevolen.
- Page 57: Borstel olie over het vlees en wrijf het vlees in met zout en peper. Laat na de bereiding tenminste 15 minuten rusten alvorens voor te snijden. De crisperplaat moet voorverwarmd worden voordat het voedsel erop geplaatst wordt. Om perfecte resultaten te krijgen, wordt u tijdens het koken gevraagd om het voedsel om te draaien. Voeg ongeveer 200 g water toe aan de stoommand en verdeel het voedsel gelijkmatig in de stoommand. Verdeel gelijkmatig over de crisperplaat. Doorboor de worsten met een vork om barsten te voorkomen. Plaats in de oven met de borst bovenaan. Verdeel gelijkmatig over de crisperplaat en wissel de visfilets en de aardappelen af. Hittebestendige accessoires zijn onder andere de druppelplaat, bakplaat, en stoompan.
- Page 58: Categorie Gerecht Gewicht/porties/stuks Waarschuwing Accessoire Snijd in stukken, kruid met olie, zout en breng op smaak met kruiden. Verdeel gelijkmatig over de crisperplaat. Om perfecte resultaten te krijgen, wordt u tijdens het koken gevraagd om het voedsel door te roeren. Hol de groente uit en vul met een mengsel van de pulp van de groente, gehakt en kaassnippers. Voeg zout toe en breng op smaak met knoflook en kruiden naar keuze. Voeg ongeveer 200 g water toe aan de stoompan. Snijd in stukjes en verdeel het voedsel gelijkmatig in de stoommand. Plaats het deksel. Maak het deeg volgens uw favoriete recept voor een licht brood. Leg in een broodrecipiënt voordat het begint te rijzen. Gebruik de speciale ovenfunctie voor rijzen. Bereid pizzadeeg volgens uw favoriete recept. Laat het rijzen met de speciaal daarvoor bedoelde functie van de oven. Rol het deeg uit in een licht ingevette bakplaat. Voeg naar wens topping toe. Bekleed een taartvorm voor 8-10 porties met deeg en prik erin met een vork. Vul het deeg volgens uw favoriete recept. Maak een vetvrij cakebeslag voor luchtige cake. Giet het deeg in de beklede en ingevette bakplaat. Maak deeg voor 16-18 stuks volgens uw favoriete recept en vul de papieren vormpjes. Verdeel gelijkmatig over de bakplaat. Druk het deeg in de taartvorm en bestrooi de bodem met broodkruimels om het fruitsap te absorberen. Vul met stukjes vers fruit gemengd met suiker en kaneel. Bereid volgens uw favoriete recept. Bekleed de bakplaat met bakpapier en spreid het deeg hierop uit.
- Page 59: Plaats de zak altijd rechtstreeks op het rooster. Bereid slechts één zak per keer. Verdeel gelijkmatig over de crisperplaat. Voor het perfect bruinen van gerechten aan de bovenkant en de onderkant. Deze functie kan alleen worden gebruikt met de speciale crisperplaat. Ontdooien van ingevroren voedsel of zacht laten worden van boter en kaas. Deze gezonde en exclusieve functie combineert de kwaliteit van de crispfunctie met de eigenschappen van de warmeluchtcirculatie. Om de oven voor een bereidingscyclus snel voor te verwarmen. Het is raadzaam om het voedsel tijdens de bereiding te draaien. Gebruik de magnetronfunctie alleen met voedsel of dranken erin om de juiste werking van het product te behouden. Voor perfecte resultaten, een combinatie van de grill en ovenluchtconvectie.
- Page 60: TurboGrill + MG Om het voedsel snel te bereiden en een bruin korstje te geven, een combinatie van de magnetron, grill en ovenluchtconvectie. Benodigde accessoires: rooster op niveau 1, magnetronbestendige en hittebestendige bak. Speciale functies Conventioneel + Magn Om gebakken gerechten sneller te bereiden door de conventionele oven te combineren met de magnetron. Warmhouden Voor het warm en krokant houden van zojuist bereide gerechten, inclusief vlees, gefrituurde gerechten of gebak. Turbo hetelucht + magnetron Voor het bereiden van elk soort gerecht op slechts één hoogte met combinatie van heteluchtcirculatie en de magnetron. Yoghurt Voor het maken van yoghurt. Dehydratie Om fruit en groenten te dehydrateren. Snijd in dunne plakjes en leg direct op een rooster. Conventioneel Om elk gerecht perfect te garen en te bruinen, zowel boven als onder, op slechts één plank. Maxi-cooking Voor het braden van grote stukken vlees (meer dan 2,5 kg). Zelfreiniging Door de werking van de stoom die tijdens deze speciale reinigingscyclus op lage temperatuur vrijkomt, kunnen vuil en voedselresten gemakkelijk worden verwijderd.
- Page 61: Taart Bereid een pestolasagne of cannelloni naar wens in een metalen of pyrex bak. Bak visfilets met gesneden groenten direct op de bakplaat. Gebruik deze functie om drie gelijke platen taarten te bakken voor een optimaal resultaat. Pizza (bevroren) Gebruik deze functie om drie gelijke platen pizza's te bakken voor een optimaal resultaat. Kookwekker Om de tijd bij te houden zonder een functie in te schakelen. Deze cyclus is ontworpen om een volledige vleesmaaltijd en een dessert te bereiden. Favorieten Om de lijst van de 9 favoriete functies op te vragen. Instellingen Om de instellingen van het apparaat te regelen.
- Page 62: Druk op om het uur in te stellen waarop de bereiding moet klaar zijn. De functie start automatisch na een tijdsperiode die berekend is om de bereiding te laten eindigen op het uur dat u gekozen hebt. Wanneer er een uitgestelde bereidingsstarttijd wordt geprogrammeerd, wordt de voorverwarmingsfase van de oven uitgeschakeld. Het voedsel in de oven plaatsen vooraleer de fase van de voorverwarming afgelopen is, zal een negatief effect hebben op het uiteindelijke resultaat van de bereiding. De bereidingstijd is exclusief de voorverwarmingsfase. Deze functies selecteren automatisch de beste bereidingswijze, temperatuur en duur om alle beschikbare gerechten te koken. Als de deur wordt geopend, wordt de bereiding tijdelijk onderbroken en worden de verwarmingselementen uitgeschakeld. Bij sommige 6th Sense-bereidingsrecepten moet voedsel toegevoegd worden na de voorverwarmingsfase. Een hoorbaar signaal gaat af en op het display verschijnt de uit te voeren actie. Er klinkt een geluidssignaal en op de display wordt aangegeven dat de bereiding klaar is.
- Page 63: alle acties die moeten worden uitgevoerd voor een optimale reiniging: volg de aanwijzingen en druk op als u klaar bent. let op: het is raadzaam om de ovendeur niet te openen tijdens de reinigingscyclus om verlies van waterdamp te voorkomen. de oven volledig laten afkoelen en de binnenkant van het apparaat afvegen met een doek of spons. wanneer de oven uitgeschakeld is, kan het display gebruikt worden als kookwekker. voor een gemakkelijker gebruik kan de oven maximaal 20 van uw favoriete functies opslaan. druk op om de kookwekker in te schakelen. u hoort een geluidssignaal en het display toont wanneer de kookwekker afgeteld heeft. let op: als het geheugen vol is of het nummer al in gebruik is, wordt u gevraagd te bevestigen om de vorige functie te overschrijven. om het toetsenbord te vergrendelen, houdt u het minstens drie seconden ingedrukt. de zelfreinigingsfunctie kan ook tijdens het bereidingsproces worden ingeschakeld. gebruik geen aluminium bakjes in het apparaat.
- Page 64: Nuttige tips Tips voor bereiding in de magnetron De microgolven dringen slechts in beperkte mate in het voedsel. Kleine stukken zijn sneller gaar dan grote. De meeste levensmiddelen garen verder nadat de bereiding met de magnetron voltooid is. Verwijder alle sluitstrips met metaaldraad van papieren of plastic zakken voordat u ze in de magnetron plaatst. Plastic folie moet ingesneden of ingeprikt worden met een vork om het openbarsten te voorkomen. Wanneer u babyvoeding in een zuigfles of potje in de magnetron verwarmt, moet u het voedsel altijd doorroeren en de temperatuur controleren. Voor gebak en brood raden we de functie Turbohetelucht aan. Vloeistoffen kunnen oververhit raken tot boven het kookpunt zonder dat ze zichtbaar borrelen. Voor de beste resultaten adviseren wij u het voedsel rechtstreeks op het rooster te ontdooien.
- Page 65: Reinigen en onderhoud Zorg ervoor dat de oven afgekoeld is vooraleer te onderhouden of te reinigen. Gebruik geen staalwol, schuursponsjes of schurende/ bijtende reinigingsproducten, omdat deze het oppervlak van het apparaat kunnen beschadigen. De oven moet worden losgekoppeld van het elektriciteitsnet voordat u onderhoudswerkzaamheden uitvoert. Draag beschermende handschoenen. Activeer de Smart Clean-functie voor een optimale reiniging van de interne oppervlakken. Reinig de oppervlakken met een vochtig microvezeldoekje. Na elk gebruik moet de oven afkoelen en dan gereinigd worden, bij voorkeur wanneer die nog warm is. Neem contact op met het Callcenter en vermeld het getal na de letter 'F' als er een foutmelding op de display verschijnt. Controleer of het elektriciteitsnet spanning heeft en of de oven is aangesloten als de oven niet inschakelt. De QR-code in uw apparaat gebruiken voor aanvullende productinformatie.
- Page 66: Grazie per avere acquistato un prodotto Whirlpool. Per ricevere un'assistenza più completa, registrare il prodotto. Prima di utilizzare l'apparecchio leggere attentamente le istruzioni di sicurezza. Descrizione del prodotto include pannello comandi, ventola della cavità, ripiani a scaletta, porta, resistenza superiore, luce, punto di inserimento della sonda carne, targhetta matricola e resistenza inferiore. Descrizione del pannello comandi include tasti ON/OFF, accesso diretto a menu e funzioni, navigazione meno e più, accesso diretto a opzioni e funzioni, display, conferma e avvio. Il tasto ON/OFF serve per accendere e spegnere il forno. I tasti di accesso diretto permettono di accedere rapidamente alle funzioni e al menu. Il tasto di navigazione meno serve per scorrere i menu e ridurre le impostazioni. Il tasto di conferma serve per confermare la selezione di una funzione o un valore impostato. Il tasto avvio serve per avviare una funzione utilizzando le impostazioni specificate.
- Page 67: Accessori Assicurarsi che siano resistenti al calore e adatti alla cottura a vapore. Gli accessori durante la funzione microonde possono subire un aumento di temperatura. Si raccomanda di utilizzare una protezione per maneggiare gli accessori al termine del ciclo. Assicurarsi che vi sia uno spazio di almeno 30 millimetri tra il bordo superiore di qualsiasi contenitore e le pareti della cavità. La griglia metallica è adatta a tutte le modalità di cottura, anche a quella a microonde. La teglia è adatta a tutte le modalità di cottura, ad eccezione delle funzioni designate. Il piatto Crisp deve essere sempre appoggiato al centro della griglia. Per cuocere a vapore alimenti come pesce o verdure, versare acqua potabile sul fondo della vaporiera. Chiudere la vaporiera con l'apposito coperchio per ottenere un risultato ottimale. Il numero di accessori può variare a seconda del modello acquistato.
- Page 68: Montaggio e rimontaggio dei ripiani a scaletta Le guide a scaletta sono rimovibili per rendere più comoda la pulizia. Per rimuovere le guide a scaletta, afferrare saldamente la parte esterna della guida e tirarla verso l'alto. Per riposizionare le guide a scaletta, far scorrere la parte posteriore sul supporto posteriore. Primo utilizzo Alla prima accensione, è necessario impostare lingua e ora. Il forno è programmato per assorbire una potenza elettrica compatibile con una rete domestica di capacità superiore a 3 kW. Un nuovo forno può rilasciare degli odori dovuti alla lavorazione di fabbrica. Scaldare il forno a 200 °C per circa un'ora utilizzando la funzione Preriscaldamento rapido. Dopo aver selezionato la lingua, sarà necessario impostare l'ora corrente. Funzioni 6th Sense Con le funzioni 6th Sense, è sufficiente selezionare il tipo e il peso o la quantità degli alimenti per ottenere i migliori risultati.
- Page 69: Riscaldamento 6th Sense Per riscaldare cibi pronti, sia surgelati che a temperatura ambiente. Il forno calcolerà automaticamente i valori necessari per ottenere i migliori risultati possibili nel minor tempo. Disporre gli alimenti su un piatto o un recipiente adatto al microonde e resistente al calore, direttamente sulla griglia metallica al livello 1. Estrarre gli alimenti dalla confezione rimuovendo le eventuali pellicole di alluminio. Al termine del processo di riscaldamento 1-2 minuti di tempo di attesa migliorano sempre il risultato. Scioglimento e ammorbidimento 6th Sense Per sciogliere e ammorbidire gli alimenti. Il forno calcolerà automaticamente i valori necessari per ottenere i migliori risultati possibili nel minor tempo. Disporre gli alimenti su un piatto o un contenitore adatto al microonde e resistente al calore, direttamente sulla griglia metallica al livello 1. Per ottenere risultati ottimali, posizionare il burro su un contenitore direttamente sulla griglia. Tabella di cottura 6th Sense Indicata per cuocere diversi tipi di piatti e alimenti e ottenere risultati ottimali nel modo più semplice e veloce. Per utilizzare al meglio questa funzione si raccomanda di seguire le indicazioni della tabella di cottura. Impostare il tempo di cottura consigliato per la pasta. Versare l'acqua salata e la pasta insieme nella parte inferiore della vaporiera e coprire. Considerare circa 100 g di pasta per ogni porzione. Utilizzare 400 g di acqua per ogni porzione di pasta.
- Page 70: Alimenti Spennellare con olio e cospargere di sale e pepe. Condire con aglio e aromi a piacere. Il piatto crisp deve essere preriscaldato prima di inserire gli alimenti. Il forno vi avviserà quando sarà il momento di inserire gli alimenti. Per ottenere risultati perfetti, durante la cottura vi verrà chiesto di girare gli alimenti. Distribuire uniformemente sul piatto crisp dopo il preriscaldamento. Punzecchiare le salsicce con una forchetta per evitare che l'involucro si laceri. Aggiungere circa 200 g di acqua nella parte inferiore della vaporiera e distribuire uniformemente gli alimenti nel cestello. Coprire. Considerare circa 100 g di pesce e 100 g di patate per ogni porzione. Distribuire uniformemente sul piatto crisp.
- Page 71: Alimenti Tagliare a pezzi, condire con olio, sale e aromi. Distribuire uniformemente sul piatto crisp. Durante la cottura vi verrà chiesto di mescolare gli alimenti. Patate arrosto: 300 g - 1,0 kg Scavare le verdure e preparare il ripieno con la polpa risultante, carne macinata e formaggio grattugiato. Aggiungere circa 200 g di acqua nella parte inferiore della vaporiera. Verdure ripiene: 600 g - 2,0 kg Preparare l'impasto con la ricetta preferita per ottenere un pane leggero. Foderare uno stampo da crostata con un impasto per 8-10 porzioni e punzecchiarlo con una forchetta. Preparare un impasto per pan di Spagna senza grassi. Pizza: 250 - 700 g Preparare l'impasto con 500 g di farina, 200 g di burro salato, 200 g di zucchero e 2 uova.
- Page 72: Alimenti e porzioni consigliate per la cottura. Disporre sempre il sacchetto direttamente sulla griglia. Cuocere un solo sacchetto alla volta. Preparare secondo la ricetta preferita in un unico recipiente. Accessori necessari per la funzione Crisp. Funzione Crisp per ottenere una doratura perfetta. Preriscaldamento veloce per un ciclo di cottura. Funzione Grill per dorare, grigliare o gratinare. Utilizzare la funzione microonde solo con alimenti o bevande all'interno. Funzioni combinate per cuocere e gratinare rapidamente.
- Page 73: Turbo grill + microonde Scongelamento programmato Indicata per cuocere e dorare velocemente gli alimenti combinando l'azione delle microonde, del grill e del forno ventilato. Accessori necessari: griglia metallica al livello 1, contenitore adatto al microonde e resistente al calore. Funzioni speciali Permette di preparare le pietanze più velocemente combinando la cottura statica con le microonde. Per mantenere caldi e croccanti cibi appena cotti, come carne, frittura o torte. Per ottenere una lievitazione ottimale di impasti dolci o salati. Per disidratare frutta e verdura. Permette di cuocere velocemente qualsiasi pietanza con farcitura liquida combinando l'azione delle microonde, il riscaldamento statico e la funzione ventilata. Per cuocere tagli di carne di grosse dimensioni (superiori ai 2,5 kg). Per cuocere arrosti ripieni e filetti di carne in pezzi su un solo ripiano. Per cuocere e dorare perfettamente sia sopra sia sotto qualsiasi tipo di pietanza su un solo ripiano. Per la cottura di dolci e carni con circolazione di aria calda.
- Page 74: Pizza surgelata può essere cotta a livello 3. Preparare lasagne al pesto o cannelloni in una teglia di metallo o pirex da posizionare al livello 2. Cuocere filetti di pesce al cartoccio con verdure a fette nella teglia al livello 1. Utilizzare la funzione per cuocere tre teglie di pizze surgelate contemporaneamente. Il ciclo Cook 3 Menu 1 è progettato per cucinare un pasto completo a base di carne e un dessert. Preparare una crostata di frutta in una teglia rotonda da collocare sulla griglia al livello 3. Il ciclo Cook 3 Menu 2 è progettato per cucinare un pasto a base di pesce o vegetariano e un dessert. Impostare il timer senza attivare una funzione con la funzione Conta Minuti. Attivare la modalità ECO per risparmiare energia riducendo la luminosità del display. Selezionare una funzione e modificare la temperatura usando i comandi appropriati.
- Page 75: Desiderata, quindi premere per confermare e attivare la funzione. Il forno ha raggiunto la temperatura e la funzione si avvierà automaticamente dopo un periodo di tempo calcolato. La programmazione dell'avvio ritardato disattiva la fase di preriscaldamento del forno. Inserire gli alimenti nel forno prima della fine del preriscaldamento può compromettere i risultati di cottura. Aprendo la porta durante la fase di preriscaldamento, questa si interrompe temporaneamente. Aprendo la porta, le resistenze vengono disattivate e la cottura viene temporaneamente interrotta. Alcune ricette richiedono di introdurre gli alimenti dopo la fase di preriscaldamento. Questa richiesta sarà segnalata da un segnale acustico e da un messaggio corrispondente sul display. Alla richiesta, premere per selezionare il livello di cottura desiderato. Allo scadere del tempo programmato, un segnale acustico indicherà che la cottura è terminata.
- Page 76: Ciclo di pulizia, perché la fuoriuscita del vapore potrebbe avere un effetto negativo sul risultato finale. A ciclo ultimato, il relativo messaggio di avviso lampeggia sul display. Lasciar raffreddare il forno, quindi pulire e asciugare le superfici interne con un panno o una spugna. Per una maggiore facilità d'uso, è possibile memorizzare fino a 20 funzioni preferite. Al termine della cottura, sul display compare un messaggio che propone di salvare la funzione nella lista dei preferiti. Dopo avere attivato il conta minuti, è anche possibile selezionare e attivare una funzione. Per richiamare successivamente le funzioni salvate, premere il tasto corrispondente. Per bloccare i tasti, tenere premuto per almeno tre secondi. Osservare queste istruzioni quando si usa il microonde. Non utilizzare vaschette di alluminio nell'apparecchio.
- Page 77: Consigli per la cottura a microonde Distribuire gli alimenti in larghezza per esporre la massima superficie alle microonde. I pezzi piccoli cuociono più velocemente di quelli grandi. Prevedere sempre qualche minuto di riposo al termine del ciclo di cottura. Togliere i ferretti di chiusura dai sacchetti di plastica o di carta. Forare o incidere le pellicole per liberare la pressione. Liquidi I liquidi possono riscaldarsi oltre il punto di ebollizione senza bollicine visibili. Evitare i recipienti a collo stretto e mescolare il liquido prima di riscaldarlo. Agitare e controllare sempre la temperatura degli alimenti per neonati prima di servire. Togliere il coperchio del recipiente e la tettarella del biberon prima di riscaldarli. Dolci e pane Usare la funzione Termoventilato per la cottura di dolci e pane. Per le torte con farcitura liquida, si consiglia la funzione Ventilato. Carne e pesce Utilizzare funzioni che combinano la cottura ventilata e l'azione delle microonde per una doratura perfetta. Alimenti surgelati Far scongelare gli alimenti direttamente sulla griglia metallica per risultati ottimali.
- Page 78: Pulizia e manutenzione Assicurarsi che il forno si sia raffreddato prima di effettuare qualsiasi intervento di manutenzione o pulizia. Non usare pagliette metalliche, panni abrasivi e detergenti abrasivi o corrosivi che possano danneggiare le superfici. Indossare guanti protettivi. Il forno deve essere scollegato dalla rete elettrica prima di effettuare qualsiasi tipo di manutenzione. Attivare la funzione Hydro Self Clean per una pulizia ottimale delle superfici interne. Pulire le superfici con un panno in microfibra umido. Dopo ogni uso, lasciare raffreddare il forno e pulirlo preferibilmente quando è ancora tiepido. Il display visualizza la lettera F seguita da un numero o da una lettera diversa da F4E1. Contattare il Call Center e indicare il numero che segue la lettera F. Il forno non si accende.

Midea MDW-14D8-OD Dishwasher

PHILCO PD 1045 EA Dishwasher

Smeg LSPU8653X Dishwasher

beko DFN05R10W Dishwasher

BOSCH SMS4IMI62T Dishwasher

BOSCH SMS8ZDW86M Dishwasher

FRIGIDAIRE FDHP4336AS Dishwasher

Montpellier MDWBID6053 Dishwasher

BOSCH SRI4HKS53E 45cm 4 Partial Dishwasher

eta 338290000B Dishwasher