Home > CMA Dishmachines > CMA DISHMACHINES CMA-180 Rack Straight Dishwasher
CMA DISHMACHINES CMA-180 Rack Straight Dishwasher


3. 180 Conversion Kit – Corner to Straight #00617.18
INSTRUCTIONS:
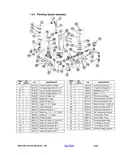
ILLUSTRATION #1
1. Open dishmachine doors to their highest position so that there is
little spring resistance on the door handle. Remove hardware
holding the door handle to the door linkage. Save all the washers
and spacers. With the door handle in “UP” position, lift spring
and remove from extension rod. Remove the nut attaching the
eyebolt and save all hardware.
2. To remove the door handle, simply unscrew the four bolts holding
the door handle mounting plates and slide the complete assembly
up and off of the cabinet. Use the bolts, nuts and washers to plug
the holes in the back of the cabinet.
3. Remove door panel & hardware from left side of machine, and
install door guides from kit. Remove front door and relocate to
left side of machine. The service door will be used to seal off this
side of machine. Remove bolt located on top right hand corner of
the wrapper and use it to mount service door latch bracket.
Relocate tray track guide to front service door side of tray track.
4. Using provided nuts, bolts and washers; mount the left and right
door handle supports on the back of the cabinet. Insert the
eyebolts into the brackets on the back of the dishmachine stand
and screw the nuts on just enough to hold them in place. Hook
both door springs and door spring extension rods on to the door
handle and secure them with the washers and cotter pins. Then
simply rest the door handle on the door handle supports. (You
may have to lift the door handle to reach the handle supports.)
5. Swing the door handle downwards to reach the door linkages;
and using the two provided bolts and existing washers and
spacers, attach the door linkages to the door handle. Adjust the
tension in the spring by tightening the nuts under the eyebolt
bracket so that the doors can slide up and down freely. Mount
the provided door handle grips on the ends of the door handle.
6. Eyebolt adjustment nuts should be adjusted to the point the doors
begin to lift from a closed position. Both eyebolts should be
adjusted the same. SEE “Illustration #1” for the proper location of
all door handle hardware for CMA 180-S.
ITEM
NO.
NO.
REQ’D
P/N
DESCRIPTION
1
2
2
2
1
1
2
1
1
2
4
2
1
1
1
1
1
2
4
2
1
4
4
2
00636.17
00603.07
00606.00
00613.17
00913.00
01555.50
01556.50
00607.04
00924.00
00900.00
17506.00
00535.30
13915.00
13915.06
13701.00
17554.00
00912.00
17506.60
17506.65
00610.00
00962.00
1222.50
EZ Glide Door Guide
Door Spring Extension Rod
5/16-18 x 7” Eyebolt
Door Handle
7. “Illustration #2” shows CMA 180-S and CMA 180-C door handle
assembly.
3
4
5
5/16”-18 SS Nut
ILLUSTRATION #2
6
L.H. Door Handle Support
R.H. Door Handle Support
Door Handle Grip
¼” SS Washer
7
Back
View
8
9
10
11
11A
12
12A
13
14
15
16
17
18
19
20
Cotter Pin
Service Door
Door Handle
Door Latch Bracket
Latch Bracket with Nut
Open Door Latch
Door Glide
¼” 20 Nylon Lock Nut
Door Splashguard-Straight
Service Door Splashguard-S
Spacer Small
¼”-20 x 1 SS Hex Head Bolt
Tank Plug
Model CMA-180 Parts Manual Rev. 2.09
Buy Parts
page 24
| General | Details |
|---|---|
| Name | CMA DISHMACHINES CMA-180 Rack Straight Dishwasher |
| Make | CMA Dishmachines |
| Language | English |
| Filetype | PDF (Download) |
| File size | 0.87 MB |


CMA DISHMACHINES EST-44 Conveyor Dishwasher

CMA DISHMACHINES CMA-180UC Under Counter Dishwasher

CMA DISHMACHINES EST-AH Door Type Rack Low Dishwasher

CMA DISHMACHINES UC65e M3 Dishwasher

CMA DISHMACHINES CMA-180VL Dishwasher

CMA DISHMACHINES UC50e Dishwasher

CMA DISHMACHINES CMA-180 Dishwasher

CMA DISHMACHINES CMA-180UC Dishwasher

CMA DISHMACHINES H-1X Undercounter Dishwasher

CMA DISHMACHINES 180UC-3 Under Counter Dishwasher


LG DFB-425FP Dishwasher

BOSCH SMS4HMW00G Dishwasher

BOSCH SMV6ZAX00X Dishwasher

BOSCH SMS6ZCW00E Dishwasher

FISHER PAYKEL DD24SI9 N Integrated Single DishDrawer Dishwasher

FISHER PAYKEL HDW13V1S1 Dishwasher

smeg STL323DALH Universale Totally Dishwasher

ASKO D5233 Dishwasher

Electrolux EET43200LX Fully Integrated Dishwasher

BOSCH SMH4HVX00E Dishwasher