Home > CMA Dishmachines > CMA DISHMACHINES 180UC-3 Under Counter Dishwasher
CMA DISHMACHINES 180UC-3 Under Counter Dishwasher

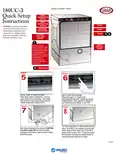

180UC-3
Quick Setup
180UC-3 REAR VIEW
Instructions
connections need to be made by a
qualified service technician and
comply with all available Federal,
State and Local Health, Electrical,
Plumbing and Safety codes.
TUBE
4
STIFFENER
WARNING: Electrical and plumbing
RINSE
INJECTION
DRAIN HOSE
1
CHEMICAL
TUBING
DETERGENT
INJECTION
GROUND
HOT
RED
BLUE
WASH
SENSOR
NOT MORE
THAN 22"
HEIGHT FROM
FLOOR
RINSE
SENSOR
HARD WIRE
THREE WIRE
POWER SUPPLY
STEP
STEP
PUMP DRAIN
MOTOR
1/2" WATER INLET
3
2
LEVELING
LEGS
1
2
1"AIR GAP
WALL
DRAIN
FLOOR DRAIN
Level dishmachine by adjusting leveling legs.
Dishmachine must be level front and back and
side to side.
Connect the drain hose to wall, not higher than
22 inches, or floor drain. The drain hose should
have a 1 inch air gap between drain hose and
drain.
STEP
STEP
BLUE
RED
4
3
Connect dishmachine to hot water source,
Insert tube stiffener with chemical tubing into
corresponding chemical dispensers.
recommended minimum temperature 140°F. Unit will
remain in wash cycle until booster heater
temperature reaches 180°F, then it will advance into
rinse cycle.
6-2024

| General | Details |
|---|---|
| Name | CMA DISHMACHINES 180UC-3 Under Counter Dishwasher |
| Make | CMA Dishmachines |
| Language | English |
| Filetype | PDF (Download) |
| File size | 0.55 MB |


CMA DISHMACHINES EST-44 Conveyor Dishwasher

CMA DISHMACHINES CMA-180UC Under Counter Dishwasher

CMA DISHMACHINES EST-AH Door Type Rack Low Dishwasher

CMA DISHMACHINES UC65e M3 Dishwasher

CMA DISHMACHINES CMA-180VL Dishwasher

CMA DISHMACHINES UC50e Dishwasher

CMA DISHMACHINES CMA-180 Dishwasher

CMA DISHMACHINES CMA-180UC Dishwasher

CMA DISHMACHINES H-1X Undercounter Dishwasher

CMA DISHMACHINES AH Straight Thru Design Dishwasher

CMA DISHMACHINES 180UC-3 Under Counter Dishwasher Overview
Summary of Contents
- Page 1: Quick setup instructions require connections to be made by a qualified service technician. All connections must comply with Federal, State, and Local Health, Electrical, Plumbing, and Safety codes. Dishmachine must be level front and back and side to side. Connect the drain hose to the wall, not higher than 22 inches, or to a floor drain. The drain hose should have a 1-inch air gap between the drain hose and the drain. Connect the dishmachine to a hot water source with a recommended minimum temperature of 140°F. The unit will remain in the wash cycle until the booster heater temperature reaches 180°F. Insert tube stiffener with chemical tubing into corresponding chemical dispensers. Leveling legs should be adjusted to ensure proper leveling of the dishmachine. Ensure proper connections for rinse, injection, and drain hoses.
- Page 2: Quick setup instructions Electrical and plumbing connections need to be made by a qualified service technician and comply with all available Federal, State and Local Health, Electrical, Plumbing and Safety codes. Initial start-up instructions. Daily start procedure. Press power switch to ON position. Listen for water spraying into the machine. Check wash tank for water, if none repeat till wash tank full. Allow machine 10 minutes for wash tank temperature display to read 160°F. Cycle machine by pushing start switch. Observe “Rinse Cycle” must be minimum 180°F.

FISHER AND PAYKEL DD60ST4NX9 Dish Drawer Dishwasher

BOSCH SMV6HVX01I Dishwasher

Electrolux GA55LV Dishwasher

Miele G 5051 Dishwasher

BOSCH SBH4HVX00G Dishwasher

FISHER and PAYKEL DW60FC2X2 Contemporary Dishwasher

ARDESTO DWMB-V459SMH3 Dishwasher

SIEMENS SX53EW01AH Dishwasher

IKEA SBE8596Z0E DISKAD PROFFSIG Dishwasher

BOSCH SHX78CM4N 24 Dishwasher