
element ENB5322HECW Dishwasher






Dishwasher Use & Care Manual
24 inch
Built-In Hybrid Dishwasher
ENB5322HECW
ENB5322HECB
ENB5322HECS


| General | Details |
|---|---|
| Name | element ENB5322HECW Dishwasher |
| Make | Element |
| Language | English |
| Filetype | PDF (Download) |
| File size | 5.81 MB |
 (1 votes, average: 5.00 out of 5)
 Loading...

element ENB5322HECW Full Console Dishwasher

element ENB6631PEBB 18 Inch Dishwasher

element ENB6632PEBB Dishwasher

element ENB5322HECW Dishwasher Overview
Summary of Contents
- Page 1: Dishwasher use and care manual. 24 inch built-in hybrid dishwasher. Model numbers: ENB5322HECW, ENB5322HECB, ENB5322HECS.
- Page 2: Dishwasher safety Operating requirements Location requirements Water supply requirements Parts and features Start up guide How your dishwasher cleans Before using your dishwasher Using your new dishwasher Dishwasher care
- Page 3: Warning/grounding instructions highlight the importance of proper grounding to prevent electric shock. Improper connection of the equipment-grounding conductor can result in a risk of electric shock. Check with a qualified electrician if you are in doubt about proper grounding. Do not modify the plug if provided with the appliance. This appliance must be grounded to reduce the risk of electric shock. For a grounded, cord-connected appliance, the plug must be plugged into an appropriate outlet. For a permanently connected appliance, it must be connected to a grounded metal wiring system. Important safety instructions emphasize following basic precautions when using the dishwasher. Read all instructions before using the dishwasher. Use only detergents or rinse agents recommended for use in a dishwasher.
- Page 4: Do not tamper with controls. Do not abuse, sit on, or stand on the dishwasher door, or dish racks. To reduce the risk of injury, do not allow children to play in or on a dishwasher. Hydrogen gas may be produced in a hot-water system that has not been used for two weeks or more. If the hot-water system has not been used, turn on all hot-water faucets before using the dishwasher. Severe product damage and/or injury could result from the use of unqualified service technicians or non-original replacement parts. Do not store or use combustible materials, gasoline, or other flammable vapors and liquids near the appliance. Keep young children and infants away from the dishwasher when it is operating. Do not use the dishwasher if it has a damaged power line or plug. Remove the door to the washing compartment when discarding an old dishwasher.
- Page 5: State of California Proposition 65 Warnings: WARNING: Cancer and reproductive harm. Suffocation hazard. Before you throw away your old appliance, remove the door or lid so that children cannot hide or get trapped inside. Failure to follow these instructions can result in death or brain damage. CAUTION: Never use harsh chemicals to clean your dishwasher. Never use steam cleaning products to clean your dishwasher. To avoid possible dishwasher damage, do not use harsh chemicals, abrasive cleaners, scouring pads, or abrasive cloths/paper towels to clean your dishwasher’s exterior door panel. It is highly recommended that the user become familiar with the procedure to shut off the incoming water supply and the procedure to shut off the incoming power supply. If the dishwasher drains into a food disposer, make sure the disposer is completely empty before running the dishwasher. NSF/ANSI 184 Certified residential dishwashers are not intended for licensed food establishments. Protect your dishwasher from the elements to avoid possible damage to the fill valve.
- Page 6: Operating requirements include electrical and location requirements. Electrical requirements emphasize the need for proper grounding to prevent electrical shock hazards. The dishwasher must be connected to a dedicated 120 V, 60 Hz, 15- or 20-amp electrical supply. Using an extension cord is not permitted. The dishwasher should be installed in a location protected from the elements to avoid freezing. It is important to level the dishwasher on a suitable floor that can support its weight. Water supply temperature should be maintained between 120°F to 150°F. Water pressure must be between 20 and 80 psi for adequate flow. Failure to follow these instructions can lead to serious hazards, including death or fire. Refer to the Dishwasher Care section for winter storage information.
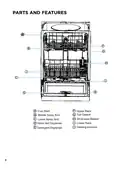
- Page 7: Parts and features include various components such as the cup shelf, upper rack, tub gasket, middle spray arm, silverware basket, lower rack, lower spray arm, rinse aid dispenser, heating element, and detergent dispenser.
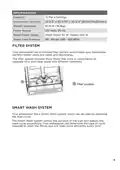
- Page 8: Specifications include capacity, dimensions, weight, power supply, rated power usage, and water feed pressure. The dishwasher has a capacity of 12 place settings. Dimensions are 23 3/5 x 22 7/10 x 33 3/4. The weight unpacked is 81.35 lb. Power supply is 120 volts, 60 Hz. Rated power usage includes a wash motor of 50 W and a heater of 840 W. Water feed pressure ranges from 20 to 80 psi. The dishwasher features a multiple filter system for better performance using less water and energy. The Smart Wash system adjusts the wash cycle based on the soil level of the load. The dishwasher determines the required cycle for efficient cleaning.
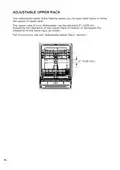
- Page 9: Adjustable upper rack feature allows loading of taller items. Upper rack can be adjusted 2 (5.08 cm). Adjusting the upper rack affects the clearance of the lower rack. For instructions, refer to the “Adjustable Upper Rack” section.
- Page 10: Start up guide Properly dispose of/recycle all packing material. Read this entire user manual. You will find important safety information and useful operating tips. Your dishwasher cleans by spraying a mixture of hot water and detergent through the spray arms against soiled surfaces. Check the filters for debris that may have been introduced from the packaging or during installation. Add rinse aid. To decrease cycle time and possibly improve performance, turn on the hot water faucet nearest to the dishwasher until the water runs hot. Load dishwasher. Add detergent. Select desired cycle and options. Close the door firmly to latch.
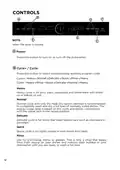
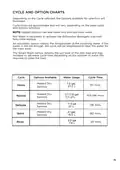
- Page 11: Additional features include the Delay Time feature, which allows programming the dishwasher to start a wash cycle 3, 6, or 9 hours later. To cancel the Delay feature, press and hold the Start control for 3 seconds. The Child Lock feature prevents children from accidentally changing the dishwasher cycle or starting it. Press and hold Child Lock for 3 seconds to activate or cancel the option. Options enhance the wash cycle, and some are available only with certain wash cycles. The Sanitize option meets NSF International standards for soil removal and sanitization efficacy. When selected, the water temperature will reach a maximum of 156.2°F (69°C). The Sanitize control illuminates to indicate the completion of the wash cycle with the Sanitize option. The Heated Dry option activates the heater during the drying process.
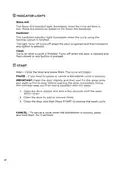
- Page 12: Indicator lights provide important information about the dishwasher's status. The rinse aid indicator light illuminates when the rinse aid level is low. Rinse aid should be added to the rinse aid dispenser. The sanitized indicator light illuminates when the cycle using the sanitize option is finished. The light turns off when the door is opened and then closed or any button is pressed. The clean indicator turns on after a cycle is finished. To start the cycle, close the door and press start. To pause or cancel a cycle, open the door slightly and wait for the spray arms and wash action to stop. To add or remove items, open the door after the wash action stops. To cancel a cycle, press and hold start for 3 seconds.
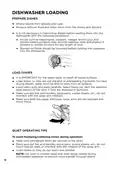
- Page 13: Dishwasher loading Prepare dishes Empty liquids from glasses and cups. Remove leftover food and other items from the dishes and discard. It is not necessary to hand-rinse dishes before loading them into the dishwasher with certain exceptions. Foods such as mayonnaise, mustard, vinegar, lemon juice, and tomato-based products may discolor stainless steel and plastics. Burned-on foods should be loosened before loading the cookware into the dishwasher. Load dishes so they are not stacked or overlapping if possible. Make sure pot lids and handles do not interfere with the spray arm rotation. To avoid thumping/clattering noises during operation, make sure lightweight items are secured in the racks. For built-in models, keep sink drain plugs closed during dishwasher operation to prevent noise transfer through drains.
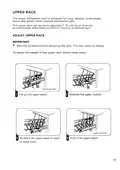
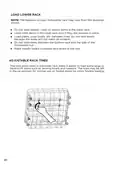
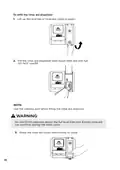
- Page 14: The upper dishwasher rack is designed for cups, glasses, small plates, bowls, and plastic items marked dishwasher safe. The upper rack can be easily adjusted 2 (5 cm) up or down to accommodate taller items in either the top or bottom rack. Remove all items before adjusting the rack. The rack must be empty. To adjust the height of the upper rack, follow these steps: Pull out the upper basket. Remove the upper basket. Re-attach the upper basket to upper or lower rollers. Push in the upper basket.
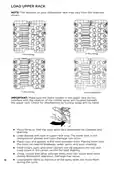
- Page 15: Load upper rack The features on your dishwasher rack may vary from the drawings shown. Make sure the items loaded in the upper rack do not interfere with the rotation of the middle spray arm. Check for interference by turning the spray arm by hand. Place items so that the open ends face downward for cleaning and draining. Load glasses and cups in the upper rack only. Place cups and glasses in the rows between tines. Small bowls, pans, and other utensils can be placed in the top rack. China, crystal, and other delicate items must not touch each other during dishwasher operation. Load plastic items so the force of the spray does not move them during the cycle.
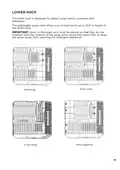
- Page 16: The lower rack is designed for plates, soup bowls, cookware, and bakeware. The adjustable upper rack allows you to load items up to 12.6 inches in height in the lower rack. Items in the lower rack must be placed so that they do not interfere with the rotation of the spray arms, block the water inlet, or keep the water spray from reaching the detergent dispenser.
- Page 17: Load lower rack Do not load glasses, cups, or plastic items in the lower rack. Load small items in the lower rack only if they are secured in place. Load plates, soup bowls, etc. between tines. Do not nest bowls because the spray will not reach all surfaces. Do not load items between the bottom rack and the side of the dishwasher tub. Place heavily soiled cookware face down in the rack. The fold-down tines in the lower rack make it easier to load extra large or hard-to-fit items such as serving bowls and roasters. The tines may be left in the up position for normal use, or folded down for more flexible loading.
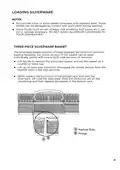
- Page 18: Do not load silver or silver-plated silverware with stainless steel. These metals can be damaged by contact with each other during washing. Some foods can pit or corrode silverware. Do not wash aluminum cookware in your dishwasher. The silverware basket consists of three separate sections. For optimum loading flexibility, the center section of the basket can be used individually, joined with one or both side sections, or removed. Lift handle to remove the silverware basket and set the basket on a counter or tabletop. Lift up on each side section to disengage the center section from the keyhole slots in the side sections. Either replace the section(s) in the bottom rack and load the silverware, or load the silverware while the section(s) are on the countertop and then replace the basket in the bottom rack.
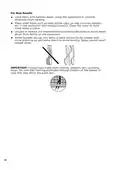
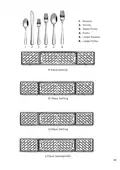
- Page 19: For best results, load items with handles down, using the separators to prevent silverware from nesting. Place small items such as baby bottle caps, jar lids, corncob holders, etc. in the section(s) with hinged cover(s). Close the cover to hold small items in place. Unload or remove the basket before unloading the racks to avoid water drops from falling on the silverware. When handles are up, mix items in each section of the basket with some pointing up and some down to avoid nesting. Spray cannot reach nested items. Always load sharp items (knives, skewers, etc.) pointing down. Be sure that nothing protrudes through the bottom of the basket or rack that may block the wash arm.
- Page 20: Spoons Knives Salad forks Forks Large spoons Large forks 8 place setting 10 place setting 12 place setting 8 place setting (DOE)
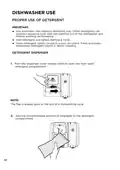
- Page 21: Proper use of detergent is essential for effective dishwasher operation. Use automatic dish washing detergent only to avoid excessive suds. Add detergent just before starting a cycle for optimal results. Store detergent tightly closed in a cool, dry place for better cleaning performance. The dispenser cover can be opened by pushing the release catch. The flap of the detergent dispenser is always open at the end of a cycle. Add the recommended amount of detergent to the compartment for best results.
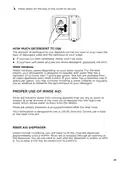
- Page 22: Press down on the top of the cover to secure. The amount of detergent to use depends on the soil level of your load, the type of detergent used and the hardness of your water. If you use too little detergent, dishes won’t be clean. If you have soft water and use too much detergent, glassware will etch. Water hardness varies depending on your water source. Your dishwasher is designed to operate with water that has a hardness of no more than 7 grains per gallon. Rinse aid prevents water from forming droplets that can dry as spots or streaks. A small amount of the rinse aid is released into the final rinse water. Your dishwasher is designed to use a liquid rinse aid. Do not use a solid or bar-type rinse aid. Under normal conditions, you will need to fill the rinse aid dispenser approximately once a month.
- Page 23: To refill the rinse aid dispenser Lift up the end tab of rinse aid cover to open. Fill the rinse aid dispenser with liquid rinse aid until full. Do not overfill. Use the viewing port when filling the rinse aid reservoir. Do not fill the reservoir above the full level indicator. Excess rinse aid can overflow during the wash cycle. Press the rinse aid cover down firmly to close.
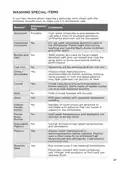
- Page 24: Washing special items If you have doubts about washing a particular item, check with the dishware manufacturer to make sure it is dishwasher safe. Aluminum: High water temperature and detergents can affect the finish of anodized aluminum. Unfinished aluminum will be discolored. Disposable aluminum: Do not wash disposable aluminum pans in the dishwasher as they might shift during washing and transfer black marks to dishes. Bottles and cans: Wash bottles and cans by hand. Labels attached with glue can loosen and clog the spray arms or pump. Cast iron: Seasoning will be removed and iron will rust. China/stoneware: Always check manufacturer’s recommendations before washing. Antique, hand-painted, or over-the-glaze patterns may fade. Crystal: Check manufacturer’s recommendations before washing. Some types of leaded crystal can etch with repeated washing. Gold: Gold-colored flatware will discolor. Plastics: Always check manufacturer’s recommendations before washing. Plastics vary in their capacity to withstand high temperatures and detergents. Load plastics in the top rack only. Stainless steel: Run a rinse cycle if not washing immediately. Prolonged contact with food containing salt, vinegar, milk products, or fruit juice can damage the finish.
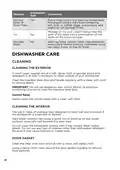
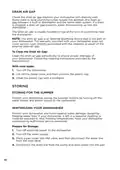
- Page 25: Dishwasher care Run a rinse cycle if not washing immediately. Prolonged contact with food containing salt, acid, or sulfide can damage finish. Wash wooden ware by hand and check manufacturer’s instructions before washing. Regular use of a soft, damp cloth or sponge and mild detergent is necessary to clean the exterior. Do not use appliance wax, polish, bleach, or products containing chlorine to clean the stainless steel door. Gently clean the control panel with a clean, soft cloth. The tub is made of stainless steel designed to resist rust and corrosion. Do not clean the dishwasher interior until it has cooled and wear rubber gloves. Clean around the door gasket regularly to remove food particles.
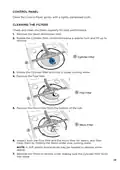
- Page 26: Control panel Clean the control panel gently with a lightly dampened cloth. Cleaning the filters Check and clean the filters regularly for best performance. Remove the lower dishwasher rack. Rotate the cylinder filter counterclockwise a quarter turn and lift up to remove. Empty the cylinder filter and rinse it under running water. Remove the fine filter. Remove the micro filter from the bottom of the tub. Inspect both the fine filter and the micro filter for debris, and then clean them by holding the filters under slow running water. A stiff, plastic bristle brush may be needed to remove some debris. Reinstall the filters in reverse order making sure the cylinder filter locks into place.
- Page 27: Drain air gap Check the drain air gap anytime your dishwasher isn’t draining well. Some state or local plumbing codes require the addition of a drain air gap between a built-in dishwasher and the home drain system. If a drain is clogged, a drain air gap prevents water from backing up into the dishwasher. The drain air gap is usually located on top of the sink or countertop near the dishwasher. The drain air gap is an external plumbing device that is not part of your dishwasher. The warranty provided with your dishwasher does not cover service costs directly associated with the cleaning or repair of the external drain air gap. Clean the drain air gap periodically to ensure proper drainage of your dishwasher. Protect your dishwasher during the summer months by turning off the water supply and power supply to the dishwasher. Protect your dishwasher and home against water damage caused by freezing water lines.
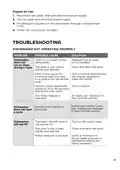
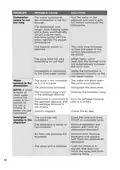
- Page 28: Problem: Dishwasher seems to run too long. Possible cause: The water supplied to the dishwasher is not hot enough. Solution: Run the water in the adjacent sink until it gets hot before turning on the dishwasher. Possible cause: The Sanitize option is selected. Solution: The cycle time increases to heat the water to the correct temperature for sanitizing. Possible cause: Dishwasher is connected to the cold water supply. Solution: Verify the dishwasher is connected correctly to the hot water supply. Problem: Water remains in the dishwasher or it is in a pause. Possible cause: The drain hose is kinked. Solution: Straighten the drain hose. Possible cause: The knockout plug is still in the garbage disposal. Solution: Run the garbage disposal until it is empty. Possible cause: Drain is clogged. Solution: Check the air gap. Problem: Detergent remains in the dispenser. Possible cause: The cycle has not completed. Solution: Close the door and press START to complete cycle. Possible cause: The detergent is damp or has clumped. Solution: Remove detergent and replace with fresh dry dishwasher detergent. Possible cause: An item was blocking the dispenser. Solution: Remove item and replace with fresh dry dishwasher detergent. Possible cause: The spray arm is blocked. Solution: Load the dishes in a manner that does not block the spray arm from rotating freely.
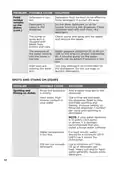
- Page 29: Problem: Grinding, grating, or buzzing sounds. Possible cause: A hard object or detergent granules have entered the wash module. Solution: Remove the hard object; noise should stop once detergent is ground up. Note: If noise persists after a complete cycle, call for service. Beeping indicates the wash cycle is completed. Note: A rapid beep indicates an error condition; see “Error Codes” for further direction. Suds in the tub may be caused by using the wrong type of detergent. Solution: Use only detergent approved for automatic dishwashers. Dishwasher leaks may occur due to excessive suds or if the dishwasher is not level. Solution: Level the dishwasher; see Installation Instructions. Rinse Aid light is on indicates the Rinse Aid level is low. Solution: Add liquid Rinse Aid. Dishes are not completely clean due to incorrect loading or wash cycle selection. Solution: Refer to “Dishwasher Loading” and select the appropriate wash cycle based on soil level. Water temperature should be a minimum of 120°F (49°C) for best results. Using incorrect amount of detergent can affect cleaning. Solution: Use a minimum of 1 Tbsp. (15 g) per load; adjust for heavy soil or hard water.
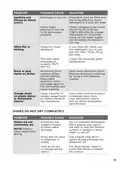
- Page 30: Problem: Food residue remains on the dishes Possible cause: Detergent is too old. Solution: Detergent must be fresh to be effective. Store detergent in a cool, dry area. Problem: Food residue remains on the dishes Possible cause: Detergent is caked in the dispenser. Solution: Clean dispenser and refill with fresh, dry detergent. Problem: Food residue remains on the dishes Possible cause: The pump or spray arm is clogged with labels from bottles and cans. Solution: Check pump and spray arm for labels and remove the labels. Problem: Food residue remains on the dishes Possible cause: The water pressure is too low. Solution: Water pressure should be 20 to 80 psi for proper dishwasher fill. Problem: Food residue remains on the dishes Possible cause: High suds are slowing the wash arm. Solution: Use only detergent recommended for the dishwasher. Problem: Spots and staining on dishes Possible cause: Rinse Aid dispenser is empty. Solution: Add a liquid rinse aid to the dispenser. Problem: Spots and staining on dishes Possible cause: Hard water with high mineral content. Solution: Use a rinse aid and keep the dispenser filled. Problem: Spots and staining on dishes Possible cause: Water temperature is too low. Solution: For best results, water should be a minimum of 120°F as it enters the dishwasher. Problem: Spots and staining on dishes Possible cause: Did not use enough detergent. Solution: Use a minimum of 1 Tbsp. of detergent per load.
- Page 31: Problem: Spotting and filming on dishes Possible cause: Detergent is too old. Solution: Detergent must be fresh and dry to be effective. Store detergent in a cool, dry area. Problem: Water pressure is too low to fill dishwasher properly. Solution: Water pressure to the home should be 20 to 80 psi for proper dishwasher fill. A booster pump on the water supply can be added if pressure is too low. Problem: Silica film or etching Possible cause: Using too much detergent. Solution: If you have soft water, use less detergent, but do not use less than 1 Tbsp. per load. Problem: The inlet water temperature exceeds 150°F. Solution: Lower the incoming water temperature. Problem: Black or gray marks on dishes Possible cause: Aluminum items rubbing dishes during washing. Solution: Hand wash aluminum items. Remove aluminum markings by using a mild abrasive cleaner. Problem: Orange stains on plastic dishes or dishwasher interior Possible cause: Large amounts of tomato-based foods on dishes placed in the dishwasher. Solution: Use a stain removal product to remove stains from your dishwasher. Problem: Dishes are not completely dry Possible cause: Dishes are not loaded properly to allow water drainage. Solution: Do not overload dishwasher. Place glasses and cups in the rack so that the bottom surface is slanted to allow water to run off. Problem: Rinse aid not used or dispenser is empty. Solution: Use a liquid rinse aid to speed drying and keep the dispenser full. Problem: Used an air dry or energy-saving option. Solution: For dryer dishes, select a cycle that allows a heated dry option.
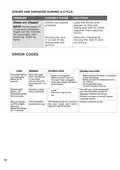
- Page 32: Dishes are damaged during a cycle. Dishes are chipped due to improper loading. Load the dishes and glasses so they are stable and will not strike together. Some types of china and glassware might be too delicate for automatic dish washing. Minimize chipping by moving the rack in and out slowly. Error codes indicate issues with water flow or pressure. Rinse light flashes if the faucet is not opened or water pressure is incorrect. Check the drain hose and contact customer service if necessary. Delicate light flashes if there is a leak or too much water in the tub. Communication issues may require contacting customer service.
- Page 33: Warranty Element Appliance Limited Warranty This Product is warranted by Element Appliance Company, LLC to the original customer against defects in material and workmanship under proper use, maintenance, and care. Proof of purchase is required for all Warranty service. One-Year Warranty: For a period of one year from the date of purchase, if the parts or components are determined to be defective, Element will repair, replace, or refund the defective Product. Limited Extended Warranty: If the Original Customer registers the Product within ninety days of purchase, the Warranty Period may be extended to two years. Timing and Procedure: The Original Customer must contact the retailer or Element for problem determination and service procedures. Exclusions and Limitations: The Warranty does not cover damages resulting from improper use, unauthorized alterations, or external causes such as extreme temperatures or natural disasters.
- Page 34: This warranty is made to the original customer only and does not cover products sold as is or with all faults. The warranty is invalid if the factory-applied serial number has been altered or removed from the product. This warranty is valid only in the United States and applies only to products purchased and serviced in the United States. The addition of equipment or features not manufactured or recommended by Element may void the warranty. The warranty does not cover discoloration, fading, cosmetic changes, rust, or damages related to exposure to chemicals, heat, cold, or humidity. The warranty is contingent upon proper use, maintenance, and care of the product. Repair, replacement, or refund of the original purchase price are the exclusive remedies of the customer. Element shall not be liable for any incidental or consequential damages caused by the use, misuse, or inability to use the product. This warranty shall not extend to anyone other than the original customer who purchased the product and is not transferable. Some states do not allow the exclusion or limitation of incidental or consequential damages, so the above limitations may not apply.
- Page 35: Element, the Element Logo, and Bring it home are trademarks of Element Brand Holding, LLC. All other trademarks are the property of their respective owner, who has not sponsored, endorsed, or approved this product. ©2023 Element Appliance Company, LLC. All rights reserved. Distributed by Element Appliance Company, LLC. For service, support and warranty information.

Home and Marker TURBOWASH Angoily Dishwasher

Haier HDW15F2S1 Dishwasher

FISHER PAYKEL DW60UNT4B2 Sanitise Built Under Dishwasher

ARDESTO DWMB-V459SMT3 Dishwasher

Hotpoint H7I HT59 L Dishwasher

MAYTAG PDBTT49AWW Dishwasher

KKT KOLBE DW4505FS Dishwasher

BOSCH SGH4HVX32G Dishwasher

BOSCH SMH4EVX00E 01 Integrated Dishwasher

ASKO DFI544D Dishwasher