INDESIT D2I HL326 Full Size Dishwasher


EN
DAILY REFERENCE
GUIDE
THANK YOU FOR BUYING AN INDESIT PRODUCT.
In order to receive a more complete assistance, please
register your appliance on: www.indesit.com/register
You can download the Safety Instructions and the
User Manual, by visiting our website docs.indesit.eu
and following the Instructions on the back of this
booklet.
Before using the appliance carefully read Safety Instructions guide.
PRODUCT DESCRIPTION
APPLIANCE
1. Upper rack
1
3
2. Foldable flaps
7
8
3. Upper rack height adjuster
4. Upper spray arm
5. Lower rack
2
6. Cutlery basket
7. Lower spray arm
8. Filter Assembly
9. Salt reservoir
4
5
9
10. Detergent and Rinse Aid dispensers
11. Rating plate
6
12. Control panel
11
10
Service:
0000 000 00000
12
CONTROL PANEL
1
2
3
4
5
1. ON-OFF / Reset button with indicator light
2. Program selection button / Push&GO
3. Salt refill indicator light
4. Program indicator lights
5. START/Pause button with indicator light
1

| General | Details |
|---|---|
| Name | INDESIT D2I HL326 Full Size Dishwasher |
| Make | INDESIT |
| Language | English |
| Filetype | PDF (Download) |
| File size | 2.07 MB |


Indesit D2F HD624 A Separate Dishwasher

Indesit 869991713220 Dishwasher

INDESIT I0F D641A X Free Standing Dishwasher

Indesit I0F D641A Dishwasher

INDESIT DFE 1B19 14 Dishwasher

INDeSIT D2F Dishwasher

INDeSIT D2I HD524 A Dishwasher

INDESIT W11667630 B Dishwasher

InDeSIT IN2FE10CS90S Dishwasher

inDeSIT DSIO3M24CS Dishwasher

INDESIT D2I HL326 Full Size Dishwasher Overview
Summary of Contents
- Page 1: Thank you for buying an Indesit product. In order to receive more complete assistance, please register your appliance on the website. You can download the Safety Instructions and the User Manual by visiting our website. Before using the appliance, carefully read the Safety Instructions guide. Product description includes various components such as the upper rack, lower rack, cutlery basket, and spray arms. The control panel features an ON-OFF/Reset button, program selection button, salt refill indicator light, program indicator lights, and START/Pause button.
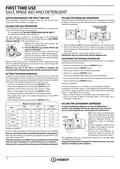
- Page 2: First time use After installation, remove the stoppers from the racks and the retaining elastic elements from the upper rack. Filling the rinse aid dispenser Rinse aid makes dish drying easier. The rinse aid dispenser should be filled when the dark optical indicator on the dispenser door becomes transparent. Filling the salt reservoir The use of salt prevents the formation of limescale on the dishes and on the machine’s functional components. It is mandatory that the salt reservoir never be empty. Adjusting the dosage of rinse aid If you are not completely satisfied with the drying results, you can adjust the quantity of rinse aid used. Setting the water hardness To allow the water softener to work perfectly, it is essential that the water hardness setting is based on the actual water hardness in your house. Filling the detergent dispenser To open the detergent dispenser use the opening device. Introduce the detergent into the dry dispenser only. Usage of detergent not designed for dishwashers may cause malfunction or damage to the appliance. Only use salt that has been specifically designed for dishwashers. If the salt container is not filled, the water softener and the heating element may be damaged as a result of limescale accumulation.
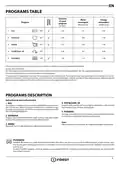
- Page 3: Programs table includes duration of wash programs, water consumption, and energy consumption for each program. Eco program data is measured under laboratory conditions according to European Standard EN 60436:2020. Pre-treatment of the dishes is not needed before any of the programs. Values for programs other than the eco program are indicative only and may vary depending on various factors. Fast&Clean 28’ is for half load of lightly-soiled dishes and does not have a drying phase. Eco program is suitable for normally soiled tableware and is the most efficient in terms of energy and water consumption. Push&GO is an everyday wash and dry cycle that ensures great cleaning performance in a short time without pre-treatment. Intensive program is recommended for heavily soiled crockery, especially pans and saucepans. Mixed program is for normally soiled dishes with dried food residues. Push&GO button allows direct access to the Push&GO program for easy operation.
- Page 4: Loading the racks involves placing delicate and light dishes in the upper rack and larger items like pots and plates in the lower rack. The height of the upper basket can be adjusted to accommodate bulky crockery in the lower basket or to create more space upwards. The cutlery basket should only be positioned at the front of the lower rack. When adjusting the upper rack, do not raise or lower it when loaded, and avoid adjusting it on one side only. Knives and sharp utensils must be placed with points facing downwards or horizontally in the upper rack's tip-up compartments. The side foldable flaps can be adjusted to optimize crockery arrangement. Wine glasses can be safely placed in the foldable flaps by inserting the stem into the corresponding slots. To unfold the flaps, slide them up and rotate or release from the snaps. To fold the flaps, rotate and slide them down or pull them up to attach to the snaps.
- Page 5: Daily use Check water connection Ensure the dishwasher is connected to the water supply and the tap is open. The machine will switch off automatically during inactivity to minimize electricity consumption. Switch on the dishwasher Open the door and press the ON/OFF button. Load the racks Refer to the loading instructions for proper rack loading. Filling the detergent dispenser Choose the program and customize the cycle Select the appropriate program based on the type of crockery and its soiling level. Start adding extra crockery You can add crockery during the wash cycle without switching off the machine. End of wash cycle The end of the cycle is indicated by beeps and a flashing indicator light. Wait a few minutes before unloading to avoid burns. Accidental interruptions If the door is opened or there is a power cut, press the START/Pause button to resume the cycle. Advice and tips Use only dishwasher-safe glasses and porcelain, and remove food residues before loading. Tips on energy saving Initiate the wash cycle when the dishwasher is fully loaded to maximize efficiency and save water and energy.
- Page 6: Care and maintenance Cleaning the filter assembly Regularly clean the filter assembly to prevent clogging and ensure proper wastewater flow. Cleaning the spray arms Check and clean the spray arms with a small non-metallic brush to avoid blockages. Using a dishwasher with clogged filters may cause malfunction and higher resource usage. The filter assembly consists of three filters that remove food residues from washing water. The dishwasher must not be used without filters or if the filter is loose. Check the filter assembly at least once per month or after every 30 cycles. Water softening system The water softener reduces water hardness and prevents scale buildup on the heater. Regeneration of the water softener occurs once per six Eco cycles, depending on water hardness. After cleaning the filters, replace the filter assembly correctly for efficient operation. Cleaning the water inlet hose Let the water run to ensure it is clear before making connections to avoid blockage.
- Page 7: Troubleshooting In case your dishwasher doesn’t work properly, check if the problem can be solved by going through the following list. For other errors or issues please contact authorized After-sales Service. Spare parts will be available for a period of either up to 7 or up to 10 years. Salt reservoir is empty. The appliance has not been plugged in properly. For safety reasons, dishwasher will not re-start automatically when power returns. The dishwasher door is not closed. The sink drain pipe is blocked. The detergent has not been measured out correctly or it is not suitable for use in dishwashers. The cap on the rinse aid compartment has not been shut correctly. Check water supply for leaks or other issues letting air inside.
- Page 8: Page 8

BOSCH SMV4ECX21E-38 Dishwasher

CMA DISHMACHINES UC65e M3 Undercounter Dishwasher

Hotpoint W11518627 Dishwasher

SIEMENS SN27ZI04CZ Dishwasher

Bosch SMV6ZDX16E Fully Integrated Dishwasher

FISHER and PAYKEL DD24STX6HI1 Dishwasher

BOSCH SMS4EMW01E Dishwasher

LG LDPH7972S Smart Dishwasher

FISHER PAYKEL DW60UNT4B2 Built-Under Dishwasher

BOSCH SHP78CM6N Dishwasher