Home > Montpellier > Montpellier MAB1353DC Retro Dishwasher
Montpellier MAB1353DC Retro Dishwasher


THE PERFECT BALANCE OF FUNCTION & STYLE
LAUNDRY DISHWASHING COOKING COOLING
Installation & Operating Instructions
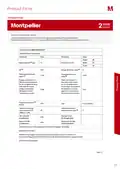
60cm Retro Dishwasher
MAB1353DC/K/R Cream, Black, Red
Please read these instructions carefully before attempting to install or use this appliance.
We recommend that you keep these instructions in a safe place for future reference.

| General | Details |
|---|---|
| Name | Montpellier MAB1353DC Retro Dishwasher |
| Make | Montpellier |
| Language | English |
| Filetype | PDF (Download) |
| File size | 0.94 MB |
 (1 votes, average: 5.00 out of 5)

Montpellier MDWBID6053 Dishwasher

MDI450 Montpellier Dishwasher

Montpellier MDWBID4553 Slimline 45cm Dishwasher

Montpellier MAB1353DC Retro Dishwasher Overview
Summary of Contents
- Page 1: The perfect balance of function and style. Installation & operating instructions. 60cm retro dishwasher. Please read these instructions carefully before attempting to install or use this appliance. We recommend that you keep these instructions in a safe place for future reference.
- Page 2: Welcome Thank you for choosing this Montpellier appliance. We recommend that you keep this manual in a safe place for future reference. Your appliance is covered by a comprehensive two year parts & labour guarantee. Please note that any claim must be accompanied by the model reference number, serial number and proof of purchase. To activate your guarantee, you will need your product serial number. This user manual contains important safety information and instructions on the operation and maintenance of your appliance. Please take the time to read this user manual before using your appliance and keep for future reference. The design and specifications are subject to change without prior notice for product development. Operating the system correctly.
- Page 3: Putting your safety first General safety warnings Installation warnings During usage Installation Machine positioning Water connection Water inlet hose Drain hose Electrical connection Specifications General appearance Technical specifications Before using the appliance Preparing your dishwasher for first use Salt usage Fill the salt Test strip Water hardness table Loading your dishwasher Recommendations Basket adjustments Alternative basket loads The control panel Selecting a programme Changing a programme Cancelling a programme Switching the machine off Cleaning & maintenance Filters Spray arms Drain pump Troubleshooting Product fiche Here for you After-sales assistance
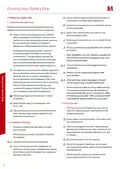
- Page 4: Putting your safety first Check that the indoor electrical fuse system is connected in line with safety regulations. All electrical connections must match the values on the rating plate. Read these instructions carefully before using your appliance and keep this manual for future reference. Ensure the machine does not stand on the electrical supply cable. Do not operate the machine if it appears damaged or if the packaging has been opened. The plug should be accessible after the machine is installed. This appliance can be used by children aged from 8 years and above, and by persons with reduced physical, sensory or mental capabilities if they have been given supervision or instruction. Only use detergents and rinse-aids produced specifically for dishwashers. Your machine must only be installed by an authorised service agent. Do not drink water from the machine.
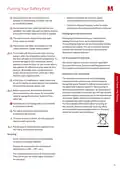
- Page 5: Putting your safety first Only put items in the machine which are suitable for dishwashing, and take care not to overfill the baskets. Material unsuitable for domestic waste must be disposed of at recycling centres. Do not open the door while the machine is in operation; hot water may spill out. The machine door should not be left open as it may cause accidents. Packaging materials protect your machine from damage during transportation and are recyclable. Place knives and other sharp objects in the cutlery basket in a blade-down position. We declare that our products meet the applicable European Directives, Decisions and Regulations. The symbol on the product indicates that it may not be treated as household waste. Repair should only be performed by an authorised service company to avoid voiding the warranty. For safety, disconnect the plug once a programme has finished.
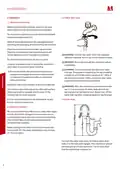
- Page 6: Installation When positioning the machine, place it in an area where dishes can be easily loaded and unloaded. Do not put the machine in an area where the ambient temperature falls below 0°C. Use the new water inlet hose supplied with your machine, do not use an old machine’s hose. Run water through the new hose before connecting. Connect the hose directly to the water inlet tap. Ensure the water inlet and outlet hoses are not squeezed or trapped. Adjust the feet so the machine is level and balanced. After the connections are made, turn the tap on fully and check for water leaks. We recommend fitting a filter to your water inlet supply to prevent damage to your machine. Connect the water drain hose directly to the water drain hole or to the sink outlet spigot.
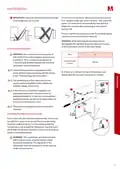
- Page 7: Installation Items will not wash properly if a drain hose longer than 4m is used. To remove the top panel, remove the screws that hold it on, located at the rear of the machine. Adjust the machine feet according to the slope of the floor. Fit your machine by pushing it under the counter taking care not to crush or bend the hoses. Your machine is set to operate at 220-240V. If the mains voltage supply to your machine is 110V, connect a transformer. Connect the product to a grounded outlet protected by a fuse complying with the values in the technical specifications table. The earthed plug of the machine must be connected to an earthed outlet supplied by suitable voltage and current. In the absence of earthing installation, an authorised electrician should carry out an earthing installation. If you wish to fit your machine undercounter, there must be sufficient space to do so and the wiring-plumbing must be suitable. The countertop, which the machine will be placed under, must be stable in order to prevent imbalance.
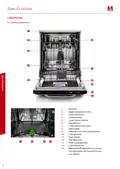
- Page 8: Specifications General appearance Worktop Upper basket with racks Upper spray arm Cutlery basket Lower basket wheels Mug shelves Lower basket with racks Detergent and rinse-aid dispenser Mini Active Drying Unit: This system provides better drying performance for your dishes.
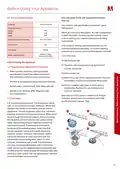
- Page 9: Before using your appliance Technical specifications Only add water to the salt compartment before first use. Capacity: 13 place settings Use softener salt specifically produced for use in dishwashers. When you start your dishwasher, the salt compartment is filled with water. If the softener salt has overflowed and you do not start the machine immediately, run a short washing programme to protect your machine against corrosion. To add softener salt, open the salt compartment cap by turning it counter clockwise. Make sure the electricity and supply water specifications match the values indicated in the installation instructions for the machine. For a good washing function, the dishwasher needs soft, i.e., less calcareous water. The dishwasher can only use special dishwasher salt to soften the water.
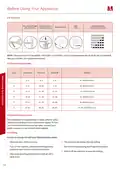
- Page 10: Before using your appliance, run water through the tap for 1 minute. Keep the test strip in the water for 1 second and wait for 1 minute. Set the hardness level of your machine and shake the strip. The default hardness level is set to 3. If the water is well water or has a hardness level above 90 dF, use filter and refinement devices. The dishwasher is equipped with a water softener that reduces the hardness in the mains water supply. To find out the hardness level of your tap water, contact your water company or use the supplied test strip. To change the salt level, open the door of the machine. The machine will display the last setting, and you can set the level by pressing the Programme button. Switch off the machine to save the setting and turn it on again to adjust the salt level.
- Page 11: Before using your appliance, ensure you follow the manufacturer's instructions for detergent usage. Only use detergents specifically designed for domestic dishwashers and keep them in cool, dry places out of reach of children. Add the proper amount of detergent for the selected programme to ensure the best performance, considering cycle, load size, and soil level of dishes. Do not overfill the detergent compartment, as this can lead to whitish streaks or bluish layers on glass and dishes, and may cause glass corrosion. Using too much detergent can damage the machine, while using too little can result in poor cleaning. When using combined detergents, ensure water hardness and rinse-aid settings are correctly adjusted. Rinse-aid helps to dry dishes without streaks and stains and is required for stain-free utensils and clear glasses. The rinse-aid dispenser should be refilled just before the start of each programme. Rinse-aid is automatically released during the hot rinse phase. Adjust the rinse-aid dosage setting to avoid whitish stains or bluish layers on dishes and the dishwasher interior.
- Page 12: Before using your appliance To fill the rinse-aid compartment, open the rinse-aid compartment cap. Fill the compartment with rinse-aid to the MAX level and then close the cap. Be careful not to overfill the rinse-aid compartment and wipe up any spills. If excessive amounts over spill, it is advisable to immediately run the Prewash cycle. In order to change the rinse-aid level, follow the below steps before turning on the machine: Open the door of the machine. Turn on the machine and press the programme button as soon as the machine is turned on. Hold down the programme button until all LED’s blink twice. Rinse-aid setting follows water hardness setting. The machine will display the last setting. Change the level by pressing the programme button. Switch off the machine to save the setting. The factory setting is 4. If the dishes are not drying properly or are spotted, increase the level. If blue stains form on your dishes, decrease the level.
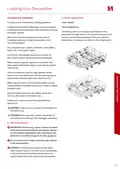
- Page 13: Loading your dishwasher effectively contributes to energy and water savings. The lower basket features folding racks for larger items like pots and pans. Manual pre-rinsing of tableware is not recommended as it increases water and energy consumption. Place cups, glasses, and small plates in the upper basket with openings facing downwards. Avoid leaning long glasses against one another to prevent damage. Use the cutlery grid in the cutlery basket for optimal results. Large pots, pans, and very dirty items should be placed in the lower rack. Dishes and cutlery should not be stacked above each other. Ensure that the spray arms can rotate freely and that the detergent dispenser can open. Remove coarse residue from dishes before loading for efficient operation.
- Page 14: Loading your dishwasher Height adjustable mug shelves The height adjustable racks enable glasses and cups to be placed on or under the racks. The upper basket includes a mechanism which enables the height of the basket to be adjusted up or down without having to remove the basket. The basket does not need to be empty but any loose or delicate items such as glassware should be removed in case of any damages. Cutlery and utensils can also be placed on the racks horizontally. If the basket is in the lower position, hold the basket on both sides and pull it up into the higher position. If you wish to lower the basket at any time, hold the basket on both sides and pull it up slightly before lowering carefully back into the lower position. Take care to always make sure that both sides of the upper basket are in the same position. Turn the Rail Stop Clips, at the ends of the rails, to the sides to open them, then pull out and remove the basket. To reinstall the basket to the rail, guide the basket wheels into the rails and close the Rail Stop Clips.
- Page 15: Loading your dishwasher Alternative basket loads Incorrect loading can cause poor washing and drying performance. Please follow the manufacturer’s recommendations for good performance results. Unsuitable items for dishwashing include cigarette ash, candle leftovers, polish, paint, chemical substances, and iron-alloy materials. Forks, spoons, and knives with wooden, bone, ivory, or nacre coated handles should not be washed. Temperature-sensitive plastics, copper or tin coated containers are unsuitable for dishwashing. Some delicate glasses, ornamental printed porcelains, and lead crystal glasses should not be washed. Absorbent items such as sponges or kitchen rugs are not suitable for dishwashing. In future, purchase dishwasher-proof kitchenware. Important note for test laboratories regarding detailed information required for tests according to EN normatives.
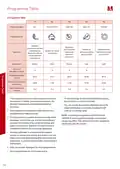
- Page 16: Programme table Eco programme is suitable to clean normally soiled tableware, being the most efficient in terms of energy and water consumption. The programme duration may change according to the amount of dishes, water temperature, ambient temperature, and selected additional functions. To assist drying, it is recommended to slightly open the door after a cycle is complete. Values given for programmes other than the eco programme are indicative only. Washing tableware in a household dishwasher usually consumes less energy and water than hand dishwashing when used according to the manufacturer’s instructions. Only use powder detergent for short programmes, which do not include drying.
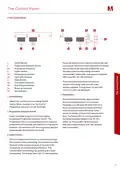
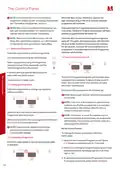
- Page 17: The Control Panel On/Off button activates the machine. Press the Option button twice to activate the Half Load option, reducing duration and consumption. When Half Load option is selected, the Half Load LED will illuminate. Press the Options button three times to activate Energy Save and Half Load options together. Delay button allows you to delay the start time of a programme for 3, 6, or 9 hours. The Delay LED indicates the remaining delay duration. Switching off the machine cancels the delayed start time. Select a suitable programme using the Programme Selection button. The Programme LED corresponding to the selected programme will illuminate. Press the Option button once to activate the Energy Save option for improved drying efficiency.
- Page 18: The Control Panel If you decide not to start the selected programme, please see the “Changing a Programme” and “Cancelling a Programme” sections. When the door of your machine is opened, the light corresponding to the most recently selected programme will illuminate. When there is insufficient softening salt, the Salt Lack Warning Indicator will illuminate to indicate that the salt chamber needs filling. When there is insufficient rinse-aid, the Rinse-Aid Lack Warning Indicator will illuminate to indicate the rinse-aid chamber needs filling. The End Of Programme Indicator will illuminate when a programme is complete. A signal will also sound 5 times. Close the door to begin the cycle. Do not open the door before the programme is complete. If the door of the machine is opened or the power is cut off while a programme is in operation, the programme will continue when the door is closed or the power returns. To change the buzzer sound level, follow the steps below. Open the door and press Programme and Option buttons simultaneously for 3 seconds to cancel a programme while in operation.
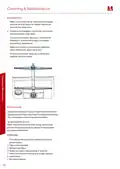
- Page 19: The Control Panel / Cleaning & Maintenance Select a programme which runs at high temperature and run the dishwasher empty. To extend the life of your dishwasher, clean the appliance regularly, preferably each month. Wipe the door seals regularly with a damp cloth to remove any accumulated residue or foreign objects. Clean the filters and spray arms at least once a week. If any food waste remains or foreign objects on the coarse and fine filters, remove them and clean them thoroughly with water. To activate or deactivate save power mode, follow the below steps: Open the door and press Option and Delay buttons simultaneously for 3 seconds. Rinse the filter with lots of water until it is free of residue. Reassemble the filters. Cleaning your dishwasher is important to maintain the machine’s service life. Make sure that the water softening setting is done correctly and the correct amount of detergent is used to prevent limescale accumulation. Never use your dishwasher without a filter.
- Page 20: Cleaning & Maintenance Make sure that the spray holes are not clogged and that no food waste or foreign objects are stuck to the spray arms. If there is any clogging, remove the spray arms and clean them under water. To remove the upper spray arm, undo the nut holding it in position by turning it clockwise and pulling it downwards. Make sure that the nut is properly tightened when refitting the upper spray arm. To remove the lower spray arm pull the arm upwards from the centre. Large food residues or foreign objects which were not captured by the filters may block the waste water pump. Warning: Risk of cuts! When cleaning the waste water pump, ensure that you do not injure yourself on pieces of broken glass or pointed implements. First always disconnect the appliance from the power supply. Check the area and remove any foreign objects.
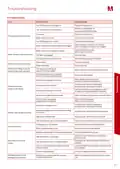
- Page 21: Troubleshooting Your dishwasher is not plugged in. Plug your dishwasher in and switch it on by pressing the On/Off button. The programme does not start. Check the water inlet hose and machine filters and make sure they are not clogged. Water remains inside the machine. Clean the filters and check mains power. Shaking and hitting noises are heard during a wash operation. Move or remove items blocking the spray arm and do not overload baskets. Partial food wastes remain on the dishes. Use the information in the programme table to select the most appropriate programme. Whitish stains remain on dishes. Increase rinse-aid dosage setting and check the salt compartment cap is closed properly. Dishes do not dry. Select a programme with a drying option and adjust the water hardness level using the water hardness table. Rust stains form on the dishes. Check that the salt compartment cap is closed properly and avoid spilling salt while filling. Detergent remains in the detergent compartment. Make sure the detergent compartment is dry before use.
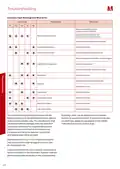
- Page 22: Troubleshooting Automatic fault warnings and what to do Possible fault Water inlet system failure Make sure the water inlet tap is open and water is flowing. Contact for service if the error continues. Inability to discharge water Water discharge hose and filters may be clogged. Cancel the programme. Heater error The installation and repairing procedures should always be carried out by the Authorised Service Agent. Improper repairs or use of non-original spare parts may cause considerable damage and put the user at considerable risk.
- Page 23: Page 23
- Page 24: Here for you Montpellier Appliances do not accept claims for consequential loss, rusting, corroding, delivery damage or scratches. If you continue to experience problems with your appliance, please call the Montpellier customer service helpline. Your guarantee is valid only in the UK and the Republic of Ireland. To register your appliance, complete the card in your appliance pack or register online. Please have all your product details available before registering a fault. Your 2 year Manufacturer’s guarantee protects you against the cost of repairs during the first 24 months from date of purchase. Any claim must be accompanied by evidence of the model reference, model serial number and proof of purchase. What is not covered under the Guarantee includes appliances not correctly installed and operated according to the manufacturer’s instructions. Costs of call-out for work covering routine maintenance or for faults that cannot be found are not covered. Repair costs incurred that have not been authorized by Montpellier service are also not covered.
- Page 25: The symbol on the product indicates that it may not be treated as household waste. This product shall be handed over to the applicable collection point for recycling. Ensuring correct disposal helps prevent potential negative consequences for the environment and human health. Inappropriate waste handling could cause harm to the environment and health. For detailed information about recycling, contact your local city office or waste disposal service. You can also reach out to the shop where you purchased the product.

BOSCH SHP9PCL5N Custom Panel Dishwasher

RAZORRI Comodo CDW04A Dishwasher Machine

Whirlpool WDF130PAHB Dishwasher

SIEMENS 9001881808 Fully Iintegrated Dishwasher

FISHER and PAYKEL DW60FC2X3 Contemporary Dishwasher

BOSCH SMS4ITW00X Dishwasher

Miele PFD 100 Smart Biz Free Standing Dishwasher

ARDESTO DWMB-V459SMT3 Dishwasher

FISHER AND PAYKEL DD24DCTB9-N Dishwasher

LG LDTH7972SS Black Dishwasher