
SAMSUNG DW80B70 Smart Dishwasher



















Dishwasher
User manual
DW80BB70* Series, DW80B70* Series, DW80B60* Series
North America_DW7000B_WEB_DW0005_English.indd
1
2023-07-04 6:22:02


| General | Details |
|---|---|
| Name | SAMSUNG DW80B70 Smart Dishwasher |
| Make | Samsung |
| Language | English |
| Filetype | PDF (Download) |
| File size | 3.54 MB |
 (1 votes, average: 5.00 out of 5)
 Loading...

SAMSUNG DW80N3030UW Front Dishwasher

SAMSUNG DW90F89 Dishwasher

SAMSUNG DW80BB70 Dishwasher

SAMSUNG DW50T6060U Dishwasher

SAMSUNG DW80BB70 Series Dishwasher

SAMSUNG DW80CB5450 Dishwasher

Samsung DW60M5062 Dishwasher

Samsung DW60 7 Series Dishwasher

SAMSUNG DW9000F Dishwasher

SAMSUNG DW60R2014 Wide 12 Place Dishwasher

SAMSUNG DW80B70 Smart Dishwasher Overview
Summary of Contents
- Page 1: Dishwasher user manual DW80BB70* Series, DW80B70* Series, DW80B60* Series
- Page 2: Safety information What you need to know about the safety instructions Important safety symbols Before using your dishwasher Regulatory notice Unpacking your dishwasher Unsuitable items for the dishwasher Detergent guidelines Cycle overview Simple steps to start your dishwasher
- Page 3: Troubleshooting Check these solutions if your dishwasher… Information codes Cycle chart Appendix Helping the environment Specifications Open Source Announcement Warranty (U.S.A)
- Page 4: Safety information Congratulations on your new Samsung dishwasher. This manual contains important information on the installation, use, and care of your appliance. What you need to know about the safety instructions Warnings and Important Safety Instructions in this manual do not cover all possible conditions and situations that may occur. It is your responsibility to use common sense, caution, and care when installing, maintaining, and operating your dishwasher. Important safety symbols What the icons and signs in this user manual mean: WARNING: Hazards or unsafe practices that may result in severe personal injury or death. To reduce the risk of fire, explosion, electric shock, or personal injury when using your dishwasher, follow these basic safety precautions. CAUTION: Hazards or unsafe practices that may result in minor personal injury or property damage. These warning signs are here to prevent injury to you and others. Please follow them explicitly. After reading this section, keep it in a safe place for future reference.
- Page 5: California Proposition 65 Warning: Cancer and reproductive harm. When using your dishwasher, follow basic precautions, including the following: Read all instructions before using the dishwasher. Use the dishwasher only for its intended function. Use only detergents or wetting agents recommended for use in a dishwasher. When loading items to be washed, locate sharp items so that they are not likely to damage the door seal. Do not wash plastic items unless they are marked “dishwasher safe.” Do not touch the heating element during or immediately after use. Do not operate your dishwasher unless all enclosure panels are properly in place. Do not tamper with the controls. To reduce the risk of injury, do not allow children to play in or on the dishwasher.
- Page 6: Safety information After unpacking the dishwasher, keep the packaging out of the reach of children. The dishwasher is extremely heavy. Do not attempt to move or carry the dishwasher by yourself. As with any equipment using electricity, water, and moving parts, potential hazards exist. Do not install the dishwasher near electrical components. Keep the dishwasher away from open flames. Install and level your dishwasher on an uncarpeted floor that can support its weight. Your dishwasher must be properly grounded. Never connect it to an ungrounded outlet. The water supply line is susceptible to breakage. Check the line periodically for leaks. Do not put gasoline, solvents, or other flammable materials inside the dishwasher. Keep your dishwasher detergent out of the reach of children. Detergent is corrosive. Do not repair, replace, or service any part of your dishwasher yourself.
- Page 7: Before disposing of your dishwasher, remove the door of the washing compartment or the door latch so that children or small animals cannot get trapped inside. If the dishwasher is left unused for an extended period of time, turn off the water supply. This dishwasher is intended for residential use only. Do not use the dishwasher until it is correctly installed. Do not push down on the dishwasher door when it is open. Do not place excessive weight on the dishwasher door when it is open. Electrically ground the dishwasher. Connect the ground wire to the green ground connector in the junction box. Do not use an extension cord. Save these instructions.
- Page 8: Safety information Any changes or modifications not expressly approved by the party responsible for compliance could void the user’s authority to operate the equipment. This device complies with Part 15 of FCC Rules. Operation is subject to two conditions: it may not cause harmful interference and must accept any interference received. For products sold in the US and Canadian markets, only channels 1–11 are available. This equipment has been tested and found to comply within the limits for a Class B digital device. These limits are designed to provide reasonable protection against harmful interference in a residential installation. This equipment generates, uses, and can radiate radio frequency energy. If not installed and used in accordance with the instructions, it may cause harmful interference to radio communications. If this equipment does cause harmful interference to radio or television reception, the user is encouraged to try to correct the interference. Measures to correct interference include reorienting or relocating the receiving antenna and increasing the separation between the equipment and receiver. Consulting the dealer or an experienced radio/TV technician for help is also recommended.
- Page 9: FCC radiation exposure statement: This equipment complies with FCC radiation exposure limits set forth for an uncontrolled environment. This equipment should be installed and operated so there is at least 8 inches (20 cm) between the radiator and your body. This device and its antenna(s) must not be co-located or operated in conjunction with any other antenna or transmitter. IC notice: The term “IC” before the radio certification number only signifies that Industry Canada technical specifications were met. Operation is subject to the following two conditions: (1) this device may not cause interference, and (2) this device must accept any interference, including interference that may cause undesired operation of the device. This Class B digital apparatus complies with Canadian ICES-003. For products sold in the US and Canadian markets, only channels 1–11 are available. IC radiation exposure statement: This equipment complies with IC RSS-102 radiation exposure limits set forth for an uncontrolled environment. SAVE THESE INSTRUCTIONS.
- Page 10: Before you start Be sure to have your installer follow these instructions closely so that your new dishwasher works properly and that you’re not at risk of injury when washing dishes. Unpacking your dishwasher Once your new dishwasher has been delivered to you, carefully unpack it and check for any damage. If the dishwasher has been damaged, make note of it on the waybill and keep a copy. Do not install the dishwasher, and contact Samsung Customer Service. If there is no damage to the product, you can proceed with the installation. If you are going to install it yourself, make sure to read through the installation guide and follow the directions inside. After unpacking your dishwasher, keep the packaging out of the reach of children to ensure their safety.
- Page 11: Checking parts Make sure you’ve received all the parts shown below. If your dishwasher was damaged during shipping, contact Samsung Customer Service. Top nozzle Storm Wash+ Lower nozzle Dispenser Control panel Door Base
- Page 12: Before you start Accessory parts include the user/installation manual, installation kit, and kick plate. Do not wash items that are covered with ash, sand, wax, lubricating grease, or paint. These materials will damage the dishwasher. Remove food remains such as bones, fruit seeds, etc., and waste such as toothpicks and paper napkins from your dishes. Food remains and waste can make noise, cause the dishwasher to malfunction, and damage your dishes and dishwasher.
- Page 13: Unsuitable items for the dishwasher Wash only items such as glass, porcelain, and cutlery which the manufacturer states is dishwasher safe. Do not wash aluminium (e.g. grease filters). The dishwasher may damage aluminium, or in extreme cases, cause a severe chemical reaction. Do not wash the following items in the dishwasher: Copper, brass, tin, ivory, and aluminium items or items with adhesive. Non-heat resistant plastics. Craft items, antiques, valuable vases, and decorative glassware. Pottery or glazed-ceramic items. Wooden cutlery and crockery or items with wooden parts. Delicate glassware or glassware containing lead crystal. Silver cutlery, crockery or items with silver parts. Silverware that has contacted food containing sulphur may become discoloured.
- Page 14: Using your dishwasher Basic use of racks In the lower rack, you can easily fold down the fold-down tines to make room for large items such as pots and pans in the StormWash area. In the upper rack, you can adjust the angle of the tines to two different positions to match the size and shape of your dishes.
- Page 15: Height adjustment You can adjust the height of the upper rack in your Samsung dishwasher to accommodate larger sized dishes. Depending on where you set the upper rack height, the lower rack can accommodate plates up to 12 in. (30 cm) in diameter. To raise the upper rack, pull the upper rack upwards. To lower the upper rack, hold both adjustable handles located at the left and right sides of the upper rack, and then evenly press down. Adjust the height of the upper rack before loading dishes into the rack. Adjusting the rack after loading the dishes may damage the dishes. Make sure to hold both handles when adjusting, or the dishwasher door may not close properly.
- Page 16: Using your dishwasher To remove the upper rack Pull the upper rack towards the front and then remove it by lifting it up slightly and pulling it towards the front. CAUTION While the upper rack is removable, it must be installed for the dishwasher to operate properly. If you attempt to operate the dishwasher without the rack, noise will occur and the dishwasher will perform poorly.
- Page 17: To remove the 3rd rack: Stand facing the dishwasher and pull the 3rd rack out so that the handles at the ends of the rack supports are even with the end of the rack. Find the small indentation on the inside of the left rack support that houses the tab for the handle lock. Push the handle lock tab in with the tip of your thumb, and then pull the handle towards you until it disengages from the support. Repeat this process with the right handle using your left thumb. When the handles are removed, remove the 3rd rack from the dishwasher. Reverse the order of removal to re-insert the 3rd rack. Make sure the hook-shaped part of the handle faces downward and the handle lock re-engages when reinserting the handle into the rail.
- Page 18: Using your dishwasher Loading dishes Loading the lower rack The lower rack has been especially designed for dinner dishes, soup bowls, plates, pots, lids, casserole dishes, and plates. Load large items such as pans and pots into the dishwasher so their open sides face downwards. We recommend loading cups, stemware, and small plates into the upper rack. See the recommended loading patterns below.
- Page 19: Loading the Storm Wash+ area is recommended for more effective cleaning. Large items should be placed in the Storm Wash+ area on the left side of the lower rack. Selecting Storm Wash+ activates additional power for the water jet in that area. Ensure that pot handles and other items do not obstruct the rotation of the nozzles. Caution is advised to avoid clogging the hot air outlet of SmartDry. A clogged outlet will hinder heat circulation. Keep plastic dishes away from the hot air outlet of SmartDry, as they can be damaged by heat.
- Page 20: Using your dishwasher Loading the upper rack The upper rack has been designed for small plates, mugs, glasses, and plastic items marked “dishwasher safe”. Load your plates into the dishwasher in two half rows, so that the front of each plate faces the back of the plate in front of it. Make sure the loaded dishes do not interfere with the rotation of the nozzle located at the bottom of the upper rack. When loading dishes, pull the upper rack out sufficiently so you can load it without striking the counter above. The glass support is especially suited for wine glasses. Hang wine glasses onto the pegs of the glass support. Fold the glass support back when it is not being used. Do not adjust the level of the upper rack with the glass support propped up.
- Page 21: Loading the 3rd rack is best suited for flatware and cooking or serving utensils. Use it with the spoon stands in the lower basket. You can load cutlery and utensils in the 3rd rack or the spoon stands in the lower basket. The entire cutlery rack can be removed if more space is needed on the upper rack for larger items.
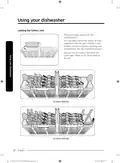
- Page 22: Using your dishwasher Loading the cutlery rack The cutlery rack consists of two compartments. You can place each knife, spoon, or fork separately into the spoon stands in the basket’s covers to prevent chipping and discoloration. You can use the cutlery rack with the cover open.
- Page 23: The spoon stands as seen from above with the suggested placement of cutlery items. Match the numbers in the diagram to the numbers in the list of cutlery items below. Do NOT let any item extend through the bottom. Do not load chopsticks in this rack, which should be loaded in the 3rd rack. Forks Tea spoons Dinner spoons Knives Serving spoons and serving forks Remaining items
- Page 24: Using your dishwasher Detergent guidelines All dishwasher cycles require detergent in the detergent compartment. Apply detergent as appropriate for the selected cycle to ensure best performance. Do not consume dishwasher detergent. Avoid breathing in detergent fumes. Dishwasher detergent contains irritants and caustic chemicals that can induce respiratory conditions. If you have consumed dishwasher detergent or inhaled detergent fumes, seek medical attention immediately. Keep dishwasher detergent out of children’s reach. Use dishwasher detergent only. Other types of detergent produce excessive foam, which may decrease the dishwasher’s performance or cause it to malfunction. To fill the detergent dispenser, gently press the dispenser flap to unlock, and then slide it open. Note that the dispenser flap opens at the end of each cycle.
- Page 25: Apply the recommended amount of detergent to the main compartment. Close the flap, and then press down to lock. This dishwasher has no separate compartment for tablet detergent. For better performance, pour a small amount of detergent onto the door to clean heavily soiled items more effectively. The additional detergent will activate during the pre-wash process.
- Page 26: Using your dishwasher The cover opens automatically to dispense the detergent during the wash. Amount of detergent Main wash dispenser Onto the door for pre-wash Rinse aid improves the drying performance of the dishwasher. When the rinse refill indicator lights up on the control panel, refill with rinse aid. Only use liquid rinse aid. Do not apply any type of detergent to the rinse aid compartment. Do not overfill the compartment. Pull up the cap of the rinse compartment to open. Fill the compartment with rinse aid as specified by the rinse aid manufacturer.
- Page 27: For more information on setting the rinse aid amount, see page 35. Press down the circle area of the cap to close. To prevent the touch-enabled controls from losing responsiveness, follow these instructions. Touch the center of each button with one finger. Do not touch more than one button at a time, except as directed. Clean the surface of the control panel regularly with a soft, damp cloth.
- Page 28: Operations To reduce the risk of fire, electric shock, or injury to persons, read the important safety instructions before operating this appliance. When you press the power button, the Cycle On light for the most recently started cycle turns on. Select the appropriate wash cycle depending on the soil level of your dishes. If you want to change the cycle once it has started, press the power button. If selected, only the lower rack nozzle is activated to reduce both the cycle time and power consumption. Use this cycle to wash a small load of dishes or glasses in the lower rack. To wash heavily soiled items, select the Storm Wash+ option.
- Page 29: Use this option when you want to wash pots and pans, durable serving bowls, and other large, very dirty, hard to clean dishes. To use Storm Wash+, place the dishes face down in the marked Storm Wash+ area in the lower basket. Raises the main wash temperature to improve cleaning for loads containing tough, baked-on food. With the Sanitize option selected, the water temperature is increased to 163 ˚F (73 ˚C) in the final rinse cycle for high temperature sanitization. If you select the Sanitize option, the Sanitize lamp blinks when the water temperature reaches the sanitary temperature (over 155 ˚F (68 ˚C)), and then remains illuminated until the Sanitize option ends. Only Normal cycle with the Sanitize option has been designed to meet the requirements for soil removal and sanitization efficacy in NSF 184. For the Sanitize mode, the amount of detergent as 3/4 oz (20 g) in Main wash dispenser and 1/3 oz (10 g) on the door for pre-wash is used. Control Lock allows you to lock the buttons on the control panel so children cannot accidentally start the dishwasher by pressing the buttons on the panel. To lock and unlock the buttons on the control panel, hold the Sanitize button down for three (3) seconds when the power is On.
- Page 30: Operations SmartDry Hi/Lo allows you to select between two drying options: SmartDry High and SmartDry Low. SmartDry High increases the rinsing temperature up to 73 ˚C for enhanced drying performance. SmartDry Low reinforces drying performance through heated air circulation and increases cycle time. SmartDry Low is the recommended drying option for regular use with normally soiled dishes. During the SmartDry process, the dishwasher remains at high temperatures; do not open the door or touch dishes. Avoid clogging the hot air outlet of SmartDry with dishes to facilitate heat circulation. Keep plastic dishes away from the hot air outlet to prevent damage from heat. Using rinse aid is recommended to enhance drying performance during the SmartDry cycle. The dishwasher can be monitored and controlled remotely via Wi-Fi. The display shows information about the current cycle, including cycle time and remaining time.
- Page 31: Delay a cycle for up to 24 hours in one-hour increments. To increase the delay start time, press or hold the Delay Start button. After setting the delay time, press the START button, and then close the door to start the cycle. To change the delay time after the dishwasher has started, first turn the dishwasher off and turn it back on. Cancel & Drain: To cancel a currently running cycle and drain the dishwasher, press and hold the START button for three seconds. Once the dishwasher is reset, select a cycle and option, and then press START to restart the dishwasher. Lights up if Control Lock is activated, and blinks if any button except for the POWER button is pressed. Lights up if Self Clean is activated, and blinks for 5 seconds every 20-22 cycles. Lights up if the dishwasher runs out of rinse aid. Lights up if SmartThings is activated.
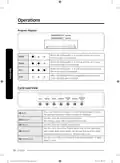
- Page 32: Operations Progress displays Cycle overview Auto cycle detects soil level and initiates optimal cycle. Normal cycle is for normally soiled dishes. Heavy cycle is for heavily soiled dishes. Delicate cycle is for fragile items like fine glassware. Do not use delicate cycle for other glassware to avoid clouding. Express 60' cycle washes dishes quickly in about 1 hour.
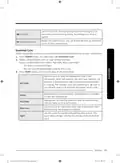
- Page 33: Use this cycle for dislodging large food debris quickly and preventing caking. No detergent or rinse is applied. You can download and use additional cycles on your smartphone. The default cycle is Self Clean. You can save the downloaded cycle for future use. Use this cycle to clean the dishwasher’s tub. If the dishwasher needs self-cleaning, the Self Clean indicator will blink for 5 seconds. Be sure to run the Self Clean cycle with the dishwasher empty. Appropriate for cleaning plastic dishes that are vulnerable to heat and temperature. Appropriate for cleaning cookware such as pans and pots that are likely to be soiled heavily. Use this cycle for normal dishwashing after a meal.
- Page 34: Operations Simple steps to start your dishwasher Open the door, and then load the dishwasher. Make sure dishes are empty. If applicable, put the dishes in the lower rack. If adding the Storm Wash+ option, put the dishes in the left side of the lower rack. Add detergent to the detergent dispenser. For better results, add rinse aid to the rinse aid compartment. You should use rinse aid for better drying performance. You can further improve drying performance by also selecting the Sanitize option. Press POWER, and then select a cycle with necessary options (Lower Rack, Storm Wash+, Hi-Temp Wash, Sanitize). Press START, and then close the door within 3 seconds. The dishwasher starts the cycle after draining for a few seconds. To change the cycle after it has started, press and hold START for 3 seconds to cancel the cycle. Then, select a new cycle. To resume after you have opened the door to stop the dishwasher while operating, simply press START first, and then close the door.
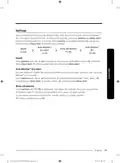
- Page 35: You can change the sound, Auto Release™ Dry alert, Rinse aid amount, and Auto Release™ Dry settings to your preference. To change the settings, press the Sanitize and Delay Start buttons simultaneously for 3 seconds. Press Sanitize to navigate through the sub menus, and then press Delay Start to confirm your changes. To mute the dishwasher, select ‘U0’, and then press Delay Start. To unmute, select ‘U1’, and then press Delay Start. You can enable or disable the setting that alerts you when the door opens to start the Auto Release™ Dry function. To disable the Auto Release™ alert, select ‘J0’, and then press Delay Start. To enable, select ‘J1’, and then press Delay Start. The higher the rinse aid number, the more rinse aid the dishwasher uses. The factory default level is ‘F4’.
- Page 36: Auto Release™ Dry function improves drying performance by automatically opening the dishwasher’s door 1 to 15 minutes before a cycle ends. You can enable or disable Auto Release™ Dry using the Setting Mode or toggle keys. Press Sanitize until “A1” or “A0” is displayed, then press Delay Start to enable (A1) or disable (A0) Auto Release™ Dry. Using the toggle keys, press the Lower + Hi-Temp Wash button for 3 seconds to enable (A1) or disable (A0) Auto Release™ Dry. Once the door opens in Auto Release™ Dry mode, it cannot be closed manually for the next 2 minutes. Disabling Auto Release™ Dry can affect drying results. Enabling Auto Release™ Dry is recommended for better drying results. After a cycle is complete, the door automatically opens to let steam out, which is normal and not a product malfunction.
- Page 37: SmartThings Wi-Fi connection On your smartphone, go to Settings, and then connect to your home Wi-Fi network. Download the SmartThings app using “SmartThings” as the search term. The SmartThings app is designed for Android 8.0 or later, iOS 13.0 or later. You must first log into SmartThings using your Samsung account. To register your device to SmartThings, make sure your smartphone is connected to a wireless network. When a message of “A new device is found,” select Add. If no message appears, select + and then select your dishwasher in a list of devices available. Follow the on-screen instructions to complete the connection process for your dishwasher. When a network connection is established, the Wi-Fi icon lights up on your dishwasher.
- Page 38: Operations Dishwasher app Integrated control: You can monitor and control your dishwasher both at home and on the go. Select the dishwasher icon on SmartThings. The dishwasher page appears. This device is designed for household use only (Class B), and can be used in all residential areas. Recommended encryption methods are WPA/TKIP and WPA2/AES. Newly developed Wi-Fi protocols or unapproved Wi-Fi protocols are not supported. The reception sensitivity of a wireless network may be affected by surrounding wireless environments. If your Internet provider has registered the MAC address of your PC or the modem module for permanent use, your Samsung dishwasher may fail to connect to the Internet. The Internet firewall may interrupt your Internet connection. Your Samsung dishwasher supports the Wi-Fi 2.4 GHz protocols. The SmartThings app is available on Android devices with OS 8.0 or higher and iOS devices with iOS 13 or higher.
- Page 39: SmartThings You can check the current cycle and its options, and the remaining cycle time. The Smart Control status is shown for the dishwasher. Use this to monitor the energy consumption status. Select a cycle and necessary options, and then select Start/Pause/Cancel to start an operation, to stop temporarily, or to cancel the current operation. Add frequently used cycles and options to My Favorite for later use. Set Delay Start to start the cycle at a scheduled time. Notifies you that the current cycle is complete. Notifies you if the dishwasher is out of rinse aid. Recommends the best cycle with optimal options for loaded dishes. The wizard features a maintenance management service and a usage guide.
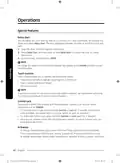
- Page 40: Operations Special features Delay Start allows you to delay the cycle starting time up to 24 hours in 1-hour increments. To change the delay time once the dishwasher has started, press POWER and then restart the dishwasher. Touch controls allow you to operate the dishwasher easily and require only a soft touch. Control Lock prevents children from playing with the dishwasher by locking all button controls except for POWER. To activate Control Lock, press and hold Sanitize or Lock for 3 seconds. AI Energy mode becomes active when the SmartThings app allows it to be enabled. AI Energy mode helps reduce power consumption but takes a longer cycle time.
- Page 41: Maintenance Keep the dishwasher clean to improve performance, reduce unnecessary repairs, and lengthen its lifecycle. Clean spills on the surface of the dishwasher as they occur. Do not use benzene, wax, thinner, chlorine bleach, alcohol, or other chemical substances. The dishwasher has electric parts inside. Do not sprinkle water directly onto the dishwasher. For a stainless-steel door panel, clean using a stainless steel cleaner for home appliances. Clean the interior of the dishwasher on a regular basis to remove any dirt or food particles. We recommend running the Self Clean cycle periodically with the dishwasher empty. To keep the cutlery pad clean, turn it over after each use. Use a damp cloth to remove lime scale or grease deposits inside the dishwasher. Do not remove the front seal. The seal keeps the inner side of the dishwasher sealed.
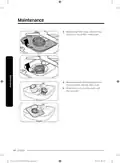
- Page 42: Maintenance To prevent the nozzles from being clogged, or if the nozzles are clogged, remove and clean each nozzle. Use caution when removing the nozzles as they may break. Upper nozzle Open the door, and then pull out the upper rack to reveal the upper nozzle. Turn counter clockwise to remove the nozzle cap, and then remove the nozzle. Unclog and clean the nozzle. Reinsert the nozzle, and then tighten the cap clockwise. Rotate the nozzle by hand to make sure the nozzle is engaged correctly. Top nozzle Check whether the nozzle holes are clogged by food particles. If cleaning is needed, remove the top nozzle. To remove the top nozzle, pull out the upper rack first, unfasten the nozzle cap by turning it counterclockwise, and then remove the nozzle. Clean the nozzle, re-insert it, and then fasten the nozzle cap to the nozzle by turning the cap clockwise. Check whether the nozzle is engaged correctly by rotating it by hand.
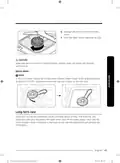
- Page 43: Lower nozzle Open the door, and then pull out the lower rack to reveal the lower nozzle. Pull up the nozzle to remove it. Clean the nozzle. Re-insert the nozzle, and then push the nozzle down until you hear a click. Rotate the nozzle by hand to make sure the nozzle is engaged correctly. Filter We recommend cleaning the filter every month. Open the door, and then remove the lower rack. Turn the filter handle counterclockwise to unlock the filter cover.
- Page 44: Maintenance involves removing the filter cover and the cylindrical micro filter underneath. It's important to remove any dirt and impurities from the micro filter and the filter cover. Rinse them with running water and then dry well.
- Page 45: Reinsert the filter, and then the filter cover. Turn the filter handle clockwise to lock. Make sure the filter cover is closed properly. A loose cover can reduce the filtering performance. If the Storm Wash nozzle has already been rotated, rotate it back to the original position as shown. If you will not use the dishwasher for an extended period of time, first drain the unit completely, and then disconnect the water hose. Shut off the water supply valve and the circuit breaker. Water remaining in the hoses or the internal components can damage the dishwasher.
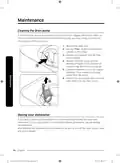
- Page 46: Maintenance Cleaning the drain pump If the dishwasher fails to drain because the drain pump is clogged with foreign matter or there is an abnormal noise coming from the drain pump, you must unclog and clean the drain pump as instructed below. Remove the lower rack. See the Filter section to remove the cylindrical micro filter. Remove any moisture from the filter using a sponge. Remove the drain-pump cover by pushing its handle in the direction of the arrow, and then pulling up. Check the impeller to see if it's in good condition. Then, remove any foreign matter from the pump. Reinsert the drain-pump cover and then press down until you hear a click. Storing your dishwasher If you need to store your dishwasher for an extended period of time, first drain and disconnect it. If you leave water in the hoses and internal components, you can damage the dishwasher. After draining and disconnecting the dishwasher, be sure to turn off the water supply valve and circuit breaker.
- Page 47: Troubleshooting Check these solutions if your dishwasher… Problem Possible cause Solution Check if the door is latched and closed completely. Check whether the upper rack is properly joined to the duct nozzle. Also, check if the upper rack is crooked or unbalanced. The door is not closed completely. Will not start. The START button was not pressed. See the information code that appears on the display. Doesn't operate at all. Check if the water supply valve is open. The water supply does not work. Check if the supplied water pressure is between 20 and 120 psi. The control panel is locked. Unlock the control lock. A circuit breaker is open. Reset the circuit breaker. Check if the water supply line is connected to a cold water supply. To work properly, the dishwasher must be connected to a hot water supply.
- Page 48: Troubleshooting Select a cycle according to the number and soil level of the dishes, as directed in this manual. Connect the water supply line to a hot water supply. For best performance, the temperature of the supplied water should be 120 ˚F (49 ˚C). The water pressure should be between 20 and 120 psi (140-830 kPa). Use a commercial dishwasher cleaner. Use high-quality, fresh detergent with rinse aid. Use automatic dishwasher detergent. We recommend a powder type or multi-function tablet dishwasher detergent. Make sure large items such as cookie sheets, cutting boards, or containers are not blocking the detergent dispenser. Rearrange the dishes so they do not interfere with detergent dispenser operation.
- Page 49: Problem Possible causes include no rinse aid, clogged nozzles, improperly loaded dishes, and clogged filters. Solutions involve checking and adding rinse aid, cleaning the nozzle, rearranging dishes, and ensuring the correct number of dishes are loaded. Food particles remaining on dishes can be addressed by scraping food off before loading. Filters should be cleaned and correctly fastened to prevent food soils from remaining. Water pressure should be checked to ensure it is within the required range. Using too much detergent can lead to a light film on glasses; underloading the dishwasher and using rinse aid can help. Aluminum dishes can cause a yellow or brown film inside the dishwasher. Soils from coffee and tea can be removed with a spot cleaner and a higher temperature cycle may be necessary.
- Page 50: Troubleshooting There is no rinse aid in the dispenser or not enough rinse aid was used. Use a liquid type rinse aid. Check the rinse aid settings. The temperature of the water is low when the dishwasher is running. Proper loading of items can affect drying. Too many dishes have been loaded. Load your dishes as recommended. Glasses and cups with concave bottoms hold water. After finishing the cycle, empty the lower rack first and then the upper rack. Auto Release™ Dry is turned off.
- Page 51: Problem Possible cause Solution Clean the dishwasher by running the Heavy cycle with the dishwasher empty and no detergent. Water was left over from an incomplete cycle. Contact a qualified service technician to remove any obstruction from the drain hose. The drain hose is obstructed. Has a bad odor. The dishwasher is not used daily or soiled dishes are left in the unit too long. With the dishwasher empty and no detergent, place a glass with 8 ounces of vinegar upright into the lower rack, and then run a Heavy cycle. Sound is generated when the dispenser cover is open and the drain pump is operating in an early stage. This is normal operation. The dishwasher is not level. Ensure the dishwasher is level.
- Page 52: Troubleshooting Has a bent upper rack after dishes are loaded. The dishes are not loaded properly. Load your dishes as recommended. Cannot close the door. Auto Release™ Dry mode is in operation. Information codes. The Control Panel displays information codes to help you understand what is occurring with your dishwasher. Leakage check. If a water supply valve connection leak occurs, close the water supply valve and contact the installer to fix. Water supply check. Check if the water supply valve is closed or clogged, or is frozen. Drain check. After closing the water supply valve, check whether the drain hose is clogged or folded. High temperature heating check. With the dishwasher empty, add detergent, and then run a cycle.
- Page 53: Pump operation check. Functional check. Turn off the dishwasher and try to start it again. If the problem continues, contact an authorized Samsung service center. Zone wash function check. Dry heater failure check. Turn the dishwasher off and turn it back on. Dry heater overheat check. Unplug the power cord of the dishwasher before contacting an authorized Samsung service center. For any codes not listed above, call for assistance.
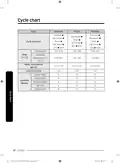
- Page 54: Cycle chart for DW80BB70* Series and DW80B7* Series includes various cycles such as Auto, Normal, Heavy, and Prewash. The cycle sequence consists of Mainwash, Rinse, Hot Rinse, and Dry phases. Temperature settings range from 122-140°F for different cycles. Sanitize option is available at 163°F. Water consumption varies by cycle, with values ranging from 2.6 to 5.4 gallons. Cycle time varies from 109 to 137 minutes depending on the selected cycle. Lower rack options are available for all cycles. Available options include Storm Wash+, Hi-Temp Wash, SmartDry-High, SmartDry-Low, and Delay Start. The document indicates the specific features and settings for the dishwasher models. It provides essential information for users to understand the operation and capabilities of the appliance.
- Page 55: Cycle options include delicate, express 60', pre blast, and prewash. Main wash and rinse cycles are essential components of the washing process. Hot rinse is available at a temperature of 131°F (55°C). Sanitize cycle operates at 163°F (73°C). Water consumption varies by cycle, with the highest being 4.3 gallons (16.4 liters). Cycle time for the main wash is 79 minutes. Lower rack options include storm wash+, hi-temp wash, and sanitize. SmartDry options are available in high and low settings. Delay start feature is included in some cycles. Document version indicates the release date as July 4, 2023.
- Page 56: Cycle chart Cycle SelfClean Plastic PotsPans Cycle sequence Water consumption Cycle time (min) Available options SmartDry-High
- Page 57: Cycle options include BabyCare, Night, Prewash, Mainwash, Rinse, Hot Rinse, and Dry. The cycle sequence ends with Dry. Main wash temperature is 131 (55) °F (°C) and Hot Rinse is 163 (73) °F (°C). Sanitize option requires a temperature of 163 °F (73 °C). Water consumption varies by cycle, with values of 1.0 (3.8) and 5.0 (19.1) gallons (liters). Cycle time can range from 89 to 150 minutes. Lower Rack options include Storm Wash+, Hi-Temp Wash, and Sanitize. Selecting Auto or Normal cycle adjusts Prewash and Rinse based on soil level. Water consumption and wash time depend on selected steps, options, and water conditions. Rinse Aid depletion may increase wash time and Last Rinse temperature.
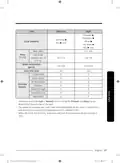
- Page 58: Cycle chart DW80B6* series Cycle options include Auto, Normal, Heavy, and Prewash. Main wash and rinse sequences are detailed. Temperature settings range from 122-140°F (50-60°C) to 149°F (65°C). Sanitize option reaches 163°F (73°C). Water consumption varies from 4.0-5.3 gallons. Cycle times range from 113-146 minutes. Lower rack options are available for various cycles. Storm Wash+, Hi-Temp Wash, and Delay Start are available options. End of cycle is indicated after Dry phase.
- Page 59: Cycle options include delicate, express 60', pre blast, and prewash. Mainwash and rinse cycles are integral parts of the washing process. Hot rinse and dry cycles are included at the end of the washing sequence. The sanitize option requires a temperature of 163 ˚F (73 ˚C). Water consumption varies by cycle, with values of 4.3, 2.9, and 1.1 gallons. Cycle times range from 10 to 95 minutes depending on the selected option. The lower rack features options like storm wash+, hi-temp wash, and sanitize. Delay start is available for multiple cycles. The document includes English language instructions. This page is part of the user manual for the North America DW7000B model.
- Page 60: Cycle chart Cycle SelfClean Plastic PotsPans Cycle sequence Main wash Temp Water consumption Cycle time (min)
- Page 61: Cycle options include BabyCare, Night, Prewash, Mainwash, Rinse, Hot Rinse, and Dry. The cycle sequence ends with Dry and End. The main wash temperature is 131°F (55°C) with a hot rinse at 163°F (73°C). Sanitize cycle operates at 163°F (73°C). Water consumption varies, with 1.0 gallons (3.8 liters) for Prewash and 5.0 gallons (19.1 liters) for Mainwash. Cycle time is 80 minutes for Prewash and 170 minutes for Mainwash. Lower Rack options include Storm Wash+, Hi-Temp Wash, and Sanitize. The Auto or Normal cycle adjusts Prewash and Rinse based on soil level. Water consumption and wash time vary with selected options and water conditions. Empty Rinse Aid may increase wash time and Last Rinse temperature.
- Page 62: Helping the environment Your dishwasher is manufactured from recyclable materials. If you decide to dispose of it, please observe local waste disposal regulations. Cut off the power cable so that the appliance cannot be connected to a power source. Remove the door so that animals and small children cannot get trapped inside the appliance. Do not exceed the detergent quantities recommended in the detergent manufacturers’ instructions. Specifications Model: DW80B7070AP / DW80B7071US / DW80B7071UG / DW80B7070US / DW80B7070UG / DW80B6061US / DW80B6061UG / DW80B6060US / DW80B6060UG Type: Built-in Dishwasher Power: 120 V / 60 Hz AC only, 15 A circuit breaker Wash capacity: 15 place settings Used water pressure: 20-120 psi (140-830 kPa) Wash Motor: 60-100 W Heater: 1100 W Rated power usage: 23 7/8 x 25 x 33 7/8 in. (605 x 636 x 860 mm) Dimensions: (DW80B7070AP / DW80B7070U* / DW80B6060U*) 23 7/8 x 27 5/16 x 33 7/8 in. (605 x 693 x 860 mm) Weight (Unpacked): 89.28 lb (40.5 kg) (DW80B7070AP / DW80B6061U* / DW80B6060U*) 91.49 lb (41.5 kg) (DW80B7070U* / DW80B7071U*)
- Page 63: Open source announcement. The software included in this product contains open source software. The following URL leads to open source license information as related to this product.
- Page 64: Warranty (U.S.A) Limited warranty to original consumer purchaser with proof of purchase and/or proof of delivery. SAMSUNG brand product is warranted against manufacturing defects in materials or workmanship. One (1) year parts and labor warranty. Five (5) years warranty on printed circuit board, racking, and stainless door liner & tub for leakage (parts only). This limited warranty is valid only on products purchased and used in the United States. Warranty service can only be performed by a SAMSUNG authorized service center. The original dated bill of sale and/or proof of delivery must be presented for warranty service. SAMSUNG will provide in-home service within the contiguous United States during the warranty period at no charge. During the applicable warranty period, a product will be repaired, replaced, or the purchase price refunded. Replacement parts and products are warranted for the remaining portion of the original product’s warranty or ninety (90) days, whichever is longer.
- Page 65: This limited warranty covers manufacturing defects in materials or workmanship encountered in normal household, noncommercial use of this product. It does not cover damage that occurs in shipment, delivery, installation, and uses for which this product was not intended. Damage caused by unauthorized modification or alteration of the product is excluded. The warranty does not apply to products where the original factory serial numbers have been removed or cannot be readily determined. Cosmetic damage including scratches, dents, and chips is not covered. Damage caused by abuse, misuse, pest infestations, accident, fire, floods, or other acts of nature is excluded. The cost of repair or replacement under excluded circumstances shall be the customer’s responsibility. Visits by an authorized servicer to explain product functions or maintenance are not covered by this limited warranty. Implied warranties, including the implied warranties of merchantability or fitness for a particular purpose, are limited to one year or the shortest period allowed by law. This warranty gives you specific rights, and you may also have other rights, which vary from state to state.
- Page 66: Warranty (U.S.A) Limitation of remedies Your sole and exclusive remedy is product repair, product replacement, or refund of the purchase price at Samsung’s option, as provided in this limited warranty. Samsung shall not be liable for special, incidental or consequential damages, including but not limited to time away from work, hotels and/or restaurant meals, remodeling expenses, loss of revenue or profits, failure to realize savings or other benefits. Some states do not allow exclusion or limitation of incidental or consequential damages, so the above limitations or exclusions may not apply to you. This warranty gives you specific rights, and you may also have other rights, which vary from state to state. Samsung does not warrant uninterrupted or error-free operation of the product. No warranty or guarantee given by any other person, firm, or corporation with respect to this product shall be binding on Samsung.
- Page 67: Page 67
- Page 68: Page 68

smeg DI324AQ Full Size Dishwasher

ATAG VA7214LR 60 cm Dishwasher

BOSCH SMH4EVX08E Dishwasher

Pelgrim GVW250XL Dishwasher

Miele G5000 Gas Range Dishwasher

Hotpoint H2IHKD526UK Dishwasher

Electrolux ESL63010 Dishwasher

SHARP QW-NA25GU44BS-DE Undercounter Dishwasher

COMFEE CDC22P Mini Dishwasher

Fisher Paykel DW60UT4I2 Built Under Dishwasher