SAMSUNG DW80BB70 Series Dishwasher


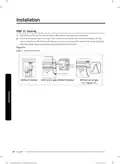


Installation
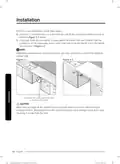
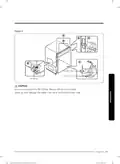
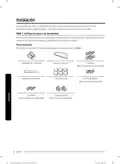
STEP 11 Securing
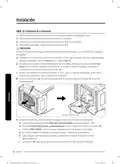
1. Check the parts on the sink to which the drain hose will be connected.
2. There are several ways to insert the drain hose into the drain hose connector of the
sink, as shown in the following figures. You must connect the drain hose in accordance
with the water pipe installation regulations in your region.
Figure 8
Case 1. Without disposal
Air gap
Drain
hose
Hose clamp
Without disposal
With an air gap/without disposal
Without an air gap
(See Figure 10.)
30 English
| General | Details |
|---|---|
| Name | SAMSUNG DW80BB70 Series Dishwasher |
| Make | Samsung |
| Language | English |
| Filetype | PDF (Download) |
| File size | 3.96 MB |


SAMSUNG DW80N3030UW Front Dishwasher

SAMSUNG DW90F89 Dishwasher

SAMSUNG DW80BB70 Dishwasher

SAMSUNG DW50T6060U Dishwasher

SAMSUNG DW80CB5450 Dishwasher

Samsung DW60M5062 Dishwasher

Samsung DW60 7 Series Dishwasher

SAMSUNG DW9000F Dishwasher

SAMSUNG DW60H9950FW-SA Dishwasher

SAMSUNG DW60R2014 Wide 12 Place Dishwasher


BOSCH SMS4HVI00E Dishwasher

SHARP SDW6506JS Dishwasher

Electrolux ESG89400UX Dishwasher

ZLINE Classic Dishwasher

FISHER PAYKEL DW60U2I2 Dishwasher

BOSCH SHP78CM4N 800 Series Dishwasher

ELVITA CBD6603V Dishwasher

BOSCH SMI6ZDS49E-39 Dishwasher

Hotpoint H7F HS51 Dishwasher

FISHER PAYKEL DD24DCTB9N Dishwasher