SAMSUNG DW80BB70 Series Dishwasher


Speciꢀcations
Power supply
120 V, 15 A, 60 Hz AC
Water pressure
20 120 psi (140 830 kPa)
~
~
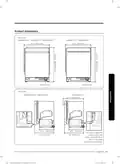
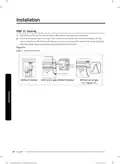
237/8 x 25 x 337/8 in. (605 x 636 x 860 mm)
(DW80BB7070** / DW80B7070AP /
DW80B7070U*/ DW80B6060U*)
Dimensions
(Width × Depth × Height)
237/8 x 275/16 x 337/8 in. (605 x 693 x 860 mm)
(DW80B7071U* / DW80B6061U*)
Minimum inlet water temperature
120 °F (49 °C)
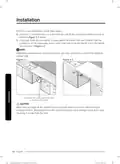
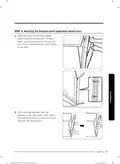
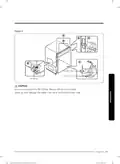
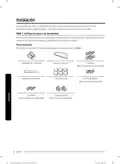
NOTE
Specifications are subject to change without notice for quality improvement purposes.
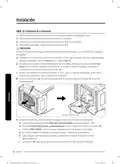
The actual appearance of the dishwasher may differ from the illustrations in this manual.
38 English
| General | Details |
|---|---|
| Name | SAMSUNG DW80BB70 Series Dishwasher |
| Make | Samsung |
| Language | English |
| Filetype | PDF (Download) |
| File size | 3.96 MB |


SAMSUNG DW80N3030UW Front Dishwasher

SAMSUNG DW90F89 Dishwasher

SAMSUNG DW80BB70 Dishwasher

SAMSUNG DW50T6060U Dishwasher

SAMSUNG DW80CB5450 Dishwasher

Samsung DW60M5062 Dishwasher

Samsung DW60 7 Series Dishwasher

SAMSUNG DW9000F Dishwasher

SAMSUNG DW60R2014 Wide 12 Place Dishwasher

SAMSUNG DW60H9950FW-SA Dishwasher


ASKO D5636XXL Dishwasher

BOSCH SMS4HMI00G Free-Standing Dishwasher
FISHER PAYKEL DD60D2HNX9 Dishwasher

FISHER AND PAYKEL ADDD24DTZB Tall Dishwasher

SIEMENS SN63HX00CS Dishwasher

Whirlpool DU810SWP Undercounter Dishwasher

FORNO WQP12-6502 Pozzo Dishwasher

BOSCH SBV4EVX08E65 Dishwasher

FISHER PAYKEL DD24DAX9N Dishwasher

ARDESTO DWMF-V458SMHDS Dishwasher