
SHARP SDW6506JS Dishwasher
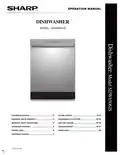





OPERATION MANUAL
DISHWASHER
MODEL : SDW6506JS
CUSTOMER ASSISTANCE ................................... 2
CONSUMER LIMITED WARRANTY.......................... 3
IMPORTANT SAFETY INSTRUCTIONS......................... 4
APPEARANCE OVERVIEW................................... 5
CONTROL PANEL................................................. 6
CONVENIENT FEATURES.................................... 7
GETTING STARTED...................................... 8-11
DISHWASHER CYCLE OPTIONS .......................12-13
CARE AND CLEANING ..................................14-15
TROUBLESHOOTING ...................................16-17
ERROR CODES .............................................18
August 29, 2023


| General | Details |
|---|---|
| Name | SHARP SDW6506JS Dishwasher |
| Make | Sharp |
| Language | English |
| Filetype | PDF (Download) |
| File size | 5.36 MB |
 (1 votes, average: 5.00 out of 5)
 Loading...

SHARP SDW6506JS 24 Front Dishwasher

SHARP SDW6888JS Smart Dishwasher

SHARP QW-NA1BF47EI-EU Series Dishwasher

SHARP QW-NA24S42DI-EE Dishwasher

SHARP SDW6767HS Dishwasher

SHARP SDW6767HS Slide In Smart Dishwasher

SHARP SDW6767HS Smart Dishwasher

SHARP QW-NA26F39DI-EN Dishwasher

SHARP QW-NS1CF49EI-ES Dishwasher

SHARP SDW6757ES Dishwasher

SHARP SDW6506JS Dishwasher Overview
Summary of Contents
- Page 1: Operation manual for the dishwasher model SDW6506JS. Customer assistance information is provided. Consumer limited warranty details are included. Important safety instructions are outlined. Appearance overview of the dishwasher is presented. Control panel features are described. Convenient features of the dishwasher are highlighted. Getting started section provides initial setup guidance. Dishwasher cycle options are explained. Care and cleaning instructions are available. Troubleshooting tips are provided. Error codes are listed for reference.
- Page 2: Customer assistance Register your product Registering your new product is easy and offers benefits that help you get the most out of your Sharp product. Convenience: If you ever need warranty support, your product information is already on file. Communication: Stay up to date with important notifications and special offers from Sharp. Support: Quickly access support content including Owner’s Manuals, FAQs, How-to Videos, and much more. Product support If you have questions about the setup or operation of your product, please refer to the corresponding section within this manual. Additionally, visit sharpusa.com/support to access exclusive content about your product. Contact us If at any time you have questions or comments concerning your Sharp product, please contact the Sharp Customer Assistance Center.
- Page 3: Consumer limited warranty Sharp Electronics Corporation warrants to the first consumer purchaser that the product will be free from defective workmanship and materials. The warranty covers repair or replacement of defective products at no charge for parts or labor. This warranty does not apply to cosmetic items, products with exterior damage, or those subjected to misuse. To enforce rights under this warranty, the purchaser should follow specified steps and provide proof of purchase. Implied warranties are limited to the periods set forth in the warranty. Sales personnel are not authorized to make additional warranties or extend warranty durations. Correction of defects constitutes complete fulfillment of Sharp's liabilities to the purchaser. Sharp is not liable for damages caused by unauthorized repairs or for incidental or consequential damages. This limited warranty is valid only in the United States, the District of Columbia, and Puerto Rico. The warranty period includes one year for parts and labor, and five years for parts only on specific components.
- Page 4: IMPORTANT SAFETY INSTRUCTIONS Follow the information in this manual to minimize the risk of fire, explosion, electric shock and to help prevent property damage or personal injury. Do not tamper with controls. Do not operate the dishwasher unless all enclosure panels are in the proper place. Install the dishwasher properly, as instructed in the included installation guide. Water supply inlet temperature should be between 120℉ and 149℉. The dishwasher must be properly grounded to reduce the risk of electrical shock. If there is any damage to the new dishwasher, contact the dealer. Do not attempt to repair or replace any part yourself. Read all instructions before using the dishwasher. Use the dishwasher only for intended function as described in this manual. Do not use the dishwasher if it has a damaged power line or plug, and do not plug the dishwasher into a damaged outlet.
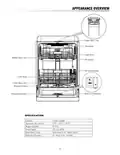
- Page 5: Appearance overview includes various components such as the upper spray arm, third rack, upper rack, tub gasket, middle spray arm, silverware basket, lower rack, lower spray arm, heating element, rinse aid dispenser, and detergent dispenser. The specifications detail a capacity of 14 place settings. Dimensions are 23.5 x 33.5 x 22.75. The weight unpacked is 70.55 lb. Power supply is 120 volts, 60 Hz. Rated power usage includes a wash motor of 50 W and a heater of 840 W. Water feed pressure ranges from 20 to 80 psi (138 to 552 kPa).
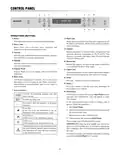
- Page 6: Control panel operations include various functions for efficient dishwashing. The power button turns the dishwasher on or off. The heavy duty cycle is designed for heavily soiled pots and pans. The sanitize function maintains a high water temperature for sanitizing dishes. Normal cycle effectively washes and dries a full load of normally soiled dishes. Delicate cycle is intended for fragile items like stemware. Express wash is suitable for lightly soiled dishes. Rinse only is used for pre-rinsing to prevent food from drying on dishes. Child lock prevents accidental changes to settings by children. The start/pause button initiates or pauses the washing cycle.
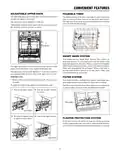
- Page 7: Convenient features include an adjustable upper rack that allows for loading taller items in either the upper or lower rack. The foldable tines in the lower rack facilitate loading extra large or hard-to-fit items. The upper rack can be adjusted by 2 inches to increase or decrease the clearance of the lower rack. The Smart Wash System determines the optimal cycle for cleaning dishes efficiently based on the load. A partial load of lightly soiled dishes triggers a wash cycle similar to Express Wash, while a full load of heavily soiled dishes activates the Heavy Duty cycle. The upper dishwasher rack is designed for cups, glasses, small plates, bowls, and plastic items marked dishwasher safe. The dishwasher features a multiple filter system that enhances performance while using less water and energy. To adjust the height of the upper rack, the rack must be empty before making any adjustments. The filter system consists of three filters that separate dirty and clean water into different chambers. The floater protection system activates if the water level in the tub is too high, closing the inlet valve and draining excess water.
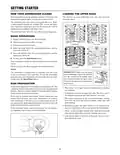
- Page 8: Getting started Your dishwasher cleans by spraying a mixture of hot water and detergent through the spray arms against soiled surfaces. The dishwasher fills with water, covering the filter area. Water is then pumped through the multiple filter system and spray arms. Prepare and load dishes into the dishwasher. Add detergent and, if needed, rinse aid. Select the cycle. Press the corresponding button, and the cycle icon will be lit. Check and clean the filters regularly for best performance. Make sure the items loaded in the upper rack do not interfere with the rotation of the middle spray arm. Scrape away large pieces of food, bones, pits, toothpicks, etc. The continuous filtered wash system will remove the remaining food particles. Load glasses and cups in the upper rack only. The lower rack is not designed for glasses and cups. Foods such as mustard, mayonnaise, vinegar, lemon juice, and tomato-based products may cause discoloration of stainless steel and plastics. Load plastic items so the force of the spray does not move them during the cycle.
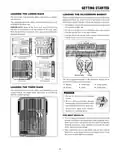
- Page 9: Getting started Loading the lower rack is designed for plates, soup bowls, cookware, and bakeware. The silverware basket has three separate sections for optimum loading flexibility. The adjustable upper rack allows you to load items up to 12.6 inches in height in the lower rack. Items in the lower rack must be placed so that they do not interfere with the rotation of the spray arms. Load the silverware into the basket sections when the basket is in the lower rack or on a countertop. The three separated modules of the silverware basket can be used in both upper and lower racks. You can place the items in the cutlery rack randomly or in an orderly fashion. Do not let any item extend through the bottom of the silverware basket or rack. Always load sharp items pointing down to avoid injury. Place small items such as baby bottle caps in the basket sections with hinged covers.
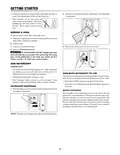
- Page 10: Getting started Unload or remove the baskets before unloading the racks to avoid water drops from falling on the silverware. Add the recommended amount of detergent to the detergent compartment. When handles are up, mix items in each section of the baskets with some pointing up and some down to avoid nesting. To add or remove items after wash cycle starts: Open door slightly and wait a few seconds until wash action stops before completely opening. Use automatic dish washing detergent only. Other detergents can produce excessive suds that can overflow out of the dishwasher. The amount of detergent to use depends on the soil level of your load, the type of detergent used, and the hardness of your water. Add detergent just before starting a cycle. Water hardness varies depending on your water source. For the best results, your dishwasher is designed to operate with water that has a hardness of no more than 7 grains per gallon.
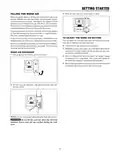
- Page 11: Getting started Press the rinse aid cover down firmly to close. Rinse aid greatly improves drying and reduces water spots and filming. Without rinse aid, your dishes and dishwasher interior will have excessive moisture. The Rinse Aid Dispenser automatically releases a measured amount of rinse aid during the final rinse. If spotting and poor drying are a problem, increase the amount of rinse aid dispensed by rotating the dial to a higher number. You can adjust the amount of the rinse aid released during the rinse aid according to the following steps. If the rinse aid is low, the rinse aid light is illuminated at the beginning and end of the cycle indicating that it is time to refill. Do not use a solid or bar-type rinse aid. Close the door and power on the dishwasher. Use the viewing port when filling the rinse aid reservoir.
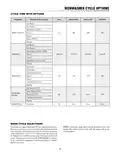
- Page 12: Dishwasher cycle options include various programs with specific cycle times and water usage. The cycle chart outlines the details for each program, including water consumption in gallons/liters and cycle time in minutes. Heavy duty cycle uses 7.1 gallons of water and has a cycle time of 151 minutes without options. Normal cycle has a water usage of 3.0-7.0 gallons and a cycle time ranging from 118 to 155 minutes depending on options selected. Delicate cycle consumes 7.0 gallons of water and has a cycle time of 135 minutes for half load. Express wash cycle is designed for quick cleaning, taking only 20 minutes without options. Rinse only cycle uses 2.0 gallons of water and has a cycle time of 12 minutes. Each cycle has specific detergent requirements measured in ounces. Sanitize options are available for certain cycles, extending the cycle time. Heated dry options are also available, affecting the total cycle duration.
- Page 13: Dishwasher cycle options include various programs such as heavy duty, normal, delicate, express, and rinse only. Cycle times are approximate and will vary with options selected. Hot water is necessary to activate dishwasher detergent and melt fatty food soils. An automatic sensor checks the incoming water temperature and delays the timer for automatic water heating if necessary. The HI-TEMP wash guarantees higher temperatures for heavier soil loads. The energy usage label is based on the normal cycle with the heated dry option selected. Each cycle has specific pre-wash, main wash, rinse, and drying stages. Temperature settings for washes vary, with some cycles reaching up to 149℉. Rinse stages are included in all cycles to ensure cleanliness. The document outlines the importance of selecting the appropriate cycle for optimal cleaning results.
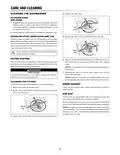
- Page 14: Care and cleaning Cleaning the dishwasher Regularly clean the stainless steel door and handle with a soft cleaning cloth to remove any debris. Do not use appliance wax, polish, bleach or products containing chlorine to clean the stainless steel door. Gently clean the control panel with a lightly dampened cloth. The tub is made of stainless steel; it will not rust or corrode if the dishwasher is scratched or dented. Do not clean the dishwasher interior until it has cooled. Inspect both the Fine filter and the Micro filter for debris and then clean them by holding the filters under slow running water. Failure to correctly re-install the filters will result in diminished performance and a potential need for service. Clean the door gasket with a damp cloth regularly to remove food particles. If there is an air gap installed with your dishwasher, make sure it is clean, so the dishwasher will drain properly.
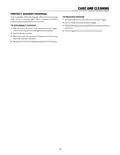
- Page 15: Care and cleaning Protect against freezing Your dishwasher should be properly protected from freezing when left in an unheated place. Have a qualified technician perform the steps listed below in this section. To restore service: Reconnect the water, drain and electrical power supply. Turn on water and electrical power supply. To disconnect service: Turn off electrical power to the dishwasher at the supply source by moving fuses or tripping the circuit breaker. Turn off the water supply. Fill both detergent cups and run dishwasher through a heated wash cycle. Check connections to make sure they do not leak. Place a pan under the inlet valve. Disconnect water line from inlet valve and drain into pan. Disconnect drain line from pump and drain water into pan.
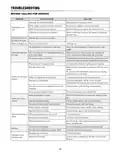
- Page 16: Troubleshooting Before calling for service Dishwasher won't start Ensure the door is properly closed. Ensure power supply is correctly connected. Refer to delay start section in this manual to reset. Refer to child lock section in this manual to deactivate the child lock. Dishwasher beeps at the end of the cycle Indicates the wash cycle is finished. Rinse aid light is on The rinse aid level is low. Add rinse aid. Make sure the dishwasher is connected to hot water supply. Dishwasher operates too long The cycle time will vary depending on the soil level of the dishes. The sanitize option is selected. Water pressure is temporarily low. Dishes are not clean enough Dishes are loaded too close together. Improper use of detergent. The selected cycle is not suitable for food soil condition. Make sure the spray arm is rotated fully. Dishes are not dry enough Improper loading of dishes. Choose the proper cycle with drying. For extremely hard water, install a water softener. Spots and filming on dishes Old or damp powder rinse aid is used. Rinse aid dispenser empty. Water temperature is too low. Use of too much detergent.
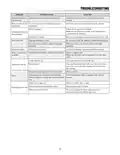
- Page 17: Troubleshooting Improper operation of the detergent cover will not close. Add the detergent and rinse aid as indicated by the manual. Previous cycle has not finished or has been interrupted. Select the proper cycle as indicated by the manual. Drain is clogged. Check the air gap if it is installed. Drain hose is kinked. Be sure the drain hose is properly connected to the sink. Improper detergent is used. Make sure to use only the automatic dishwasher detergent. Dishwasher is not level. Level the dishwasher as per the installation manual. Aluminum utensils have rubbed against dishes. Choose a higher cycle. Some tomato-based foods will cause staining. Use the rinse only cycle right after loading to decrease staining. A hard object has entered the wash module. If the noise persists after a complete cycle, call for service. Water valve is shut off. Make sure the water valve is open.
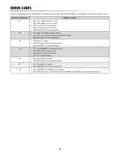
- Page 18: Error codes indicate malfunctions in the dishwasher. The dishwasher will display an error code when a malfunction occurs. E1 may indicate low water supply pressure or a closed water supply valve. E4 could suggest issues with the high-water float switch or a broken heater. E6 and E7 may relate to problems with the thermistor or main PBA. The main PBA may have various issues affecting performance. The water valves may fail to close properly, leading to malfunctions. Water leakage can also trigger error codes. Proper connections for the main PBA or sub PBA are essential for functionality. The table provides possible causes for each error code displayed.
- Page 19: Page 19

BOSCH SPS2HKW58E Dishwasher

BOSCH SMV4HTX03E Dishwasher

BOSCH SHX5AEM2N Dishwasher

BOSCH SMS4EVW02E Dishwasher

beko DIT39434C2 Fully Integrated Dishwasher

BOSCH SPI2HKS58E Dishwasher

AEG FSB42607Z Build In Dishwasher

ASKO D5233 Dishwasher

FISHER and PAYKEL DD24DDFTX9N Contemporary Tall Dishwasher

FISHER and PAYKEL DD60STX6HI1 Dishwasher