SHARP QW-NA1BF47EI-EU Series Dishwasher


Home Appliances
QW-NA1BF47EI-EU
QW-NA1BF47ES-EU
QW-NA1BF47EW-EU
Dishwasher
User Manual
EN

| General | Details |
|---|---|
| Name | SHARP QW-NA1BF47EI-EU Series Dishwasher |
| Make | Sharp |
| Language | English |
| Filetype | PDF (Download) |
| File size | 0.94 MB |


SHARP SDW6506JS 24 Front Dishwasher

SHARP SDW6888JS Smart Dishwasher

SHARP QW-NA24S42DI-EE Dishwasher

SHARP SDW6767HS Dishwasher

SHARP SDW6767HS Slide In Smart Dishwasher

SHARP SDW6767HS Smart Dishwasher

SHARP QW-NA26F39DI-EN Dishwasher

SHARP QW-NS1CF49EI-ES Dishwasher

SHARP SDW6757ES Dishwasher

SHARP QW-NA25GU44BS-DE Undercounter Dishwasher

SHARP QW-NA1BF47EI-EU Series Dishwasher Overview
Summary of Contents
- Page 1: Home appliances Dishwasher User manual
- Page 2: Thank you for choosing this product. This User Manual contains important information on safety and instructions intended to assist you in the operation and maintenance of your appliance. Please take the time to read this User Manual before using your appliance and keep this book for future reference. WARNING: Serious injury or death risk. RISK OF ELECTRIC SHOCK: Dangerous voltage risk. CAUTION: Injury or property damage risk. Operating the system correctly is essential. IMPORTANT / NOTE.
- Page 3: Safety instructions include general safety warnings, installation warnings, and precautions during use. Installation section covers machine positioning, water connection, water inlet hose, electrical connection, and fitting the machine undercounter. Technical specifications detail the general appearance and specific technical specifications of the appliance. Before using the appliance, it is important to prepare the dishwasher for first use, understand salt usage, fill the salt, and utilize a test strip. Water hardness table and water softener system settings are crucial for optimal performance. Detergent usage guidelines include filling the detergent, using combined detergents, and rinse-aid usage. Loading the dishwasher involves recommendations and alternative basket loads. The programme table outlines the available washing programs. The control panel section explains how to change a programme, cancel a programme, and switch the machine off.
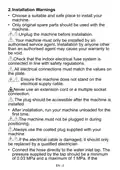
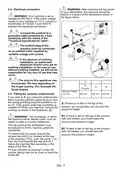
- Page 4: Installation warnings Choose a suitable and safe place to install your machine. Only original spare parts should be used with the machine. Unplug the machine before installation. Your machine must only be installed by an authorised service agent. Check that the indoor electrical fuse system is connected in line with safety regulations. Ensure the machine does not stand on the electrical supply cable. Never use an extension cord or a multiple socket connection. The plug should be accessible after the machine is installed. After installation, run your machine unloaded for the first time. Connect the hose directly to the water inlet tap.
- Page 5: During usage This machine is for domestic use only; do not use it for other purposes. Commercial use will void the guarantee. Do not stand, sit or place loads on the open door of the dishwasher. Only use detergents and rinse aids produced specifically for dishwashers. Do not drink water from the machine. Due to the danger of explosion, do not place any chemical dissolving agents into the machine’s washing section. Check the heat-resistance of plastic items before washing them in the machine. Only put items in the machine which are suitable for dishwashing, and take care not to overfill the baskets. Do not open the door while the machine is in operation; hot water may spill out. Place knives and other sharp objects in the cutlery basket in a blade-down position. For models with the automatic door-opening system, when the EnergySave option is active, the door will open at the end of a program.
- Page 6: Keep the door open for 30 minutes after a programme has ended for effective drying. Do not stand in front of the door after the auto-open signal sounds. Repair should only be performed by an authorised service company to avoid voiding the warranty. Disconnect the machine from the mains before repair work. Do not pull the cable to unplug the machine. Operation at a low voltage will cause a decline in performance levels. For safety, disconnect the plug once a program has finished. Do not unplug the machine with wet hands to avoid electric shock. Some machine components and packaging consist of recyclable materials. Packaging materials are environmentally friendly as they are recyclable.
- Page 7: CE declaration of conformity states that products meet applicable European directives and standards. The symbol on the product indicates it should not be treated as household waste. The product must be handed over to the appropriate collection point for recycling. Proper disposal helps prevent negative consequences for the environment and human health. For detailed recycling information, contact your local city office or waste disposal service. Recycling is important to ensure responsible waste handling.
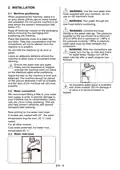
- Page 8: Installation Use the new water inlet hose supplied with your machine. When positioning the machine, place it in an area where dishes can be easily loaded and unloaded. Do not put the machine in an area where the ambient temperature falls below 0°C. Run water through the new hose before connecting. Connect the hose directly to the water inlet tap. The pressure supplied by the tap should be a minimum of 0.03 MPa and a maximum of 1 MPa. After the connections are made, turn the tap on fully and check for water leaks. Leave an adequate distance around the machine to allow ease of movement when cleaning. Ensure the water inlet and outlet hoses are not squeezed or trapped. Adjust the feet so the machine is level and balanced. We recommend fitting a filter to your water inlet supply to prevent damage to your machine due to contamination.
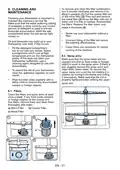
- Page 9: Electrical connection After removing the top panel of your dishwasher, the machine should be placed in a space of the dimensions shown in the figure below. Your machine is set to operate at 220-240 V. If the mains voltage supply to your machine is 110 V, connect a transformer of 110/220 V and 3000 W between the electrical connection. Connect the product to a grounded outlet protected by a fuse complying with the values in the Technical Specifications table. In the absence of earthing installation, an authorised electrician should carry out an earthing installation. The plug on this appliance may incorporate a 13A fuse depending on the target country. Fitting the machine undercounter If you wish to fit your machine undercounter, there must be sufficient space to do so and the wiring-plumbing must be suitable. The countertop, of which the machine will be placed under, must be stable in order to prevent imbalance. The top panel of the dishwasher must be removed to fit the machine under the countertop. Adjust the machine feet according to the slope of the floor.
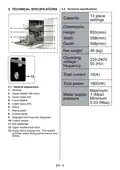
- Page 10: Technical specifications include capacity, dimensions, and weight. The height is 850 mm, width is 598 mm, and depth is 598 mm. The net weight is 46 kg. Operating voltage is 220-240V with a frequency of 50 Hz. Total current is 10 A and total power is 1900 W. Water supply pressure ranges from a minimum of 0.03 Mpa to a maximum of 1 Mpa. Key components include the worktop, upper basket with racks, upper spray arm, lower basket, and lower spray arm. The system features a Super Active Drying Unit for improved drying performance.
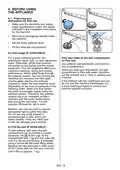
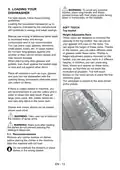
- Page 11: Before using the appliance, ensure the electricity and water supply specifications match the installation instructions. Remove all packaging material inside the machine. Set the water softener level and fill the rinse aid compartment. For optimal washing, only add water to the salt compartment on first use. Use softener salt specifically produced for dishwashers. If the softener salt overflows, run a short washing program to protect the machine against corrosion. The dishwasher requires soft water to prevent white lime residues on dishes and to maintain washing performance. The softener system needs to be refreshed to maintain performance during washes. Only use special dishwasher salt to soften the water; avoid small grained or powdered salts. To add softener salt, open the salt compartment cap and fill it with salt and water until almost overflowing.
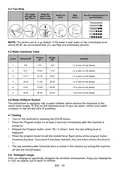
- Page 12: Test strip instructions include running water through the tap for one minute and keeping the strip in the water for one second. The default hardness level for the machine is set to 3. For well water or hardness levels above 90 dF, it is recommended to use filters and refinement devices. The water hardness table provides levels in French dF, British dE, and German dH, along with corresponding display indicators. The dishwasher is equipped with a water softener that reduces the hardness in the mains water supply. To find out the hardness level of tap water, contact the water company or use a test strip. To set the machine, turn it on and press the Program button for at least three seconds. Release the Program button when SL is displayed to access the last setting level. Each press of the Program button increases the hardness level, cycling back to 1 after level 6. Only use detergents specifically designed for domestic dishwashers and store them out of reach of children.
- Page 13: Add the proper detergent for the selected program to ensure the best performance. The amount of detergent needed depends on the cycle, load size, and soil level of dishes. Do not fill detergent into the detergent compartment more than required; otherwise, you can see whitish streaks or bluish layers on glass and dishes and may cause glass corrosion. Using little detergent can result in poor cleaning and you can see whitish streaks in hard water. The rinse aid helps to dry the dishes without streaks and stains. Rinse-aid is required for stain-free utensils and clear glasses. To fill the rinse aid compartment, open the rinse-aid compartment cap and fill it to the MAX level. Push the latch to open the dispenser and pour in the detergent. Combined detergents should be used according to the manufacturer’s instructions. If the dishes are not drying properly or are spotted, increase the rinse aid level.
- Page 14: Brightener dose levels indicate the amount dispensed. Rinse-aid not dispensed is shown as r1 on the display. 1 dose dispensed is indicated by r2 on the display. 2 doses dispensed is indicated by r3 on the display. 3 doses dispensed is indicated by r4 on the display. 4 doses dispensed is indicated by r5 on the display.
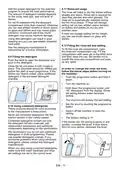
- Page 15: Loading your dishwasher requires careful attention to avoid injuries. Place long-handle and sharp-pointed knives with their sharp points facing down or horizontally. For best results, follow the loading guidelines provided by the manufacturer to contribute to energy and water savings. The top basket features a height adjustable rack designed to increase capacity. You can place glasses and cups on the racks, which can be adjusted to accommodate different sizes. Long forks, knives, and spoons should be placed laterally on the racks to avoid blocking the spray arm's rotation. Cups, glasses, stemware, and small plates should be placed in the upper basket with openings facing downwards to prevent water collection. When loading long stem glasses and goblets, lean them against the basket edge rather than other items. If a cutlery basket is present, use the cutlery grid for optimal results. Large and very dirty items should be placed in the lower rack, ensuring dishes and cutlery are not stacked above each other. Take care not to obstruct the rotation of spray arms and ensure that loaded dishes do not prevent the opening of the detergent dispenser.
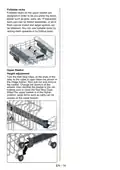
- Page 16: Foldable racks on the upper basket are designed to let you place big items easier such as pots, pans, etc. Each part can be folded separately, or all of them can be folded to obtain larger spaces. You can use foldable racks by raising them upwards or by folding down. To adjust the height of the upper basket, turn the Rail Stop Clips at the ends of the rails to the sides to open them, then pull out and remove the basket. Change the position of the wheels, then reinstall the basket to the rail, making sure to close the Rail Stop Clips. When the upper basket is in the higher position, large items such as pans can be placed on the lower basket.
- Page 17: Alternative basket loads Unsuitable items for dishwashing include cigarette ashes, candle leftovers, polish, paint, chemical substances, and iron-alloy materials. Forks, spoons, and knives with wooden, bone, ivory, or nacre-coated handles are not suitable. Temperature-sensitive plastics, copper, or tin-coated containers should not be washed. Aluminium and silver objects are also unsuitable for dishwashing. Some delicate glasses, ornamental printed porcelains, and lead crystal glasses should be placed in the upper basket. Absorbent items such as sponges or kitchen rugs should not be washed in the dishwasher. It is important to purchase dishwasher-proof kitchenware in the future. Incorrect loading can cause poor washing and drying performance. Follow the manufacturer's recommendations for optimal performance results. For detailed information required for tests according to EN normatives, contact the specified email.
- Page 18: Programme table includes various washing programs such as Intensive, Auto, Eco, and Super 50’. Intensive program is suitable for heavily soiled dishes. Auto program adjusts based on the type and level of soil. Eco program is designed for normally soiled daily dishes with reduced energy and water consumption. Super 50’ is a faster program for normally soiled daily dishes. Detergent amounts vary based on the program, with specific measurements for each. Program durations range from 00:50 to 03:25 hours. Electricity consumption per cycle is listed in kWh. Water consumption per cycle is measured in liters. Details may vary depending on the model.
- Page 19: The program duration may change according to the amount of dishes, the water temperature, the ambient temperature and selected additional functions. Values given for programmes other than the eco programme are indicative only. Eco programme is suitable to clean normally soiled tableware and is the most efficient programme in terms of its combined energy and water consumption. Washing tableware in a household dishwasher usually consumes less energy and water than hand dishwashing when used according to the manufacturer’s instructions. Only use powder detergent for short programs. Short programs do not include drying. To assist drying, we recommend slightly opening the door after a cycle is complete. You can access the product database where the model information is stored by reading the QR code on the energy label. According to regulations 1016/2010 and 1059/2010, Eco program energy consumption values may differ. This table is in line with regulations 2019/2022 and 2017/2022.
- Page 20: The control panel includes various buttons and indicators essential for operation. The remaining time indicator allows monitoring of the programme flow. The tablet button activates the tablet option for combined detergent use. The half load function shortens programme durations and reduces energy and water consumption. The start/pause button initiates the selected programme and shows the remaining time. The rinse aid indicator alerts when the rinse aid level is low. The salt indicator warns when there is insufficient softening salt. The delay button allows scheduling the programme start time from 1 to 24 hours. Washing step indicators provide visual feedback on the current stage of the programme. If the machine is turned off after setting a delay, the delay will be canceled.
- Page 21: Cancellations can be made while a programme is running. Child lock is activated by pressing the Tablet button for about 3 seconds. To save a program as a favorite, press Program and Delay buttons simultaneously. During cancellation, the Dry led is on, and the machine discharges water in about 30 seconds. If an extra option was used in the last programme, it remains active in the newly selected programme. Switch the machine off with the On/Off button after the programme ends. Do not open the door before the programme ends. At the end of the washing programme, leaving the door ajar can hasten drying. If the door is opened or power is cut off during washing, the programme will continue when conditions are restored. Start the newly selected programme by pressing the Start/Pause button.
- Page 22: Buzzer sound control allows users to change the buzzer sound level. To change the sound level, open the door and press Half Load and Tablet buttons simultaneously for 3 seconds. The machine will display the last set level, ranging from “S0” to “S3”. To decrease the sound level, press the Tablet button; to increase it, press the Half Load button. To save the selected sound level, turn off the machine. S0 level means all voices are off, while the factory setting is “S3”. Save power mode can be activated or deactivated by pressing Program and Half Load buttons at the same time for 3 seconds. When activated, “IL1” will be displayed, turning off interior lights after 2 minutes and the machine after 15 minutes of inactivity. When deactivated, “IL0” will be displayed, keeping the interior lights on as long as the door is open. In factory settings, save power mode is active.
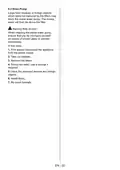
- Page 23: To remove and clean the filter combination, turn it counter clockwise and remove it by lifting it upwards. Cleaning your dishwasher is important to maintain the machine’s service life. Make sure that the water softening setting is done correctly and the correct amount of detergent is used to prevent limescale accumulation. Never use your dishwasher without a filter. Incorrect fitting of the filter will reduce the washing effectiveness. Clean filters are necessary for proper running of the machine. Make sure that the spray holes are not clogged and that no food waste or foreign object is stuck to the spray arms. To extend the life of your dishwasher, clean the appliance regularly each month. Wipe the door seals regularly with a damp cloth to remove any accumulated residue or foreign objects. Clean the filters and spray arms at least once a week.
- Page 24: Drain pump issues can arise from large food residues or foreign objects that block the waste water pump. If this occurs, rinsing water will accumulate above the filter. Warning: Risk of cuts when cleaning the waste water pump due to broken glass or pointed implements. To address the issue, first disconnect the appliance from the power supply. Remove the baskets and filters, then scoop out any water, using a sponge if necessary. Check the area for and remove any foreign objects before reinstalling the filters and baskets.
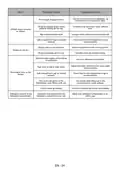
- Page 25: Troubleshooting section provides codes for various issues. Insufficient water may be indicated by code F5. Ensure the water inlet tap is open and flowing. For continuous water input, check for code F3 or F2. Inability to discharge water can be identified with specific error codes. Heater errors and overheating issues should be addressed immediately. Installation and repairs must be performed by an authorized service agent. Improper repairs can lead to significant damage and user risk. Only original spare parts should be used for replacements. Genuine spare parts are available for at least 10 years from the market date.
- Page 26: Fault possible causes and troubleshooting steps are outlined for common issues. Use the correct amount of detergent as instructed in the programme table. Not enough detergent used can lead to poor cleaning results. Rinse aid dosage and/or water softener setting may be set too low. Whitish stains remaining on dishes indicate high water hardness level. Salt compartment cap not closed properly can cause issues with cleaning. Dishes may not dry if the drying option is not selected. Stainless-steel quality of the dishes should be sufficient for dishwasher use. High level of salt in wash water can lead to rust stains on dishes. Detergent remains in the detergent compartment if added when wet. Consult a qualified electrician for poor mains grounding issues.
- Page 27: Page 27

FISHER AND PAYKEL DD60DI9 Dishwasher

INDESIT I0F D641A X Free Standing Dishwasher

Miele Dishwasher

FISHER PAYKEL DD24SCTX9N Dishwasher

Privileg RSBC 3M19 Dishwasher

FISHER AND PAYKEL DD24STX6I1 Drawer Dishwasher

AEG GS60AIM Dishwasher

BOSCH SHP78CM2N 800 Series Dishwasher

CAFE CDD220P4WW2 Smart Drawer Dishwasher

BOSCH SMV2ITX18E Series 2 Dishwasher