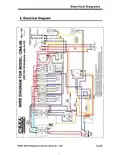
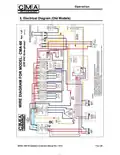
CMA-66 EST-66 Conveyor Dishwasher


Getting Started
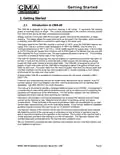
2.2. Receiving and Installation
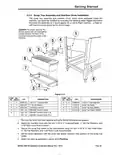
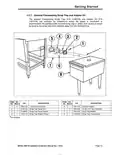
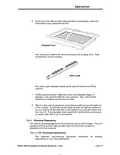
When you receive your new CMA-66, complete the assembly by installing the scrap tray
assembly with its overflow chute, the two wrapper shields and the curtain rods, which are shipped
inside the machine. After the box has been removed from the machine, remove the left and right
stainless steel wrapper shields and bolt them in place with the nuts and bolts provided. The
wrapper shield with the extra curtain clamps mounts onto the dirty end of the machine. Next,
mount the scrap tray assembly and overflow chute into position (see section 2.3.4 Scrap Tray
Assembly and Overflow Chute Installation).
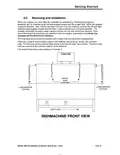
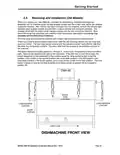
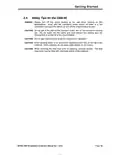
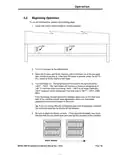
All of the spray arms should be inserted and in place over the wash tank compartments.
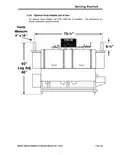
There are a total of seven curtains used in the CMA-66; two are long- narrow, two are short-
wide. The two long-narrow curtains have shorter rods than the other two curtains. The short rods
hold the curtains at the entrance and exit of the machine.
The sketch below lists curtain positions 1 through 4.
CMA-66
3
4
1
2
5
6
SHORT-
WIDE
CURTAINS
LONG-NARROW
CURTAIN
LONG-NARROW
CURTAIN
DISH FLOW
DISHMACHINE FRONT VIEW
MODEL CMA-66 Installation & Operation Manual Rev. 1.09 B
Page
4
| General | Details |
|---|---|
| Name | CMA-66 EST-66 Conveyor Dishwasher |
| Make | CMA |
| Language | English |
| Filetype | PDF (Download) |
| File size | 0.59 MB |


CMA UC65e M3 Undercounter Dishwasher

CMA H-1X Undercounter Dishwasher

CMA EST-FL1 EST Front Loader Water Dishwasher


FISHER PAYKEL DD24DTX6PX1 Tall

BOMANN GSP 7418 Household Dishwasher

BOSCH GV642 A Dishwasher

Thermador DWHD660EFM Dishwasher

MONOGRAM ZDT985SINII Fully Integrated Dishwasher

BOSCH SPS2HKW57E Dishwasher

Miele G 5058 SCVi SFP Dishwasher

FISHER AND PAYKEL DD60SCHW9 Contemporary Dishwasher

EQUATOR 2240 Dishwasher

Westinghouse WSF6608XB Dishwasher