Home > GE Appliances > GE APPLIANCES GSD2100VBB Dishwasher
GE APPLIANCES GSD2100VBB Dishwasher


Dishwasher Installation
PRETEST CHECKLIST
Review this list after installing your dishwasher to
avoid charges for a service call that is not covered
by your Warranty.
• Check to be sure power is OFF.
• Open door and remove all foam and paper packaging.
• Locate the Owner’s Manual.
• Read the Owner’s Manual for operating instructions.
• Check door opening and closing. If door does not
open and close freely, check for proper spring
adjustments. If door drops or closes when released,
adjust spring tension. See Step 1.
• Check to be sure that wiring is secure under the
dishwasher, not pinched or in contact with door
springs or other components. See Step 13.
• Check door alignment with tub. If door hits tub, level
dishwasher. See Step 14.
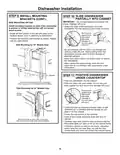
DISHWASHER WET TEST
STEP 16
STEP 18
(CONT)
• Close dishwasher door. Dishwasher should start.
• Check to be sure that water enters the dishwasher.
If water does not enter the dishwasher, check to be
sure that water and power are turned on.
• Check for leaks under the dishwasher. If a leak is found,
turn off power at the breaker, and then tighten water
connections. Restore power after leak is corrected.
NOTE: A small amount of water may splash out of the
fill funnel, on the right side of the tub, during the first
use after installation. Splash-out is most likely to occur if
there is air in the water supply line from new construction
or if the valve has been closed for an extended time.
• Check for leaks around the door. A leak around
the door could be caused by door rubbing or
hitting against adjacent cabinets. Reposition the
dishwasher if necessary. See Step 11.
• Check door alignment with cabinet. If door hits
cabinet, reposition dishwasher. See Step 11.
• Check that door spring does not contact water line, fill
hose, wiring or other components. See Steps 10 and 11.
• Verify water supply and drain lines are not kinked
or in contact with other components. Contact with
motor or dishwasher frame could cause noise. See
Steps 10 and 11.
• Turn on the sink hot water faucet and verify water
temperature. Incoming water temperature must be
between 120°F and 140°F. A minimum of 120°F
temperature is required for best wash performance.
See “PREPARE HOT WATER LINE”.
• Open dishwasher door. Press and hold the Start pad,
until the light next to the pad turns off, to cancel the
cycle. Close dishwasher door. The unit will begin to drain.
Check drain lines. If leaks are found, turn off power at
the breaker and correct plumbing as necessary. Restore
power after corrections are made. See Steps 7 and 8.
• Open dishwasher door and make sure all of the water
has drained. If not, check that disposer plug has been
removed and/or air gap is not plugged. Also check
drain hose to be sure it is not kinked underneath or
behind dishwasher. See Step 8.
• Press Start button once again and run dishwasher through
another cycle. Check for leaks and correct if required.
• Repeat these steps as necessary.
• Add 2 quarts of water to the bottom of the dishwasher
to lubricate the pump seal.
• Turn on water supply. Check for leaks. Tighten
connections if needed.
REPLACE TOEKICK
STEP 19
• Remove protective film if present from the control
panel and door.
• Install toekick insulation
(18” models only) by
• Avoid service call charges by ensuring there is an
air gap or drain hose routed through the required
32” minimum height. See Step 8.
placing ends of insulation
in left and right brackets.
Insulation should be
installed up under tub.
• Place the inner toekick
piece (with slots) against the
toekick bracket. The slots
should align with toekick.
CHECK THE FOLLOWING
• Dishwasher is square and level at both the top and
bottom of the cabinet opening, with no twisting or
distortion of the tub or door.
• All 4 legs of the dishwasher are firmly in contact with
the floor.
• Drain hose is not pinched between the dishwasher
and adjacent cabinets or walls.
STEP 17
Tip: Reduce sound from under the dishwasher.
Make sure toekick is against floor.
• Place larger toekick over the inner piece and install 4
toekick screws.
• Use both toekick pieces for all installation heights.
DISHWASHER WET TEST
STEP 18
• Turn on power supply or plug power cord into outlet,
if equipped.
• Select a cycle to run and push the Start button.
Printed in China
12
| General | Details |
|---|---|
| Name | GE APPLIANCES GSD2100VBB Dishwasher |
| Make | GE Appliances |
| Language | English |
| Filetype | PDF (Download) |
| File size | 0.86 MB |


GE APPLIANCES GTW845 Dishwasher

GE APPLIANCES GDF550PGR Plastic Interior Dishwasher with Front Controls

GE APPLIANCES PDT755SYV/BTV UltraFresh System Dishwasher with Interior

GE APPLIANCES GDT670SGV Interior Dishwasher with Hidden Controls

GE APPLIANCES GDT650SYV Interior Dishwasher with Hidden Controls

GE APPLIANCES PDP715SYVFS GE Profile Series Interior Dishwasher

GE APPLIANCES PDT715SYV Interior Dishwasher with Hidden Controls

GE APPLIANCES PDT705SYWFS Dishwasher

GE APPLIANCES GDT565HSYSS Energy Star Hybrid Tub Dishwasher

GE APPLIANCES GD*650-670 Series Interior Dishwasher


BOSCH SMV2HVX02E-01 Dishwasher

Haier HDW13F0S1 Hygiene Dishwasher

WASHTECH XP Dishwasher

FISHER PAYKEL DD60DCX9 Double Dishwasher

CMA DISHMACHINES EST-66 Conveyor Dishwasher

FISHER and PAYKEL DW60FC2X2 Contemporary Dishwasher

FISHER AND PAYKEL DD24ST4NX9 Dishwasher

BOSCH SHP65CM2WH Dishwasher

VALBERG VAL12C47SSC Dishwasher

FISHER AND PAYKEL DW60UT4I2 Built Under Dishwasher