Home > GE Appliances > GE APPLIANCES GSD2100VBB Dishwasher
GE APPLIANCES GSD2100VBB Dishwasher


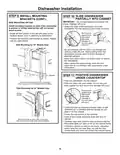


Dishwasher Installation
LEVEL DISHWASHER
IMPORTANT – Dishwasher must be level for proper dish
rack operation, wash performance and door operation. The
dishwasher must be leveled left to right and front to back.
SECURE DISHWASHER
STEP 15
STEP 14
TO COUNTERTOP OR
CABINET (CONT.)
IMPORTANT – Prevent door panel and control
panel damage. Dishwasher must be positioned so
the front panel and control panel do not contact the
adjacent cabinets or countertop. Mounting screws
must be driven straight and flush. Protruding screw
heads could scratch the door panel or control panel
and interfere with door operation.
• Make sure 1/2” minimum gap under the countertop is
maintained.
• Remove the lower dish rack and place a level on the
door and lower rack track as shown in the figure.
Method 1
Secure dishwasher to underside of wood countertop.
• Fasten the dishwasher to the underside of the
countertop with the 2 Phillips head screws. Refer to
figure. Make certain screws are driven straight and
flush to prevent panel damage.
Use Level to Check
Use Level to Check
Front-to-Back
Side-to-Side
Wood Countertop
Screws into Upper Brackets
• If the dishwasher is not
level, adjust the four
Method 2
leveling legs individually.
Secure dishwasher to cabinet sides.
Tip: Prevent unnecessary
service charges. Verify
dishwasher is leveled.
• Remove plug buttons from tub. Do not discard.
• Fasten the dishwasher to the adjacent cabinets with
the 2 Phillips-Head screws provided. Refer to the
figure. Make certain screws are driven straight and
flush to prevent panel damage. Do not screw into
the cabinet face frame.
Pull the dish racks half way
out. They should stay put.
Open and close the door.
The door should fit in the
tub opening without hitting
Turn Legs
to Adjust
• Re-install plug buttons.
Solid Surface Countertop
the side of the tub. If the
racks roll on their own, or the door hits the side of tub,
re-level the dishwasher.
IMPORTANT – After leveling, verify that the dishwasher
is still in the correct position shown in Step 11.
Plug Buttons
Screws into Side Brackets
• Re-check that the dishwasher is square and level at
both the top and bottom of the cabinet opening, with no
twisting or distortion of the tub or door after mounting to
the cabinets/countertop. Adjust if necessary.
SECURE DISHWASHER
TO COUNTERTOP OR
STEP 15
CABINET
Countertop Mounting
(18” Model Bracket Shown)
In this step you will need
the 2 remaining Phillips
Head screws from the
screws set aside in the
PREPARATION section.
• Confirm all leveling legs are in contact with the floor
to prevent the dishwasher from rocking and ensure
proper door and latch operation.
Both Methods
Countertop
The dishwasher must be
secured to the countertop
or the cabinet sides.
Side Mounting
(24” Model Bracket
Shown)
1/2"
Min.
Dishwasher Door
When the underside of the
countertop is wood, use Method 1 (Countertop Mounting).
• When step is complete, close dishwasher door
and verify that gap between countertop and top of
dishwasher door is at least 1/2”.
Use Method 2 (Side Mounting) when the underside of
the countertop is made of a material, such as granite,
that will not accept wood screws.
11
| General | Details |
|---|---|
| Name | GE APPLIANCES GSD2100VBB Dishwasher |
| Make | GE Appliances |
| Language | English |
| Filetype | PDF (Download) |
| File size | 0.86 MB |


GE APPLIANCES GTW845 Dishwasher

GE APPLIANCES GDF550PGR Plastic Interior Dishwasher with Front Controls

GE APPLIANCES PDT755SYV/BTV UltraFresh System Dishwasher with Interior

GE APPLIANCES GDT670SGV Interior Dishwasher with Hidden Controls

GE APPLIANCES GDT650SYV Interior Dishwasher with Hidden Controls

GE APPLIANCES PDP715SYVFS GE Profile Series Interior Dishwasher

GE APPLIANCES PDT715SYV Interior Dishwasher with Hidden Controls

GE APPLIANCES PDT705SYWFS Dishwasher

GE APPLIANCES GDT565HSYSS Energy Star Hybrid Tub Dishwasher

GE APPLIANCES GD*650-670 Series Interior Dishwasher


Hotpoint HFC 3C26 WC Dishwasher

Electrolux LSV48400L Dishwasher

ASKO DFI544D Dishwasher

BOSCH SMS6ITI01I Dishwasher

Samsung DW80CB5450 Series Dishwasher

BOSCH SHX4AEF5N Dishwasher

FISHER PAYKEL DD24STX6PX1 Dishwasher

BOSCH SMS67NI10M Dishwasher

BOSCH SPI2HKS08E Dishwasher
EVERDURE DWC066WE 55cm 6 Place Settings Free Standing Dishwasher