Home > GE Appliances > GE APPLIANCES GSD2100VBB Dishwasher
GE APPLIANCES GSD2100VBB Dishwasher


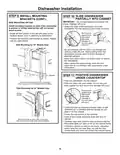


Dishwasher Installation
REMOVE TOEKICK
STEP 3
STEP 1
CHECK DOOR BALANCE
• Remove the 4 toekick screws
and the 2-piece toekick. Set
aside for use in Step 19.
CAUTION
Opening the door will cause the
dishwasher to tip forward when it
is not fully installed. When opening
the door prior to the dishwasher
being fully installed, hold the top of
the dishwasher securely with one hand and hold the
door with the other hand. Gloves should be worn.
To check the door balance, hold the top of the dishwasher
firmly.
• Check the door balance by opening and closing the
door.
18” Models
• If the door drops
when released,
increase the
spring tension.
If the door rises
when released,
decrease the
Only
INSTALL POWER CORD
Skip this step if the dishwasher will be permanently
connected to the house electrical system or has a
factory-installed power cord.
• The power cord and connections must comply with
the National Electrical Code, Section 422 and/or local
codes and ordinances. Maximum power cord length is
6 feet. Power Cord Kit WX09X70910 or WX09X70911,
available for purchase from an authorized
STEP 4
Increase
Decrease
spring tension.
GE Appliances dealer, meets these requirements.
UL Listed Wire Nuts
Ground/
Green
Black
White
24” Models
Only
Junction Box
Cover
Strain
Relief on
Power
Cord
Increase
Dishwasher
Ground Wire
and Screw
Decrease
Dishwasher
Wires
Dishwasher Ground
Wire and Screw
Junction Box Bracket
• Remove junction box cover.
• Install strain relief in the junction box bracket.
• Insert the power cord through the strain relief and tighten.
• Make sure black, white and green dishwasher wires are
threaded through the hole in the junction box bracket.
• Connect power cord white (or ribbed) to dishwasher
white, black (or smooth) to dishwasher black and
ground to dishwasher green wire. Use UL-listed wire
nuts of appropriate size.
• Replace junction box cover using the screw. Be sure
wires are not pinched under the cover.
ADJUST LEVELING LEGS
• Move the dishwasher close to the installation location
and lay it on its back. NOTE: Do not place the
dishwasher on its side.
• Measure installation height and dishwasher height.
Extend leveling legs out from the dishwasher base,
1/2” less than installation height.
STEP 2
Leveling leg
Adjust to
Installation
Height
shown with the
dishwasher laying
on its back
6
| General | Details |
|---|---|
| Name | GE APPLIANCES GSD2100VBB Dishwasher |
| Make | GE Appliances |
| Language | English |
| Filetype | PDF (Download) |
| File size | 0.86 MB |


GE APPLIANCES GTW845 Dishwasher

GE APPLIANCES GDF550PGR Plastic Interior Dishwasher with Front Controls

GE APPLIANCES PDT755SYV/BTV UltraFresh System Dishwasher with Interior

GE APPLIANCES GDT670SGV Interior Dishwasher with Hidden Controls

GE APPLIANCES GDT650SYV Interior Dishwasher with Hidden Controls

GE APPLIANCES PDP715SYVFS GE Profile Series Interior Dishwasher

GE APPLIANCES PDT715SYV Interior Dishwasher with Hidden Controls

GE APPLIANCES PDT705SYWFS Dishwasher

GE APPLIANCES GDT565HSYSS Energy Star Hybrid Tub Dishwasher

GE APPLIANCES GD*650-670 Series Interior Dishwasher


BOSCH SBV4HVX00E Dishwasher

IKEA PROFFSIG Integrated Dishwasher

AIRMSEN AE-TDQR03 Complete Dishwasher

IKEA LAGAN Dishwasher

KUCHT KD240PR Panel Ready Dishwasher

SIEMENS 9001881808 Fully Iintegrated Dishwasher

IKEA 704.755.04 MEDELSTOR Integrated Dishwasher

Whirlpool WDT970SAKZ Dishwasher

Oursson DW4001TD Dishwasher

SIEMENS SN63HX00CS Dishwasher