caple DI641 Dishwasher


D i s h wa s h e r
I n s t r u c t i o n M a n u a l
DI641

| General | Details |
|---|---|
| Name | caple DI641 Dishwasher |
| Make | caple |
| Language | English |
| Filetype | PDF (Download) |
| File size | 3.62 MB |


caple DI654 Dishwasher

caple DI631 Dishwasher
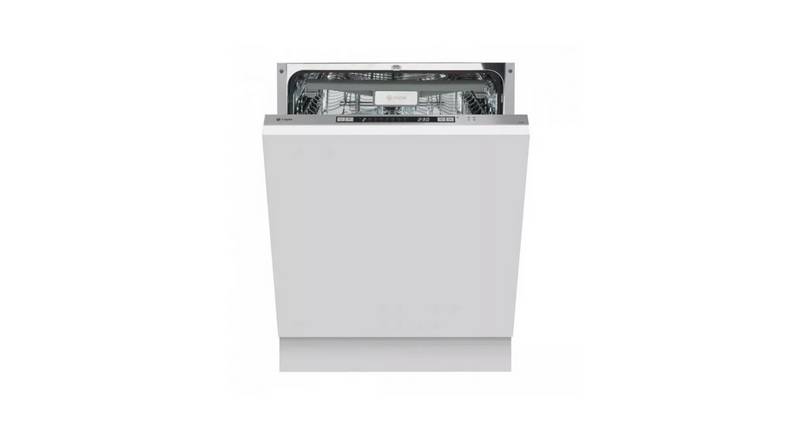
caple DI641 Dishwasher Overview
Summary of Contents
- Page 1: Dishwasher instruction manual DI641
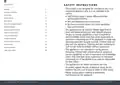
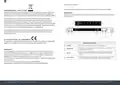
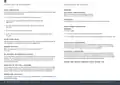
- Page 2: Safety instructions highlight that the product is a household appliance and not designed for commercial use. It should not be used in staff kitchen areas, bed and breakfast environments, or by clients in hotels and motels. Children aged 8 and above can use the appliance with supervision, but they should not play with it. Cleaning and maintenance should not be performed by children without supervision. The appliance is intended for indoor household use only. To prevent electrical shock, do not immerse the unit, cord, or plug in water or other liquids. Unplug the appliance before cleaning or performing maintenance. The instruction manual should be kept for future reference.
- Page 3: Use a slightly moistened soft cloth with mild soap, and then use a dry cloth to wipe it again. When loading items to be washed, locate sharp items so that they are not likely to damage the door seal. Warning: Knives and other utensils with sharp points must be loaded in the basket with their points down or placed in a horizontal position. Check that the detergent powder is empty after completion of the wash cycle. Do not wash plastic items unless they are marked dishwasher safe or the equivalent. Use only detergent and rinse additives designed for an automatic dishwasher. Children should be supervised to ensure that they do not play with the appliance. The appliance may only be used with correctly adjusted door springs. This appliance must be earthed. Do not modify the plug provided with the appliance.
- Page 4: The appliance is to be connected to the water mains using new hose sets and that old hose-sets should not be reused. To save energy, in standby mode, the appliance will switch off automatically while there is no operation in 30 minutes. Ensure the voltage and frequency of the power corresponds to those on the rating label. Only insert the plug into an electrical socket which is earthed properly. This appliance must be earthed to reduce the risk of electric shock. Do not use an extension cord or an adapter plug with this appliance. Do not cut or remove the earthing connection from the power cord. Please look at the rating label to know the rating voltage and connect the dishwasher to the appropriate power supply. Improper connection of the equipment grounding conductor can result in the risk of an electric shock. Please keep this instruction manual for future reference.
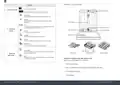
- Page 5: Control panel For detailed operating method read the corresponding content on the instruction manual. Environmental protection Waste electrical products should not be disposed of with household waste. Please recycle where facilities exist. To get the best performance from your dishwasher, read all operating instructions before using it for the first time. This appliance has been manufactured to the strictest standards and complies with all applicable legislation. Press this button to turn on your dishwasher, the screen lights up. Press this button to toggle through and select the appropriate washing program. Your new appliance is covered by warranty. Press this button to set the delayed hours for washing. For small loads, you may use just the upper or lower rack to save energy. If you fail to show your warranty card you will incur all repair charges.
- Page 6: Product overview includes the display and its functions. The display shows the selected program, remaining time, delay time, and error codes. The intensive program is for heavily soiled items like pots and pans. The normal program is suitable for normally soiled loads such as pots, plates, and glasses. The eco program is the standard for normally soiled loads. The glass program is for lightly soiled crockery and glass. The 90 min program is for normally soiled loads needing a quick wash. The rapid program is a shorter wash for lightly soiled loads without drying. The prewash is for rinsing dishes planned to be washed later. Prior to using the dishwasher for the first time, set the water softener, add dishwasher salt, fill the rinse aid dispenser, and fill in detergent.
- Page 7: Loading the salt into the softener. The salt container is located beneath the lower basket and should be filled as explained. The water softener must be set manually, using the water hardness dial. The water softener is designed to remove minerals and salts from the water. The softener should be adjusted according to the hardness of the water in your area. Only use salt specifically designed for dishwashers. The dishwasher allows for adjustment in the amount of salt consumed based on water hardness. Only fill with salt before running a cycle to prevent corrosion. Follow the steps for adjustment in salt consumption. Contact your local water board for information on the hardness of your water supply.
- Page 8: Please follow the steps below for adding dishwasher salt. The rinse aid is released during the final rinse to prevent water from forming droplets on your dishes, which can leave spots and streaks. Only use branded rinse aid for dishwasher. Never fill the rinse aid dispenser with any other substances. When to refill the rinse aid dispenser. You should never let the rinse aid level be less than 1/4 full. The salt warning light will turn off after the salt container has been filled with salt. Immediately after filling the salt into the salt container, a washing program should be started. The chemical ingredients that compose the detergent are necessary to remove, crush and dispense all dirt out of the dishwasher. Use only detergent specifically made for dishwasher use. Dishwasher detergent is corrosive. Keep dishwasher detergent out of the reach of children. Please keep this instruction manual for future reference.
- Page 9: Filling the rinse aid reservoir involves removing the cap, pouring the rinse aid, and closing the cap. For the detergent dispenser, open the flap, add detergent for the main wash cycle, and close the flap. Clean up any spilled rinse aid to avoid excessive foaming during the next wash. Adjust the rinse aid reservoir by turning the indicator dial to a number between 1 and 6 based on drying results. If dishes are not drying properly, increase the rinse aid setting. Reduce the setting if there are sticky stains or a bluish film on glassware. Observe the manufacturer’s recommendations on the detergent packaging. Keep this instruction manual for future reference.
- Page 10: Recommendations for loading the dishwasher include scraping off large amounts of leftover food and softening burnt food remnants. It is not necessary to rinse dishes under running water. For best performance, follow specific loading guidelines. Consider buying utensils identified as dishwasher-proof. Place items such as cups, glasses, and pots facing downwards. Do not remove glass and cutlery immediately after the program ends to prevent damage. Curved items should be loaded at an angle to allow water to run off. Ensure all utensils are stacked securely and cannot tip over. Certain cutlery and dishes are not suitable for washing, including those with wooden or glued parts, plastic items that are not heat resistant, and pewter or copper items. Load hollow items with openings facing downwards to prevent water collection. Avoid overloading the dishwasher for optimal results and energy consumption. Some types of glasses may become dull after multiple washes, and silver or aluminum parts may discolor. Very small items should not be washed in the dishwasher as they could fall out of the basket.
- Page 11: Removing the dishes To prevent water dripping from the upper basket into the lower basket, we recommend that you empty the lower basket first and then the upper basket. The upper basket is designed to hold more delicate and lighter dishware such as glasses, coffee and tea cups and saucers, as well as plates, small bowls and shallow pans. Pots, serving bowls, etc., must always be placed top down. Deep pots should be slanted to allow water to flow out. The Bottom Basket features folding spikes so that larger or more pots and pans can be loaded. We suggest that you place large items and the most difficult to clean items into the lower basket. Cutlery should be placed in the cutlery rack separately from each other in the appropriate positions. Do not let any item extend through the bottom. Always load sharp utensils with the sharp point down.
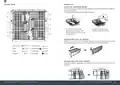
- Page 12: Cutlery rack Basket tips Adjusting the upper basket The height of the upper basket can be easily adjusted to accommodate taller dishes in either the upper or lower basket. To adjust the height of the upper rack, follow these steps: To raise the rack to the upper position, lift rack until both sides are at the same height. The rack will secure into place. To lower the rack, pull on the handles and push the rack down. Folding back the cup shelves To make room for taller items in the dishwasher basket, raise the cup rack upwards. You can then lean the tall glasses against it. Folding back the rack shelves The spikes are used for holding plates and a platter. They can be lowered to make more room for large items.
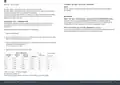
- Page 13: Cutlery rack tips Programming the dishwasher Wash cycle table The table shows which programmes are best for the levels of food residue and how much detergent is needed. Lift the left basket up, adjust it to lower position. Lift the right basket up, both left and right baskets are flat. Move the right basket from right to left, creating more space for taller glasses. Remove the right basket from the tray. Please keep this instruction manual for future reference.
- Page 14: Cleaning and maintenance This program is the test cycle for comparability tests in accordance with EN 50242. External care Draw out the lower and upper basket, load the dishes and push them back. Clean the door seals regularly with a soft damp cloth to remove food deposits. Pour in the detergent and ensure the water supply is turned on to full pressure. Open the door, press the power button, and choose a program to start the cycle. To avoid water penetration, do not use a spray cleaner on the control panel. A wash cycle can only be changed if it has been running for a short time. Check the condition of the filters regularly and clean them if necessary. A forgotten dish can be added any time before the detergent dispenser opens. It is dangerous to open the door mid-cycle, as hot steam may scald you.
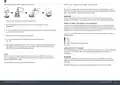
- Page 15: Spray arms need to be cleaned regularly to prevent clogging from hard water chemicals. To clean the spray arms, follow specific instructions for removing and reassembling filters. Hold the coarse filter and rotate it anticlockwise to unlock and lift it out of the dishwasher. The fine filter can be detached from the main filter by squeezing the tabs at the top. To remove the upper spray arm, hold the nut in the center and rotate it counter-clockwise. Larger food remnants can be rinsed off the filter under running water or cleaned with a soft brush. Reassemble the filters in reverse order and ensure they are securely replaced to avoid blockages. Never use the dishwasher without filters in place, as improper replacement may reduce performance and damage dishes. Keep the instruction manual for future reference.
- Page 16: Caring for the dishwasher Installation instruction Frost precaution Please take frost protection measures on the dishwasher in the winter. Disconnect electrical power before installing dishwasher. The installation of the pipes and electrical equipment should be done by professionals. After every wash, we recommend that you turn off the water supply to the appliance. Please look at the rating label to know the rating voltage and connect the dishwasher to the appropriate power supply. Before cleaning or performing maintenance, always remove the plug from the socket. To clean the exterior and rubber parts of the dishwasher, do not use solvents or abrasive cleaning products. It is recommended that you run a wash cycle with the dishwasher empty and then remove the plug from the socket.
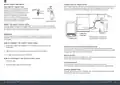
- Page 17: Water supply and drain connection Insert the drain hose into a drain pipe with a minimum diameter of 4 cm, ensuring it is not bent or crimped. The height of the drain pipe must be less than 100 cm. The free end of the hose must not be immersed in water to avoid backflow. Connect the cold water supply hose to a threaded 3/4 inch connector and ensure it is fastened tightly. If the water pipes are new or unused for an extended period, let the water run to ensure it is clear. The safety supply hose consists of double walls that block water flow if the supply hose breaks. A hose that attaches to a sink spray can burst if installed on the same water line as the dishwasher. If the sink is higher than 100 cm from the floor, excess water in hoses must be drained into a bowl or suitable container. If you need a drain hose extension, use a similar hose no longer than 4 meters. The waste connection must be at a height less than 100 cm from the bottom of the dishwasher.
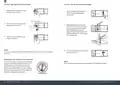
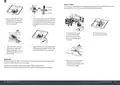
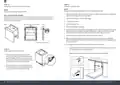
- Page 18: Position the appliance in the desired location with the back against the wall and sides along adjacent cabinets or walls. The dishwasher is equipped with water supply and drain hoses that can be positioned to the right or left sides for proper installation. The installation position should be near existing inlet and drain hoses and power cord. Once positioned, the height of the dishwasher can be adjusted via the screwing level of the feet. There should be less than 5 mm between the top of the dishwasher and cabinet, with the outer door aligned to the cabinet. If installed at the corner of the cabinet, maintain a gap of at least 50 mm when the door is opened to adjacent cabinets. Depending on the location of the electrical outlet, a hole may need to be cut in the opposite cabinet side. Keep this instruction manual for future reference.
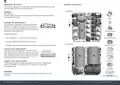
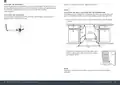
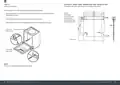
- Page 19: Furniture door panel’s dimensions and installation Dishwasher installation steps Please refer to the specified installation steps in the installation drawings. The furniture door weight should be 5-7KG. Install the hook on the furniture door panel and put the hook into the slot of the outer door of the dishwasher. Connect the inlet hose to the cold water supply. Level the dishwasher. Adjust the tension of the door springs by using a screwdriver. The dishwasher must be secured in place. The door spring tension is correct when the door remains horizontal in the fully opened position.
- Page 20: Aesthetic door panel dimensions and installation The dishwasher must be level for proper operation and wash performance. Place a spirit level on the door and rack track inside the dishwasher to check that the dishwasher is level. Level the dishwasher by adjusting the three levelling legs individually. When levelling the dishwasher, please pay attention not to let the dishwasher tip over. The maximum adjustment height of the feet is 50 mm. Please keep this instruction manual for future reference.
- Page 21: Troubleshooting A spray arm is knocking against an item in a basket. Interrupt the programme, and rearrange the items which are obstructing the spray arm. Rattling noise in the wash cabinet. Interrupt the programme, and rearrange the items of crockery. Fuse blown, or the circuit breaker acted. Replace fuse or reset circuit breaker. Remove any other appliances sharing the same circuit with the dishwasher. Power supply is not turned on. Make sure the dishwasher is turned on and the door is closed securely. The dishes were not loaded correctly. See notes in “Loading the Dishwasher Baskets”. Water pressure is low. Check that the water supply is connected properly and the water is turned on. Items are blocking the path of spray arms. Rearrange the items so that the spray can rotate freely. Filter clogged. Check coarse filter. Improper detergent. Use only the special dishwasher detergent to avoid suds. Detergent with colourant was used. Make sure that the detergent is the one without colourant.
- Page 22: Error codes indicate malfunctions in the appliance. Improper loading can lead to issues. Too little rinse aid may cause problems. E1 code suggests that the faucet is not opened or water intake is restricted. Dishes removed too soon can affect drying. E3 code indicates a malfunction of the heating element. Selecting the wrong program can lower cleaning performance. Overflow issues require turning off the main water supply. Water in the base pan should be removed before restarting the dishwasher. Keep the instruction manual for future reference.
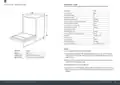
- Page 23: Technical information for household dishwasher according to EU Directive 1016/2010 & 1059/2010. Manufacturer: Caple. Type/Description: DI641. Standard place settings: 14. Energy efficiency class: A++. Annual energy consumption: 266 kWh. Power consumption of off-mode: 0.45 W. Noise level: 47 dB(A) re 1 pW. Program duration of the standard cleaning cycle: 190 min. Dimensions: Height 815mm, Width 598mm, Depth 550mm (with the door closed).
- Page 24: Please keep this instruction manual for future reference. Instruction manual DI641.
- Page 25: Page 25

Whirlpool W8I HP42 L MaxiSpace Dishwasher

BOSCH SMS2ITI06X-60 Dishwasher

BOSCH SHE4AEM6N 100 Series Black Full Console Dishwasher

CMA DISHMACHINES EST-66 Conveyor Dishwasher

BOSCH SGV43C53 Custom Panel ADA Compliant Dishwasher

Electrolux ESF6768KXA Dishwasher

CMA DISHMACHINES CMA-180UC Under Counter Dishwasher

FISHER PAYKEL DOOR DD60ST Door Panel Integrated Tall Single DishDrawer Dishwasher

IKEA 004.754.18 DISKAD Dishwasher

RANGEMASTER RDWP6015-I54 Integrated Dishwasher