
Home > GE Appliances > GE APPLIANCES DT605PSMSS with Plastic Interior Dishwasher
GE APPLIANCES DT605PSMSS with Plastic Interior Dishwasher


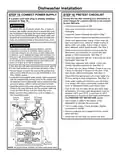




Dishwasher Installation
SLIDE DISHWASHER
STEP 7
INSTALL DRAIN HOSE,
THROUGH CABINET (CONT)
• Position dishwasher in front of cabinet opening.
Insert drain hose into the hole in cabinet side. If
a power cord is used, guide the end through a
separate cabinet opening.
STEP 6
THREE-FOURTHS OF
THE WAY INTO CABINET
(CONT)
• As you proceed, pull the drain hose through the
opening under the sink. Stop pushing when the
dishwasher extends about 6 inches forward of
adjacent cabinets.
• Make sure drain hose is not kinked under or behind
the dishwasher.
Pull insulation
blanket over
collar
• Make certain the house wiring, drain line and
water line do not interfere with components under
dishwasher.
House
Insulation
Wiring
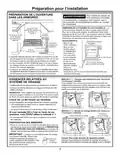
INSTALL TRIM PIECES
STEP 8
Blanket
Power Cord
(If used)
In this step you will need the trim pieces set aside in Step 1.
Top Trim
(on some models)
Drain
Hose
Water
Line
Ensure drain hose is not
twisted or pinched
Maximum drain hose
length is 16' from the
rear of the dishwasher
Side
Trim
Do not disconnect or remove high
drain loop from left side of dishwasher
Top View
Tip: Prevent unnecessary service call charges for
fill, drain or noise concerns.
Side
Trim
Position utility lines so they do not interfere with
anything under or behind the dishwasher.
Reposition the insulation blanket over the collar, as
shown.
Side Trim
Fully seat to tub flange
Tub frame
SLIDE DISHWASHER
THREE-FOURTHS OF
THE WAY INTO CABINET
STEP 7
Tub trim
IMPORTANT – Do not push against front panel with
Door
knees. Damage will occur.
Top
View
• Grasp the sides of the front panel and slide
dishwasher into the opening a few inches at a time.
Handle
• Select the top trim piece and line up center to the
top latch. Press the trim piece onto the tub flange
moving from one side to the other.
• Select the left trim piece. Align top edge with the top
trim and press it onto the left side of the tub flange
moving from the top to the bottom. Repeat for the
right side tub flange trim piece.
Do not push against
front door panel with
knee. Damage to the
door panel will occur.
8

| General | Details |
|---|---|
| Name | GE APPLIANCES DT605PSMSS with Plastic Interior Dishwasher |
| Make | GE Appliances |
| Language | English |
| Filetype | PDF (Download) |
| File size | 10.94 MB |
 (1 votes, average: 5.00 out of 5)
 Loading...

GE APPLIANCES GTW845 Dishwasher

GE APPLIANCES GSD2100VBB Dishwasher

GE APPLIANCES GDF550PGR Plastic Interior Dishwasher with Front Controls

GE APPLIANCES PDT755SYV/BTV UltraFresh System Dishwasher with Interior

GE APPLIANCES GDT670SGV Interior Dishwasher with Hidden Controls

GE APPLIANCES GDT650SYV Interior Dishwasher with Hidden Controls

GE APPLIANCES PDP715SYVFS GE Profile Series Interior Dishwasher

GE APPLIANCES PDT715SYV Interior Dishwasher with Hidden Controls

GE APPLIANCES PDT705SYWFS Dishwasher

GE APPLIANCES GDT565HSYSS Energy Star Hybrid Tub Dishwasher


Hotpoint HFC 3C26 WCUK Dishwasher

BOSCH SMH4ECX21E Dishwasher

Fisher Paykel DW60UT4I2 Built Under Dishwasher

BOSCH SMS2HVI66G Dishwasher

Bertazzoni DW24T3IXV Dishwasher

HOBART S.48820 Commercial Dishwasher
BOSCH SBH4ITX12E Dishwasher

BOSCH SMS6ITI00I Dishwasher

caple DI654 Dishwasher

CAFE CDD220P4WW2 Smart Drawer Dishwasher