
Home > GE Appliances > GE APPLIANCES DT605PSMSS with Plastic Interior Dishwasher
GE APPLIANCES DT605PSMSS with Plastic Interior Dishwasher


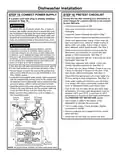




Dishwasher Installation
CONNECT POWER SUPPLY
PRETEST CHECKLIST
STEP 15
STEP 16
Review this list after installing your dishwasher to
avoid charges for a service call that is not covered
by your Warranty.
If a power cord with plug is already installed
proceed to Step 18.
WARNING
• Check to be sure power is OFF.
To reduce the risk of electric shock, fire, or injury to
persons, the installer should check to ensure that wires
are not pinched or damaged, the house wiring is attached
to the junction box bracket through a strain relief, and
all electrical connections made at the time of install (wire
nuts) are contained inside of the junction box cover.
• Open door and remove all foam and paper
packaging.
• Locate the Owner’s Manual set aside in Step 1.
• Read the Owner’s Manual for operating instructions.
• Check door opening and closing. If door does not
open and close freely, check for proper routing of
spring cable over pulley. If door drops or closes
when released, adjust spring tension. See Step 2.
ADVERTENCIA
Para reducir el riesgo de descarga eléctrica, incendio
o lesiones a personas, el instalador deberá realizar un
control para asegurar que los cables no estén pellizcados
ni dañados, que el cableado del hogar esté conectado a la
ficha de la caja de empalmes a través de un amortiguador
de refuerzo, y que todas las conexiones eléctricas realizadas
en el momento de la instalación (tuercas para cables) estén
dentro de la tapa de la caja de empalmes.
• Check to be sure that wiring is secure under the
dishwasher, not pinched or in contact with door
springs or other components. See Step 17.
• Check door alignment with tub. If door hits tub, level
dishwasher. See Step 13.
• Check door alignment with cabinet. If door hits
cabinet, reposition dishwasher. See Step 12.
In this step you will need the junction box cover and the
#10 Hex head screw from the screws set aside in Step 1.
• Secure house wiring to the back of the junction box
with a strain relief as shown in the MATERIALS YOU
WILL NEED section.
• Locate the 3 dishwasher wires, (white, black and green)
with the stripped ends coming out of the AC jumper. Use
UL-listed wire nuts of appropriate size to connect incoming
ground to green, white to white and black to black.
• Install the junction box cover using #10 hex head screw.
Check to be sure that wires are not pinched under the
cover and that all wire nuts are inside the cover.
• Make sure that the junction box cover is resting on
the mounting bracket.
• Pull lower rack out, about halfway. Check to be sure
it does not roll back or forward on the door. If the
rack moves, adjust leveling legs. See Step 13.
• Check that door spring does not contact water line,
fill hose, wiring or other components. See Step 12.
• Verify water supply and drain lines are not kinked
or in contact with other components. Contact with
motor or dishwasher frame could cause noise.
• Turn on the sink hot water faucet and verify water
temperature. Incoming water temperature must be
between 120°F and 140°F. A minimum of 120°F
temperature is required for best wash performance.
See PREPARE HOT WATER LINE section.
Ground
Screw
Ground
(Green)
AC Power
Connector
• Add 2 quarts of water to the bottom of the
dishwasher to lubricate the pump seal.
• Turn on water supply. Check for leaks. Tighten
connections if needed.
• Remove protective film if present from the control
panel and door.
• Check that tub trim does not contact the door.
Junction
Black Strain White
Relief
Box
Bracket
Junction
Box Cover
NOTE: All ground screws, brackets and wires must remain intact.
13

| General | Details |
|---|---|
| Name | GE APPLIANCES DT605PSMSS with Plastic Interior Dishwasher |
| Make | GE Appliances |
| Language | English |
| Filetype | PDF (Download) |
| File size | 10.94 MB |
 (1 votes, average: 5.00 out of 5)
 Loading...

GE APPLIANCES GTW845 Dishwasher

GE APPLIANCES GSD2100VBB Dishwasher

GE APPLIANCES GDF550PGR Plastic Interior Dishwasher with Front Controls

GE APPLIANCES PDT755SYV/BTV UltraFresh System Dishwasher with Interior

GE APPLIANCES GDT670SGV Interior Dishwasher with Hidden Controls

GE APPLIANCES GDT650SYV Interior Dishwasher with Hidden Controls

GE APPLIANCES PDP715SYVFS GE Profile Series Interior Dishwasher

GE APPLIANCES PDT715SYV Interior Dishwasher with Hidden Controls

GE APPLIANCES PDT705SYWFS Dishwasher

GE APPLIANCES GDT565HSYSS Energy Star Hybrid Tub Dishwasher


FISHER AND PAYKEL DD24SI9 N Dish Drawer Dishwasher

Danby DDW18D1EW Dishwasher

BOSCH SMS26DI01B Dishwasher

SHARP QW-NA1BF47EI-EU Series Dishwasher

Bosch SMV6ZDX16E Fully Integrated Dishwasher

BOSCH SMS4EKW06G Dishwasher

SIEMENS SN63EX03AE Dishwasher

SHARP QW-NA26F39DI-EN Dishwasher

Amana 6000 Master Clean Dishwasher

esatto EBTDWW Benchtop Dishwasher