LG DB425 Dishwasher


39
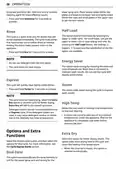
OPERATION
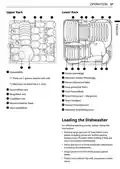
Loading the Upper Rack
Daily Use Load
The upper rack is suitable for delicate items such
as, small plates, long cutlery, cups, glasses and
appliance safe plastic items.
CAUTION
ꢀ
The spray arms must not be blocked by items
that are too tall or hang through the baskets.
Test for free movement by manually rotating the
spray arms.
Cups, glasses and bowls must be positioned upside
down.
Plates should be positioned upwards with the
plate.
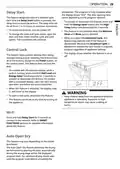
Removing and Replacing Cup
Racks
The left and right cup racks are interchangeable
and can be removed.
The cup racks provide support for long steam
glasses.
1
Slide cup rack down into its closed position.
The left side row of tines can be folded down or the
cup racks can be folded up out of the way for tall
crockery items.
2
Locate assembly slot
a
on cup rack and firmly
pop rack off support bar on that side.
| General | Details |
|---|---|
| Name | LG DB425 Dishwasher |
| Make | LG |
| Language | English |
| Filetype | PDF (Download) |
| File size | 2.93 MB |


LG LDTH7972SS Black Dishwasher

LG SDWB24S3 STUDIO Smart Dishwasher

LG LDTH7972D Smart Tub Dishwasher

LG LDPH7972D Smart Dishwasher

LG XD3A25UMB 15 Place QuadWash Dishwasher

LG LDT779 Dishwasher

LG LDT7808BD Dishwasher

LG LDFN4542S Dishwasher

LG DFB424 Dishwasher

LG LDTS5552D PrintProof Black Dishwasher


FISHER PAYKEL DD24STX6PX1 Dishwasher

BOSCH SMI2ITB33E Dishwasher

FRIGIDAIRE A23549801 Dishwasher

Miele M.-Nr. 12 506 420 Dishwasher

FISHER PAYKEL DD24SCTB9_N Single DishDrawer Dishwasher

FISHER PAYKEL DW24UT4I2 Dishwasher

BOSCH SMH4HVX00G Dishwasher

BOSCH SMS4HCI19E Dishwasher

SAMSUNG DW60CB750UAPSA Bespoke Built Under Dishwasher

FISHER PAYKEL DD24SV2T9 Single Dishwasher