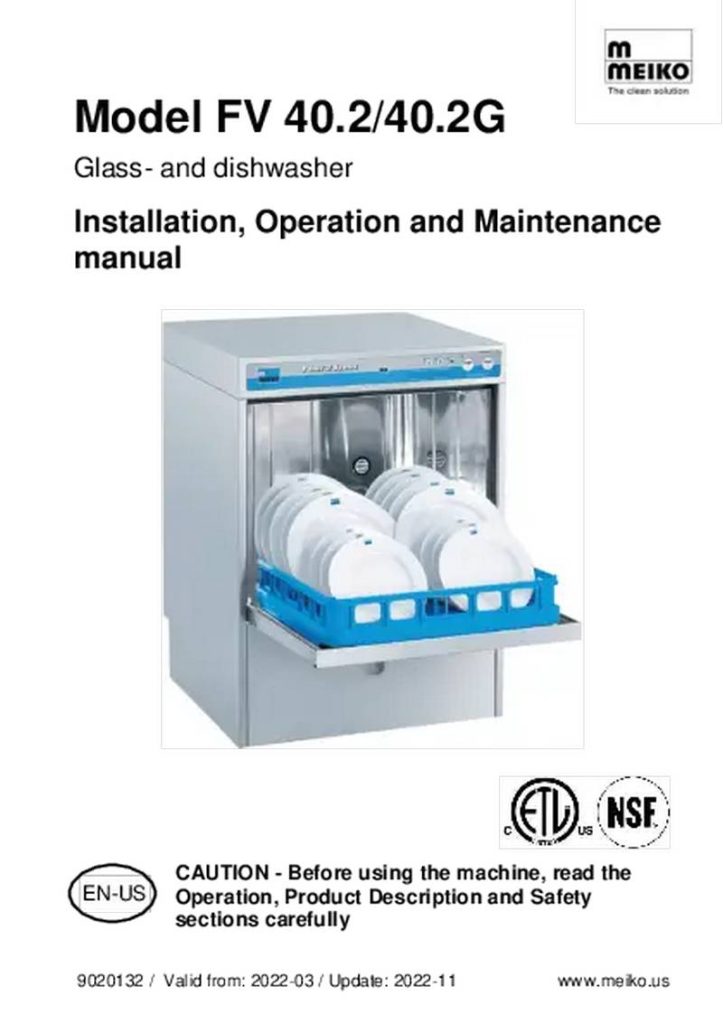
Meiko FV 40.2 Glass and Dishwasher


Model FV 40.2/40.2G
Glass- and dishwasher
Installation, Operation and Maintenance
manual
CAUTION - Before using the machine, read the
Operation, Product Description and Safety
sections carefully
EN-US
9020132 / Valid from: 2022-03 / Update: 2022-11
| General | Details |
|---|---|
| Name | Meiko FV 40.2 Glass and Dishwasher |
| Make | MEIKO |
| Language | English |
| Filetype | PDF (Download) |
| File size | 2.59 MB |


MEIKO UPster U 400 M2 Glass and Dishwasher
Meiko FV 40.2 Glass and Dishwasher Overview
Summary of Contents
- Page 1: Model FV 40.2/40.2G Glass- and dishwasher Installation, operation and maintenance manual Caution - Before using the machine, read the operation, product description and safety sections carefully.
- Page 2: Notes on the operating instructions Product identification Delivery contents Related documents Warnings Notices on use Intended use Misuse Functional description Technical data
- Page 3: Model FV 40.2/40.2G Safety symbols in the instructions Read the operating instructions Disconnect from the power supply Warning of dangerous electric voltage Guarantee activation requires contact with an authorized service partner. Free inspection is provided to ensure proper installation of the dishwasher. The guarantee is not valid until the free inspection has been completed. Read and observe all safety information and instructions. The dishwasher is intended for commercial use only. The washware must be suitable for commercial dishwashers.
- Page 4: Misuse The dishwasher must not be used for washing kitchen utensils with electrical components. It should not be used for cleaning textiles, oven cloths, or steel sponges. Washing utensils made of iron or those that must not come into contact with foodstuff is prohibited. The dishwasher must not be used for cleaning living creatures or washing food for subsequent consumption. Preparing foodstuff in the machine is not allowed. Taking wash water to prepare food or for drinking is prohibited. Washing support grids of electric ranges or grills of gas ranges is not permitted. Disposing of dirty water using the dishwasher is not allowed. Standing or sitting on machine parts, such as the door, is prohibited. Washing dishes made of wood or those with wooden parts is not allowed. Safety information Do not open the door while the program is running. Only operate the dishwasher when it is in perfect working order. Place washware, particularly small items, in the appropriate rack inserts. The washware must not come into contact with the wash arms or rinse arms of the dishwasher. Wear suitable work clothing, protective gloves, and sturdy shoes. Do not wear rings, necklaces, or other pieces of jewelry. Connect the suction lances of the dishwasher correctly to the canisters. Use optional bought-in parts in accordance with the associated instructions.
- Page 5: Model FV 40.2/40.2G Any personnel undergoing training are only allowed to work on the machine under the supervision of an experienced person. No person is under the influence of alcohol, drugs or medication (perceptual disorder). The required qualifications for performing specific work on the machine are determined by MEIKO. Qualified personnel are persons who are over 14 years of age. Qualified personnel must be able to perform the required activities due to their training, experience, and instruction. Qualified personnel must be authorized to perform the required activities by the person responsible for safety of the machine. Qualified personnel must have read and understood the operating instructions and corresponding safety information. The instructions must be acknowledged in writing.
- Page 6: Electromagnetic compatibility This equipment has been tested and found to comply with the limits for a Class A digital device, pursuant to part 15 of the FCC Rules. These limits are designed to provide reasonable protection against harmful interference when the equipment is operated in a commercial environment. This equipment generates, uses, and can radiate radio frequency energy and, if not installed and used in accordance with the instruction manual, may cause harmful interference to radio communications. Operation of this equipment in a residential area is likely to cause harmful interference in which case the user will be required to correct the interference at his own expense. Product description The dishwasher has one wash cycle and one final rinse cycle. A temperature controller keeps the set wash temperature at 155°F (66°C), minimum. A rotary pump circulates the water from the wash tank into the wash nozzles. The wash cycle is followed by a fresh water final rinse. A separate nozzle system rinses the washware using hot fresh water with at least 180°F (82°C).
- Page 7: Overview illustration Membrane keypad has 5 keys and 4 control lights. The display reports current temperatures of wash and rinse water. It displays information messages and error codes where applicable. Control lights indicate readiness for operation, active wash program, and running wash cycle. Dosing units for detergent and rinse aid are located behind the front panel. Front panel includes a handle for service purposes. Wash chamber door is part of the design. Square rack is included in the structure. Membrane keypad is essential for operation. Key features are highlighted for user reference.
- Page 8: Key functions of the dishwasher include the START key, which initiates the program and indicates with a control light when the wash program is running. A flashing control light signifies that the self-cleaning or drain program is in operation. The STOP key allows the user to halt the program and prepares the self-cleaning feature. Program keys 1 to 3 enable the selection of different wash programs, with corresponding control lights indicating readiness for operation. Flashing control lights on these keys show that the dishwasher is being prepared for operation.
- Page 9: Model FV 40.2/FV 40.2 G Current wash temperature Current final rinse temperature Wash programs Short: Lightly soiled washware Standard: Typically soiled washware Intensive: Heavily soiled washware Setpoint for wash cycle time Setpoint for boiler temperature The concentration of the rinse aid in the water remains constant.
- Page 10: The rating plate is on the inside of the front panel and on the right side panel. The rating plate includes the name and address of the manufacturer. The model name is listed on the rating plate. The serial number is included on the rating plate. The rating plate specifies the frequency and voltage. It indicates the number of phases and the incoming water temperature in both Fahrenheit and Celsius. The rated current is also part of the information on the rating plate. Minimum water temperatures for the wash tank and final rinse are provided in both Fahrenheit and Celsius. The rating plate details the minimum duration of wash and rinse cycles. It includes the total cycle duration and the duration of the drain cycle.
- Page 11: Model FV 40.2/40.2G Detergent and rinse aid Warning – Risk of injury from contact with chemicals Observe the safety data sheets and dosing recommendations of the chemical manufacturers. Use safety eyewear. Wear protective gloves. Do not mix different chemical products. Only use products that are suitable and approved for commercial dishwashers. Detergents are alkaline and are needed to dissolve soiling from the washware. Rinse aids are acidic and accelerate drying of the washware by reducing the surface tension of the water.
- Page 12: Checking the correct dosing settings is essential for optimal performance. Run three empty wash cycles to cycle the water system and obtain accurate test results. If the detergent setting is too low, dishes may not be adequately cleaned. Adjusting the program time may help if the detergent setting is insufficient. Low rinse aid settings can cause spotting and streaking on dishes. Excessive chemical use can lead to waste and may require concentration adjustments. Only authorized personnel should make adjustments to the chemical dosing system. Dosing units require regular maintenance and replacement as per specifications. The service life of dosing units depends on using suitable chemicals. Changing detergent products may cause crystallization and affect the dosing system.
- Page 13: Model FV 40.2/40.2G Procedure for changing the detergent product: Provide a suitable container with warm water and insert the suction lance. Thoroughly flush the dosing system several times by venting (priming) the lines. Wipe the suction lance and put it into the canister with the other detergent product. Refill the dosing system by venting (priming) the lines. Additional equipment: Auto Safe regulates internal boiler heating to ensure a proper final rinse temperature. Soft Start pumps wash water at reduced pressure for the first few seconds of the wash cycle. A pressure booster pump ensures that the final rinse pressure remains constant. Aqua Stop automatically shuts the machine down if a water leak is detected. MEIKO has created a data sheet that shows machine dimensions as well as connection and consumption values.
- Page 14: Noise emission workplace noise level LpA ≤ 70 dB(A). During shipping and installation, the dishwasher must be positioned upright or on its left side. Some water may remain in the lines after pre-shipping testing. Check that the delivery is complete immediately upon receipt by comparing it with MEIKO’s order confirmation and/or the delivery note. If applicable, submit claims for any missing parts immediately to the freight forwarder and notify MEIKO. Check the machine for shipping damage. If you suspect any shipping damage, the shipping company and MEIKO must be informed immediately in writing. Only qualified personnel may carry out transport works. Always transport the machine on a wooden frame only. Wear protective gloves and safety shoes.
- Page 15: Model FV 40.2/40.2G Transport with care. Unpack the dishwasher only once transport is completed. Open the packaging using a suitable tool. Requirements for installation The area must be frost-free. Freezing temperatures can damage internal components. The area must have a firm floor surface. Uneven flooring can be compensated by adjusting the feet. The area should be away from appliances, furniture, or surfaces that can be damaged by steam. Connect the drain hose to the on-site wastewater pipe. Observe the minimum height for the drain of 24“ (610 mm). Minimum diameter of the drain: 1 ½″ (38 mm). Drain water temperature can be in excess of 150 °F (65 °C).
- Page 16: Requirements for the fresh water connection must comply with local regulations. Fresh water must be of drinking water quality, including treated water. Installation components and materials must be suitable and permitted according to local regulations. A solenoid valve is integrated into the dishwasher's fresh water pipe to shut off the supply in case of a leak. Recommended water hardness is 1–3 grains per U.S. gallon, with a maximum of 6 gpg. Recommended water temperature is 140°F (60°C). Colder water will extend preheat and wash cycle times. The pressure range for the fresh water supply is 8.7–72.5 psi (0.6–5 bar). Measures to ensure correct water pressure include using a pressure booster pump if the minimum flow pressure is too low and a pressure regulator if the maximum pressure is exceeded. A dirt trap must be fitted in the fresh water supply to protect the solenoid valve.
- Page 17: Installation instructions emphasize the importance of positioning the dishwasher upright or on its left side during shipping and installation. Water remaining in the lines after pre-shipping testing can affect the operation of the water level sensor if the unit is not positioned correctly. Installation must be performed only by an authorized service technician. To attach the supply connections, the rear panel of the dishwasher must be removed. The process involves removing and retaining three screws on the bottom of the rear panel. Carefully slide the rear panel down to free the retaining clips along the casing. Remove the rear panel to the back. After installation, reattach the rear panel and tighten using the three screws.
- Page 18: Electrical installation Warning – danger to life from electric shock Work on the electrical system must only be conducted by qualified personnel who comply with the electrotechnical rules. Disconnect the machine from the power supply before removing any casing parts or working on the electrical system. Attach all housing parts again before switching on the voltage. Route the electrical supply line through the strain relief from below and to the main connection terminal block. Fasten the supply line using the strain relief. Leave enough slack in the supply line to prevent stress on the connections. Connect the supply line in accordance with the figure and the wiring diagram.
- Page 19: Protective equipotential bonding is located on the back of the machine near the media connections. Deposits in the fresh water supply can result in damage to the dishwasher. Prior to connection, thoroughly flush the fresh water pipe using fresh water. The fresh water pipe must be sufficiently long so that the dishwasher can be moved for servicing purposes. Connect the fresh water connection of the dishwasher to the fresh water supply.
- Page 20: Connecting the wastewater pipe Route and connect the wastewater hose of the dishwasher to the drain. The drain height must not be higher than 24″ (610 mm). Install a grease trap in the wastewater pipe if this is required by the local regulations.
- Page 21: Connection for wastewater temperature control (optional) The wastewater can have a temperature of more than 150 °F (65 °C). Install a temperature conditioning kit if a lower wastewater temperature is required by local regulations. Connection procedure: Position tempering assembly, as required, behind the machine. Connect cold water supply line to the backflow preventer, using a 1/2” pipe fitting. Connect from drain of the tempering assembly to an indirect waste drain pipe. Connect drain hose from the machine to the drain inlet hose barb and secure with wormgear clamp. Turn on cold water and check for leaks. Fill machine and operate. The drain water exiting the drain water tempering assembly should be no higher than 140 °F (60 °C).
- Page 22: Connecting the dosing system Drain connection Fresh water connection Strain relief for electrical supply Detergent pipe (transparent) Rinse pipe (blue) The FV 40.2 is designed for use with liquid detergent and liquid rinse aid. The hoses at the lower rear are prepared for the supply of detergent and rinse aid. Optionally, the machine can be fitted with internal dosing units for detergent and rinse aid. If machines are not provided with the optional internal dosing units, the hoses must be connected to external dosing units.
- Page 23: Caution regarding unused dosing pipes. Cut and close unused dosing pipes with supplied plug and wire clip. Refer to page 30 for machines with optional internal dosing units. Warning about risk of injury from chemicals. Observe safety data sheets and dosing recommendations. Use safety eyewear and wear protective gloves. Do not mix different chemical products. Delivery includes suction hoses and accessories for canister connection. Prepare hoses for rinse aid and detergent. Have canisters available and screw off their covers.
- Page 24: Insert the rinse aid suction lance and the detergent suction lance in the corresponding canister. Slide the rinse aid hose and the detergent hose onto the associated suction lance hoses. The suction lances must be inserted so that they are completely at the bottom. Clamp the two hoses using a collar clamp. Ensure the machine is level in both directions by using a spirit level. Compensate for an uneven floor by adjusting the feet. Table joints must be sealed with a detergent-resistant sealant. Check that the machine is stable. For disposal of packaging materials, see page 58.
- Page 25: Commissioning Warning - Danger of injury when entering a danger zone Only qualified personnel may work on the machine. Remove unauthorized persons from the danger zone. Block off the danger zone and mark it for third parties. Always wear cut-resistant protective gloves when removing casing parts or working inside the machine. Checking the requirements for commissioning Note - Damage to property due to steam emission Small quantities of steam may escape from the dishwasher. Protect adjacent furniture from swelling. Requirements to be provided by the customer include consistently frost-free storage and installation area, anti-slip floor coverings, and correct connections. Performing commissioning To avoid damage or injuries during machine commissioning, check supplier parts and ensure all tools and foreign parts are removed from the machine.
- Page 26: Model FV 40.2/40.2G Turn on the main switch. Venting of the detergent or rinse pipes must be performed during commissioning to fill the pipes with detergent and rinse aid. The pipes must also be vented if the dosing units have sucked in air. For machines with external dosing systems, the detergent and rinse pipes must be vented in accordance with the manufacturer instructions. For machines with built-in dosing systems, vent the pipes as follows: Press the STOP key for approx. 5 seconds until CodE 1- - - - - is displayed. Press the START key 5 times until 1-1 - - - - - is displayed. Press the program key I. 1-2 - - - - - is displayed. Press the START key. Priming of the rinse pipe will start. If the time has expired and 1-2 - - - - - is displayed, press program key I. 1-3 - - - - - is displayed.
- Page 27: Operation/use Prior to switching on the machine Warning – Risk of injury from contact with chemicals Observe the safety data sheets and dosing recommendations of the chemical manufacturers. Use safety eyewear. Wear protective gloves. Do not mix different chemical products. The dishwasher may only be used if the operating instructions have been read and understood. Ensure the water supply is available. Turn on the main switch. Check the detergent and rinse aid and replace in accordance with the manufacturer instructions, if necessary.
- Page 28: If there is air in the hoses, the dosing function will not work properly. The hoses must be vented. Open the door. Insert the filter, the tank cover sieve and the wash systems. Close the door.
- Page 29: Starting up the dishwasher depends on the temperature of the supplied water and the capacity of the installed boiler or tank heating. The dishwasher is closed and does not have a rack inside. The dishwasher will be filled and heated up, indicated by the control light above the selected program key flashing. Press wash program keys 1, 2, or 3. When the machine is ready to operate, the control light above the selected program key is permanently on. Remove gross leftovers and pour leftover drinks into the sink. Soak cutlery until it will be washed. Do not polish glasses, cutlery, and dishes as even clean and fresh towels may not be germ-free. Always load hollow containers upside down to ensure proper drainage. Keep a space between hollow containers to prevent scratches and select a rack with appropriate compartment dividers for glasses.
- Page 30: Model FV 40.2/40.2G Place plates, trays, and dishes into the racks at an angle with the inner surfaces facing upwards. If cutlery quivers are used, always load the cutlery pieces with the handles down. Load an assortment of spoons, knives, and forks into each cutlery quiver, as identical cutlery often is too closely spaced. Do not overload the individual cutlery quivers. Do not stack dishes in the rack to ensure effective washing. It is more efficient to load the rack with fewer items and run shorter wash cycles. Press the required program key to select the wash program. The control light of the selected program key is on.
- Page 31: Starting the wash cycle involves several steps. Pre-wash the washware by removing any gross food waste, napkins, toothpicks, lemon peel, etc. Open the door and put the washware into the rack. Insert the rack into the dishwasher and close the door. Press the START key to begin the cycle. Change the program if required, as detailed on page 37. The control light indicates that the program is active. If the selected program is not long enough to heat the water to the minimum temperature, the program duration must be extended. The program runs until the minimum temperatures are reached, but for a maximum of 5 minutes.
- Page 32: Unloading the washware Caution – Danger of burns from hot wash water, hot washware and hot machine parts. Wear protective gloves, if necessary. Let the washware cool down before emptying, if necessary. Let the machine cool down before touching machine parts, if necessary. Never open the door during a wash cycle. Only open and close the door using the designated handle(s). At the end of the program, the control light turns off and an acoustic signal sounds. Open the door. Carefully remove the rack. Close the door.
- Page 33: Switching off the machine Warning – danger of scalding Do not open the door during self-cleaning. Press the STOP button. Press the START key. All control lights turn off. The self-cleaning program starts. The control light near the START key flashes. The wash water is pumped out and the wash chamber is sprayed with hot fresh water. At the end of the program, the control light turns off. Now, the machine can be cleaned.
- Page 34: Model FV40.2/40.2G Replacing the canisters Warning – Risk of injury from contact with chemicals Observe the safety data sheets and dosing recommendations of the chemical manufacturers. Use safety eyewear. Wear protective gloves. Do not mix different chemical products. The canisters for detergent and rinse aid are located in close proximity to the dishwasher. When using a suction lance that detects whether a canister is empty, shortage of detergent or rinse aid will be indicated on the display.
- Page 35: Malfunctions can often be resolved without customer service assistance. Common malfunctions include issues such as no water availability and the dishwasher not filling up. Possible causes for no water include a clogged dirt trap or an open door. Remedies for these issues involve opening the shut-off valve and cleaning the dirt trap. Final rinse spraying problems may be due to incorrect product use or dosing quantity adjustments. Streaks or smears on washware can result from incorrect dosing quantity or defective water pre-treatment. Bubbles and streaks on washware may indicate overdosing of detergent. Water drops on washware can occur from underdosing or high dirt levels. Pre-washing washware thoroughly and changing tank water frequently can help mitigate these issues. Foaming hand dishwashing detergent should not be used for pre-cleaning or cleaning the machine to avoid malfunctions.
- Page 36: Model FV 40.2/40.2G Please contact your authorized MEIKO customer service if the listed measures cannot solve the problem. When a malfunction occurs, an information or error message (INFO/ERR) is displayed. Information messages (INFO) can be acknowledged using the START key. Error messages (ERR) usually require the deployment of an authorized service technician. If the machine displays an information or error message not listed in the following tables, contact your service technician. Emergency program active. No boiler/tank heating. No fresh water supply. Door open. Call service technician.
- Page 37: Possible causes and remedies for various issues are outlined. Drain pump may be active after triggering of safety level. The wash tank could be overfilled due to a lack of rinse aid. Empty canisters should be replaced, and suction lances checked for correct insertion. Detergent levels may be low, affecting operation. EEPROM errors can prevent further operation and require a service technician. Leaks in feed hoses or incorrect connections can lead to malfunctions. Boiler levels not reached during filling may indicate issues with water supply or defective components. Incoming water strainers should be checked and cleaned if necessary. Pressure booster pump defects can hinder operation during emptying. Service technician assistance may be needed for unresolved issues.
- Page 38: ERR description for pressure booster includes possible causes and measures for remedy. Loose booster pump requires service call. Defective starting capacitor needs technician attention. Boiler level switch may be defective, causing no signal for pressure booster pump. No signal for boiler full detected from I/O circuit board. Boiler heating may be defective due to welding beads on heater. Temperature sensor issues can arise from incorrect mounting position. Boiler contactor may be defective or circuit breaker triggered, preventing further operation. Boiler temperature not reached after maximum heating time indicates a potential defect. Increased wash time may be due to a defective temperature sensor or contact issues.
- Page 39: ERR description Possible cause Measures/remedy Supply water pressure too low Incoming water strainer dirty Clean incoming water strainer Rinse nozzles dirty Check water supply Tank level analysis disrupted Call service technician, if necessary Further operation not possible Temperature sensor defective, incorrect mounting position
- Page 40: ERR description and possible causes for issues with the dishwasher are provided. Measures and remedies include draining the dishwasher and refilling it, as well as calling a service technician for various errors. Specific error codes such as 306, 307, 310, 311, and 312 indicate different issues related to tank level and temperature sensors. Instructions for modifying settings include the functions of the STOP and START keys, as well as program keys for adjusting values. Users are advised to contact authorized customer service if there are issues with the dishwasher that are not resolved by the listed measures. The document includes a note about the importance of proper plug connections and sensor functionality. It mentions that further operation may not be possible if certain errors occur. The document provides guidance on troubleshooting and addressing error codes. It emphasizes the need for professional assistance in case of unresolved issues. The settings modification section outlines the steps to access programming mode.
- Page 41: Enter the code for the required level. For level 1, it is sufficient to press the START key 5 times. Level 1: Advanced settings (code 11111) Level 2: Dosing settings (code 40044) After entering the correct code, the desired level (1, 4) is displayed in the left field at the first digital position. If the entry is incorrect, the Info 122 message appears. Viewing the parameters involves switching to level 1 (11111), selecting entry 1–1, and confirming the selection. The first parameter is displayed.
- Page 42: Model FV 40.2/40.2G Scroll through and view the parameters using the wash program keys. Level 1 can be exited with the on/off key. Press the STOP key for approx. 5 seconds until CodE 1- - - - - is displayed. Press the START key 5 times until 1-1 - - - - - is displayed. Press the program key I. 1-2 - - - - - is displayed. Press the START key. Priming of the rinse pipe will start. By default, priming takes 180 seconds. Press the STOP key to switch the machine off.
- Page 43: Switch to level 2 (40044), see page 47. The parameters relevant for the dosing technology are displayed and can be changed. Dosing quantity for rinse aid: 0.10–1.00 ml/l (0.20 is the default setting). Dosing quantity for detergent: 0.10–20.0 ml/l (2.00 is the default setting). Lack of rinse aid indication: 1/0 = Display on/off (1 is the default setting). Lack of detergent indication: 0 = Do not activate; 1 = Activate through calculated runtime (default setting). Activation mode for rinse aid dosing unit: 0 = Do not activate; 1 = Activate through calculated runtime. Activation mode for detergent dosing unit: 0 = Do not activate; 1 = Activate through calculated runtime. Capacity of rinse aid dosing unit: 0.10–10 l/h - Must be set to 1.3 l/h. Capacity of detergent dosing unit: 0.10–20 l/h - Must be set to 7.0 l/h.
- Page 44: Cleaning the interior Caution - Danger of burns from hot machine parts Allow the machine to cool down before cleaning. Wear protective gloves, if necessary. Only use the handles provided for opening or closing. Caution - Property damage to electrics due to water ingress Never wash the machine, control cabinets and other electrical components using a water hose or high-pressure cleaner. Make sure that no water can enter the machine unintentionally. Do not use a foaming hand dishwashing detergent for pre-cleaning the dishes. Do not use detergents or stainless steel cleaning agents on the interior of the machine. Foam causes malfunctions and poor washing results.
- Page 45: Remove the tank cover sieve and the filter. Take the wash arms at the top and bottom out once a week. Observe the top and bottom rinse arm marking. Remove all food residues sticking to the tank, the tank heater, and the sieves using a brush. Rinse the filters, sieves, and the wash and rinse arms thoroughly under running water. Pay particular attention to the nozzles when rinsing. Reinstall all parts in reverse order. MEIKO recommends leaving the door open slightly overnight.
- Page 46: Model FV 40.2/40.2G Cleaning the membrane keypad should be done using a damp cloth. Ensure that the membrane keypad does not contact any stainless steel cleaning agents to avoid damage. Cleaning of stainless steel parts with inappropriate detergents can lead to damage, deposits, or discoloration. Never use aggressive detergents or abrasives on stainless steel surfaces. Avoid detergents that contain hydrochloric acid or chlorine-based bleachers. Do not use cleaning utensils that have been used for non-stainless steel. Clean the outside of the dishwasher, especially the door handle, once a day. Use cleaning agents that are suitable for stainless steel only. Do not use aggressive detergents in the surrounding area. Observe safety data sheets and dosing recommendations when descaling.
- Page 47: Operating the dishwasher using hard water can cause lime scale deposits in the boiler and tank interiors. Descale the tank interior if necessary. The boiler can only be descaled by a service technician. If lime scale deposits occur, it is necessary to descale the tank interior, boiler casing, tank heating, boiler heating, and wash and rinse systems. For descaling, only use products suitable for commercial dishwashers and follow the manufacturer's instructions. Completely flush the descaling agent out of the dishwasher by performing 3-6 wash cycles without a rack. Any remaining descaling agent residues must be removed using a soft cloth and hot water, followed by a final wash cycle. Drain the dishwasher at the end of the descaling process. Assign the task of descaling the boiler to customer service if necessary. Work on the electrical system must only be conducted by qualified personnel. Disconnect the machine from the power supply before removing any casing parts or working on the electrical system. Attach all housing parts again before switching on the voltage.
- Page 48: Model FV 40.2/40.2G Warning – Danger of injury when entering a danger zone Only qualified personnel may work on the machine. Remove unauthorized persons from the danger zone. Block off the danger zone and mark it for third parties. Always wear cut-resistant protective gloves when removing casing parts or working inside the machine. Caution – Danger of burns from hot wash water, hot washware and hot machine parts Wear protective gloves, if necessary. Let the washware cool down before emptying, if necessary. Let the machine cool down before touching machine parts, if necessary. Never open the door during a wash cycle. Important – Environmental damage due to improper disposal of liquids Always capture, store and transport liquids in suitable containers.
- Page 49: Maintenance work must only be carried out by an authorized technician. MEIKO recommends having the machine serviced by an authorized service technician at least once a year. An electrical safety inspection is carried out as part of the maintenance. Wear parts are checked and replaced if necessary. Neglected or improper maintenance increases the risk of unforeseen damage. Wear parts include dosing hoses, door seal, and supply water hose. Check pumps for leaks and any visible damage once a year. Check water level in the tank once a year. Check wash water pipe for leaks and correct spray pattern once a year. Check flow water pressure once a year.
- Page 50: Model FV 40.2/40.2G Maintenance requirements include checking the rinse system for correct spray pattern and leaks annually. Casing and built-in components should be checked for damage and correct operation yearly. Fresh water installation requires checking the level control and valves, and cleaning the dirt trap annually. Wastewater installation checks for tightness and drain pump behavior should be done once a year. Electrical installation requires checking all fuses and re-tightening electrical connections annually. An optional electrical safety check includes a visual inspection and measuring insulation resistance. Detergent dosing should be checked and adjusted as necessary once a year. Rinse aid dosing also requires checking and adjusting if necessary annually.
- Page 51: Maintenance requirements include replacing the peristaltic hose and associated seals on the nozzles once a year. A test run with a functional test of the entire machine should be conducted annually. Check test wash and rinse results once a year. Visually check the entire machine for leaks annually. Water quality and temperature should be monitored, including drinking water and water quality after treatment. Dismantling and disposal of the machine should consider harmful substances that may be present. All packaging materials are made from recyclable materials. The packaging includes square timber frame, plastic sheeting, foam material, cardboard packaging, packaging strap (steel and plastic), and a transport safety bracket.
- Page 52: Model FV 40.2/40.2G The square timber frame consists of untreated raw pine/spruce wood. Country-specific import regulations may stipulate the use of treated wood. Dismantling and disposal of the old machine. Risk of injury from contact with chemicals. Observe the safety data sheets and dosing recommendations of the chemical manufacturers. Use safety eyewear. Wear protective gloves. Do not mix different chemical products. Wash machine parts, containers, dosing units, and hoses using fresh water to remove chemical residues. Components should be separated based on the material and recycled.
- Page 53: Change of products Cleaning Electrical installation Electromagnetic compatibility Functional description Installation Intended use Maintenance Malfunctions Detergent and rinse aid

FISHER PAYKEL DD24SCTB9_N Tall Dishwasher

SHARP SDW6506JS Dishwasher

Classeq CP500 Commercial Passthrough Dishwasher

FISHER and PAYKEL DD24DTI9 N Tall Dishwasher

FISHER AND PAYKEL DW60FC4X2 Dishwasher

Bosch SPU2HKS42E Dishwasher

LG LDTH7972D Smart Tub Dishwasher

MAYTAG W11680100A Dishwasher

BOSCH SMV4EB804E Fully Integrated Dishwasher

BOSCH SPV6YMX11E Dishwasher