
Whirlpool W11323304H Heavy Duty Dishwasher


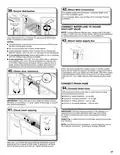




42. Direct Wire Connection
39. Secure dishwasher
To complete direct wire connection. Complete Steps 18 to
24 in this installation guide.
Once complete, return here to Step 43 to complete Product
Installation.
Screw to side
cabinet
CONNECT WATER LINE TO HOUSE
SHUT-OFF VALVE
NOTE: If using a flexible braided hose, replace inlet hose after
5 years to reduce the risk of hose failure. Record hose installation
or replacement dates on the hose for future reference.
Open dishwasher door to prepare for securing the dishwasher
to the countertop or side cabinet.
NOTES:
■ The dishwasher must be secured to keep it from shifting when
the door is opened or closed.
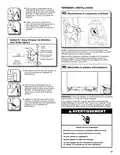
43. Attach water supply line
■ Do not drop screws into bottom of dishwasher.
■ Locate brackets installed in the “Choose Anchor Attachment
Method” section, either on top or on the sides of the dishwasher.
■ If countertop anchoring: Secure dishwasher to the countertop
with two Phillips-head screws (included).
■ If side anchoring: Drill 7/32" (5.6 mm) pilot holes in cabinet to
avoid splitting the wood. Secure dishwasher to cabinet with
two Philips-head screws (included). Remove second rack for
easier access. See the Dishwasher Loading Tips section for
instructions on how to remove the second rack if needed.
Attach the water supply line (copper tubing or flexible braided
line) to the hot water line using a connection configuration that is
in compliance with local codes and ordinances. The water supply
to the dishwasher should have a manual shut-off valve located
under the sink. Turn water valve on after attaching water supply
line.
40. Check door clearance
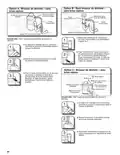
CONNECT DRAIN HOSE
44. Connect drain hose
Connect drain hose to waste tee or waste disposer using
one of the following options:
■ Option A: Waste disposer – no air gap
■ Option B: No waste disposer – no air gap
■ Option C: Waste disposer – with air gap
■ Option D: No waste disposer – with air gap
IMPORTANT: Check that top of door does not contact screws,
brackets, or countertop. If it does, adjust leveling legs or use the
side attachment option.
41. Check inner spacing
IMPORTANT: The drain hose connection of the disposer or a
waste tee must be made before the drain trap and at least
20" (50.8 cm) above the floor where the dishwasher will be
installed.
Helpful Tip: To reduce vibration of the hose, keep the hose away
from the floor.
NOTE: Use the red clamp provided to connect the drain hose to
the customer connection - plumbing or garbage disposal.
Open door and check that space between dishwasher cabinet
opening and tub is equal on both sides. If spacing is not equal,
loosen bracket screws and shift tub. Tighten bracket screws.
23

| General | Details |
|---|---|
| Name | Whirlpool W11323304H Heavy Duty Dishwasher |
| Make | Whirlpool |
| Language | English |
| Filetype | PDF (Download) |
| File size | 11.68 MB |
 (1 votes, average: 5.00 out of 5)
 Loading...

Whirlpool 2B19 Dishwasher

Whirlpool WFO3O33PLAUS Standard Dishwasher

Whirlpool W11323304G Dishwasher

Whirlpool WH7IPC15BM60 Dishwasher

Whirlpool FINPUTSAD Dishwasher

Whirlpool W7U HS31 X Dishwasher

Whirlpool Thron Dishwasher

Whirlpool WDF332PAMS 24 Front Tall Tub Dishwasher

Whirlpool WRF540CWHZ Dishwasher

Whirlpool WDF130PAHB Dishwasher


IKEA 004.754.23 PROFFSIG Integrated Dishwasher

ARDESTO DWMF-V608SMHDS Dishwasher

BOSCH SHE78CM5N Recessed Handle Dishwasher

Miele 12 668 930 Dishwasher

BOSCH SMV4HCX58E-39 Dishwasher

FISHER PAYKEL DD60SCHTX9 Dishwasher

BOSCH SMV4ECX10E Dishwasher

BUFFALO DK775 Digital Pass Through Dishwasher

AEG FSK73767P Dishwasher

FISHER PAYKEL DD60SCX9 Dish Drawer Dishwasher