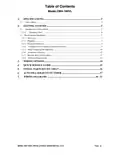
Home > CMA Dishmachines > CMA DISHMACHINES CMA-180VL Dishwasher
CMA DISHMACHINES CMA-180VL Dishwasher


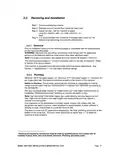


2.2. Receiving and Installation
Step 1: Remove packaging material.
Step 2: Remove service manual from inside the wash tank.
Step 3: Adjust the feet. Set the machine in place.
Level the machine side – to – side and front – to –
back.
Step 4: It is recommended that a distance of at least eight inches (8”) be
between the table scrap sink and the dishmachine.
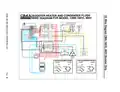
2.2.1. Electrical*
Prior to installation make sure the electrical supply is compatible with the specifications
on the machines data plate.
WARNING: Electrical and grounding connections must comply with the applicable
portions of the National Electrical Code and/or other local electrical codes.
Note: For supply connections, use copper wire only rated at 90 degree C minimum.
The control panel provides a 1” conduit connection point on the rear of the panel. Refer
to Section 3 for wiring options.
This machine is equipped to handle both single and three phase applications. See
Section 1: Specifications 1.1 for the proper electrical ratings.
2.2.2. Plumbing*
Minimum 140°F hot water supply 1/2”. Minimum 41°F cold water supply ½”– minimum 20
psi, 6 gpm flow rate. Plumbing connections located on the bottom of the machine.
Notice to Plumber: The plumber connecting this machine is responsible for making
certain that the water lines are THOROUGHLY FLUSHED OUT BEFORE connecting to
the dishwasher.
Ask your municipal water supplier for details about your local water conditions prior to
installation. Recommended water hardness is 3 grains per gallon or less.
Note: high iron levels in the water supply can cause staining and may require an iron
filter. High chlorine levels in the water supply can cause pitting and may require a
chloride removal system.
If an inspection of the dishwasher or booster heater reveals lime buildup after the
equipment has been in service, water treatment is recommended. If water softener is
already in place, ensure there is a sufficient level of salt.
The drain is a two inch (2”) pipe sleeve attached by “No-Hub” plumbing connection at the
bottom of the scrap trap. Account’s drain should be no higher than 11” to allow the
machine to drain properly.
* Electrical and plumbing connections must be made by qualified person who comply with all
available Federal, State, and Local Health, Electrical, Plumbing and Safety codes
MODEL CMA-180VL INSTALLATION & OPERATION Rev. 2.01C
Page
7
| General | Details |
|---|---|
| Name | CMA DISHMACHINES CMA-180VL Dishwasher |
| Make | CMA Dishmachines |
| Language | English |
| Filetype | PDF (Download) |
| File size | 0.74 MB |


CMA DISHMACHINES EST-44 Conveyor Dishwasher

CMA DISHMACHINES CMA-180UC Under Counter Dishwasher

CMA DISHMACHINES EST-AH Door Type Rack Low Dishwasher

CMA DISHMACHINES UC65e M3 Dishwasher

CMA DISHMACHINES UC50e Dishwasher

CMA DISHMACHINES CMA-180 Dishwasher

CMA DISHMACHINES CMA-180UC Dishwasher

CMA DISHMACHINES H-1X Undercounter Dishwasher

CMA DISHMACHINES 180UC-3 Under Counter Dishwasher

CMA DISHMACHINES AH Straight Thru Design Dishwasher


DAEWOO DA1D5SI0ES Dishwasher

BOSCH SPS2IKW1BR/40 Dishwasher

Whirlpool WDP370PAHB Dishwasher

AEG FSE73800RO Dishwasher

Maidaid Halcyon AMH80 Amika Pass Through Gravity Drain Dishwasher

IKEA RENGÖRA 204.756.05 Dishwasher

INVENTUM VVW6008AW Dishwasher

FRIGIDAIRE A23587501 24-Inch Dishwasher

Rubicum DRYSTACK Multistage Dishwasher

AEG FSK83828P Dishwasher